
TL;DR:
- A beginner heat press checklist covers essential tools, transfer media, and proper garment preparation to ensure durable results. Consistent process discipline, including pre-pressing, testing, and maintaining equipment, significantly improves transfer quality. Following these guidelines helps beginners produce professional, long-lasting transfers on various fabrics.
A beginner heat press checklist is a structured list of tools, supplies, and steps that every new presser needs to produce clean, lasting transfers from day one. Skip any item on this list and you risk peeling designs, scorched fabric, or a machine that dies after 50 shirts. The checklist covers everything from choosing the right press and transfer media to garment prep, pressing parameters, and maintenance habits. Whether you are pressing heat transfer vinyl (HTV), sublimation, or Direct-to-Film (DTF) transfers, this guide gives you the exact sequence to follow.
1. What belongs on your beginner heat press checklist?
Every beginner’s setup needs five categories of gear: the press itself, transfer media, protective accessories, design tools, and safety equipment. Missing even one category leads to avoidable mistakes. The sections below walk through each item in detail so you know exactly what to buy and why.
2. Choosing the right heat press machine
The heat press machine is the single most important purchase you will make. Clam shell presses are the most common entry point for beginners because they are compact and straightforward to operate. Swing-away presses cost more but give you better access to the platen, which reduces burn risk on thick garments.
Machine quality matters more than most beginners expect. Lower-cost presses often use “X-pattern” coils that create hot spots and cold zones across the platen. Higher-quality machines use “snake-like” coils that distribute heat evenly, which directly improves transfer durability and color consistency. A digital pressure readout with over-the-center adjustment also helps you hit even pressure every time, not just approximate it.
Pro Tip: Buy the best heating element you can afford. Uneven heat is the number one cause of beginner frustration, and no amount of technique fixes a bad coil.
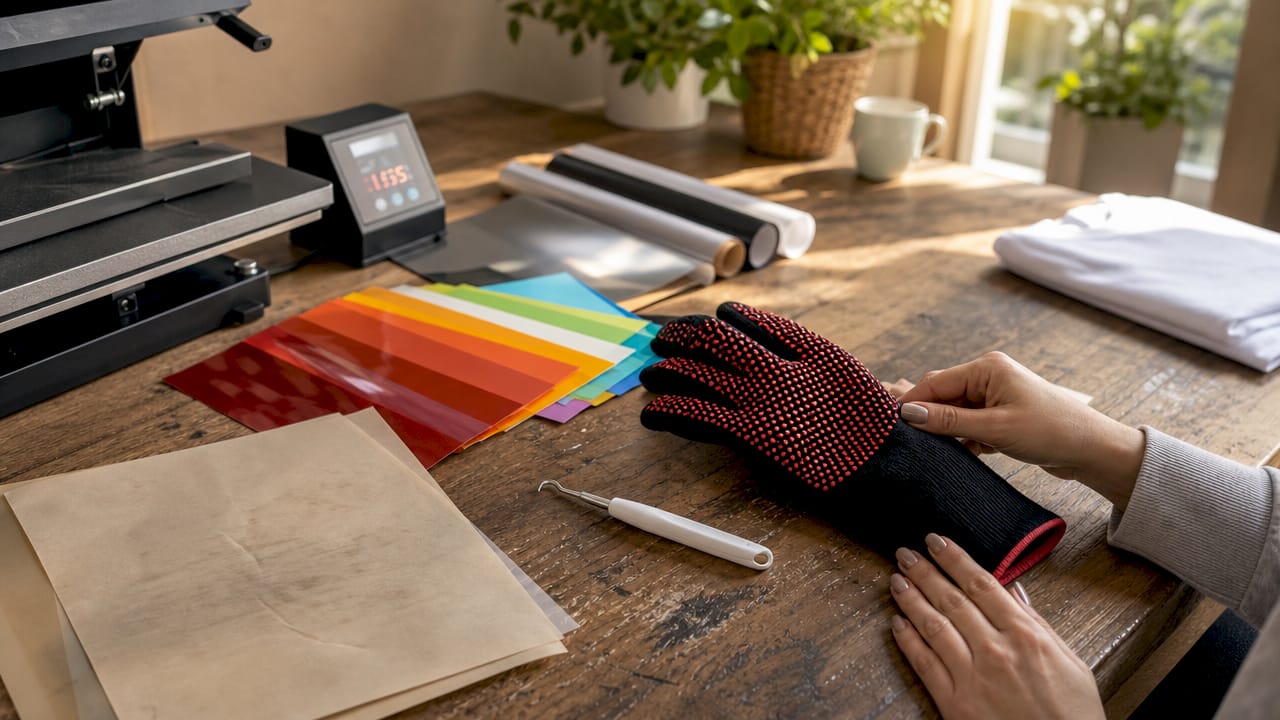
3. Essential accessories and transfer media
The right accessories protect your machine and your garments. Stock these before you press your first shirt:
- Teflon sheets or silicone sheets: Teflon and silicone cover sheets protect the platen from adhesive residue and shield fabric from direct heat damage. Use one on every press.
- Heat-resistant tape: Keeps transfers aligned during pressing so designs do not shift.
- Weeding tools: Required for HTV to remove the excess vinyl around your design before pressing.
- Heat-resistant gloves: Protect your hands when handling hot garments and transfers.
- Silicone mat or pressing pillow: Levels uneven surfaces like seams, zippers, and pockets for consistent pressure.
For transfer media, beginners typically work with three types. HTV is the most forgiving and widely available. Sublimation works on polyester and polymer-coated items. Plastisol transfers give a screen-print look without a screen. DTF transfers, like those from Transferkingz, work on virtually any fabric and require no weeding, which makes them a strong choice for beginners who want professional results fast.
For design work, Cricut Design Space pairs well with Cricut cutting machines, while Adobe Illustrator and CorelDRAW are industry standards for more advanced work. A vinyl cutter like the Cricut Maker or Silhouette Cameo handles HTV cutting at the beginner level.
4. How to prepare garments and transfers correctly
Garment preparation is where most beginners cut corners and pay for it later. Follow these steps every time:
- Pre-wash new garments. Pre-washing removes debris and prevents shrinkage that can warp a transfer after the first wash. Skip this step and your design may crack or peel within weeks.
- Lint-roll the surface. Even a single fiber trapped under a transfer creates a visible bump. Roll the garment right before pressing.
- Pre-press for 3–5 seconds. Pre-pressing removes moisture and smooths wrinkles, which prevents bubbles under the transfer. This step takes five seconds and saves ruined shirts.
- Mirror your HTV design. HTV is pressed face-down, so the design must be mirrored before cutting. Forgetting this produces a backwards transfer every time.
- Align and tape the transfer. Use heat-resistant tape to secure the transfer to the garment. Even a small shift during pressing ruins alignment.
- Cover with a Teflon sheet. Place a Teflon or parchment sheet over the transfer before closing the press. This protects both the platen and the top surface of the transfer.
Pro Tip: Use a T-shirt ruler or alignment tool to center your design consistently. Eyeballing placement is the fastest way to produce crooked prints.
5. Critical pressing parameters by transfer type
Time, temperature, and pressure are the three variables that determine whether a transfer sticks or fails. Each transfer type has its own window, and staying inside that window is non-negotiable.
| Transfer type | Temperature | Time | Pressure | Peel method |
|---|---|---|---|---|
| HTV | 305–320°F | 10–15 seconds | Medium-firm | Warm or cold peel |
| Sublimation | 385–400°F | 45–60 seconds | Medium-firm | Hot peel |
| Plastisol | 350–375°F | 8–10 seconds | Medium-firm | Cold peel |
| DTF | 300–320°F | 10–15 seconds | Medium-firm | Cold peel |
HTV requires 305–320°F for 10–15 seconds, sublimation needs 385–400°F for 45–60 seconds, and plastisol transfers press best at 350–375°F for 8–10 seconds. These are starting points, not fixed rules. Environmental factors like humidity and machine calibration shift results, which is why testing on scrap fabric before pressing final garments is the single most important habit you can build.
Correct pressure is as critical as temperature. Medium-firm pressure means closing the press requires noticeable effort but not maximum force. Too little pressure causes lifting edges. Too much pressure crushes fabric fibers and flattens HTV texture.
Hot peel means you lift the transfer carrier sheet immediately after pressing while the transfer is still hot. Cold peel means you wait until the transfer cools completely before removing the carrier. Using the wrong peel method for your transfer type is one of the most common causes of peeling and incomplete adhesion.
6. Maintenance and safety habits for long-term results
A well-maintained press produces consistent results for years. A neglected one drifts out of calibration and starts burning transfers without warning.
- Clean the platen after every session. Wipe residue with a damp cloth while the platen is warm but not hot. Never scrape the platen surface with metal tools. Scraping damages the coating and creates uneven heat zones.
- Inspect the platen pad regularly. A compressed or uneven pad creates pressure inconsistencies. Replace it when you notice uneven transfers across the platen surface.
- Lubricate moving joints. High-temperature lithium grease on the press joints keeps the mechanism smooth and prevents metal wear that causes pressure drift over time.
- Place the press on a stable, heat-resistant surface. A wobbly table creates uneven pressure. A non-heat-resistant surface is a fire hazard.
- Never leave the press unattended while heating. Most entry-level presses lack automatic shutoff. Unattended presses overheat and damage both the machine and the work surface.
Pro Tip: Keep a press settings log for every material you press. Record the temperature, time, pressure, and peel method that worked. This log becomes your personal reference and cuts troubleshooting time dramatically.
7. Common pitfalls and how a checklist prevents them
Most beginner failures trace back to skipping steps, not to bad equipment. A checklist builds the muscle memory that prevents these errors from becoming habits.
- Skipping pre-pressing leaves moisture in the fabric. That moisture turns to steam under the platen and creates bubbles that lift the transfer.
- Guessing temperature instead of using a thermometer or digital readout leads to scorching at high settings and poor adhesion at low ones.
- Uneven pressure from a worn pad or a misadjusted knob causes one side of a transfer to stick while the other peels.
- Pressing without a test wastes finished garments. One scrap test costs nothing. One ruined shirt costs real money.
- Ignoring safety gear leads to burns. Heat-resistant gloves take three seconds to put on and prevent injuries that sideline you for days.
A workflow checklist for printing turns each of these pitfalls into a checked box. You stop relying on memory and start relying on process.
Key takeaways
A complete beginner heat press checklist covers equipment quality, garment prep, correct pressing parameters, and consistent maintenance to produce durable, professional transfers every time.
| Point | Details |
|---|---|
| Machine quality determines results | Choose a press with snake-like coils and digital pressure readout for even heat distribution. |
| Pre-press every garment | Press for 3–5 seconds before applying any transfer to remove moisture and prevent bubbles. |
| Match settings to transfer type | HTV, sublimation, and plastisol each require different temperatures, times, and peel methods. |
| Test before final pressing | Always press a scrap piece first to verify settings before committing to finished garments. |
| Log every successful setting | A press settings log saves time and prevents repeated troubleshooting on familiar materials. |
Why discipline beats talent in heat pressing
I have watched beginners with entry-level presses produce cleaner shirts than experienced operators with professional machines. The difference is never the equipment. It is always the process.
The operators who get consistent results are the ones who pre-press every single garment, test every new material on scrap, and write down what worked. They treat the checklist as non-negotiable, not as a suggestion for days when they feel like being careful. That discipline compounds fast. After two weeks of following the same sequence, the steps become automatic and the results become predictable.
The biggest mistake I see is beginners blaming their machine for problems that come from skipped steps. A press that “runs hot” is usually a press where nobody tested the actual platen temperature with an infrared thermometer. A transfer that “keeps peeling” is usually a garment that never got pre-pressed. Fix the process first, then evaluate the equipment.
If you are serious about maximizing transfer durability on your custom apparel, the checklist is where that commitment shows up in practice. Start there.
— Anthony
Ready to press with transfers that actually work?
The checklist gets you set up correctly. The transfers you use determine how good the final product looks. Transferkingz produces high-quality DTF transfers that apply cleanly at standard beginner settings, require no weeding, and hold up wash after wash on virtually any fabric.

Beginners get the most out of DTF because the application process is straightforward: press, peel, done. Transferkingz offers no minimum order quantities, fast turnaround, and gang sheet options that let you test multiple designs without committing to large runs. If you are in Texas or shipping nationwide, check out DTF transfers from Transferkingz to see current options and pricing. You can also browse the full Transferkingz Print Point for additional resources and products built for beginners and production shops alike.
FAQ
What temperature should a beginner set for HTV?
HTV presses best at 305–320°F for 10–15 seconds with medium-firm pressure. Always test on scrap fabric first since machine calibration varies.
Do I need to pre-wash shirts before heat pressing?
Yes. Pre-washing removes shrinkage and debris that can ruin a transfer. Pressing on an unwashed shirt risks the design cracking or lifting after the first wash.
What is the difference between hot peel and cold peel?
Hot peel means removing the carrier sheet immediately after pressing while the transfer is still warm. Cold peel means waiting until the transfer cools completely. Using the wrong method for your transfer type causes peeling and incomplete adhesion.
How do I know if my heat press pressure is correct?
Medium-firm pressure means closing the press requires noticeable effort but not maximum force. If the press closes too easily, increase the pressure knob by one turn and test again.
How often should I clean and maintain my heat press?
Wipe the platen after every session with a damp cloth while it is still warm. Lubricate joints with high-temperature lithium grease periodically and inspect the platen pad monthly for compression or uneven wear.
Recommended
- Garment printing checklist: Essential steps for quality apparel – Transfer Kingz
- 7 Steps DTF Transfer Application Checklist for Designers – Transfer Kingz
- Master Best Practices for Heat Pressing Transfers Easily – Transfer Kingz
- Heat Press Application: Boosting Apparel Decoration Results – Transfer Kingz
0 comments