
TL;DR:
- Effective custom apparel design starts with defining your purpose and choosing the right garments before creating print-ready artwork in CMYK at 300 DPI with proper bleed and exact placement.
- Matching the printing method—such as DTF for complex designs or screen printing for bulk orders—to your project ensures quality and cost-efficiency, while precise order planning and sample approvals prevent costly reprints.
Custom apparel design is the process of creating branded or personalized clothing by combining print-ready artwork with a chosen decoration method and a reliable production partner. Whether you’re a small business owner ordering logo tees, an independent designer launching a merch line, or a hobbyist making event shirts, the same core workflow applies. Tools like Adobe Illustrator, Printify Product Creator, and the Custom Ink Design Lab have made professional-grade design accessible without a formal art degree. This guide walks you through every stage of that workflow, from concept to finished garment, so your first order ships right.
What should you consider before designing custom apparel?
The single biggest mistake first-time buyers make is jumping straight into design software before answering three questions: What is this apparel for? How many pieces do I need? And what is my budget per unit? Answering these upfront shapes every decision that follows, including fabric choice, printing method, and vendor selection.
Define your purpose first. Promotional giveaways, retail merchandise, team uniforms, and event shirts each carry different design priorities. A giveaway shirt benefits from a bold, simple logo that reads well at a distance. A retail piece needs a design that holds up after dozens of washes. A team uniform demands consistent placement across multiple garment sizes.
Garment and fabric selection matters more than most people expect. Cotton absorbs ink deeply and suits screen printing and Direct-to-Film (DTF) transfers. Polyester reflects heat and works well with sublimation. Cotton-polyester blends offer a middle ground for everyday wear. The fabric you choose directly affects which printing methods are available to you, so lock in the garment before finalizing your design.
- Decide on garment style: t-shirt, polo, hoodie, hat, or tote
- Choose fabric composition based on printing method compatibility
- Confirm sizing range needed to avoid substitutions later
- Set a realistic per-unit budget that accounts for setup fees
Pro Tip: Order a blank sample of your chosen garment before placing a full print run. Fit, weight, and fabric feel are impossible to judge from a product description alone.
A practical custom apparel workflow starts with purpose definition and quantity planning before any design work begins. Getting these details right upfront prevents expensive reprints and size-related delays.
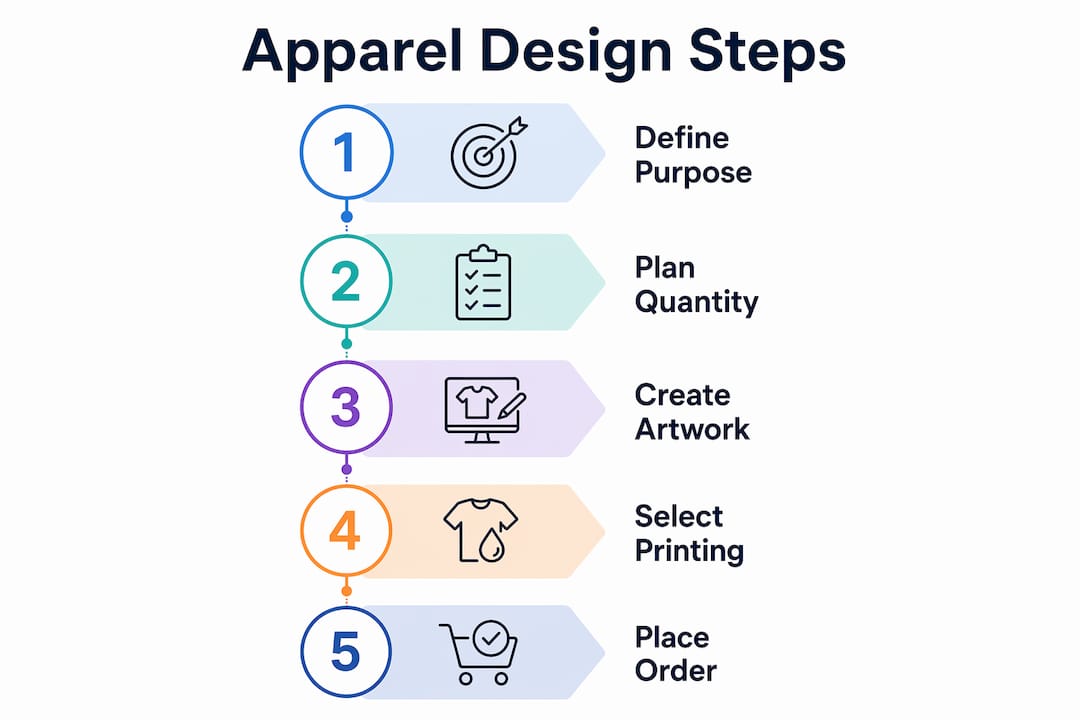
How do you create and prepare artwork for custom apparel printing?
Print-ready artwork is the single most controllable variable in your entire order. A great design printed from a bad file looks worse than a simple design printed from a perfect file. Industry standards exist for a reason, and skipping them costs you money.

File format and resolution are non-negotiable. Vector files (AI/EPS) scale to any size without losing quality, making them the preferred format for logos and clean graphics. For raster artwork, the minimum is 300 DPI at the final print size. A file that looks sharp on screen at 72 DPI will print blurry at actual garment size.
Color mode and bleed settings affect the final output. Print-ready artwork requires 300 DPI resolution, CMYK color mode, and a 0.125-inch bleed with safe zone margins. RGB files look vibrant on screen but shift noticeably when converted to CMYK during printing. Set your color mode to CMYK from the start, not as an afterthought before export.
Follow this sequence when preparing your artwork file:
- Build your design in Adobe Illustrator or a comparable vector program
- Set the document color mode to CMYK before placing any artwork
- Export or save at 300 DPI minimum with a 0.125-inch bleed on all sides
- Keep all critical text and design elements at least 3 mm inside the trim line
- Preview the design on a garment mockup using Printify Product Creator or a similar tool
- Export a flattened PDF or PNG for vendor submission
Pro Tip: Avoid thin fonts below 8 points and low-contrast color combinations. White text on a light gray shirt disappears entirely after printing. Test contrast by converting your design to grayscale before submitting.
Here is a quick reference for file preparation standards:
| Requirement | Standard | Why It Matters |
|---|---|---|
| Resolution | 300 DPI minimum | Prevents pixelation at print size |
| Color mode | CMYK | Matches physical ink output accurately |
| Bleed | 0.125 inch | Prevents white edges on cut prints |
| Safe zone | 3 mm inside trim | Keeps text and logos from being cut off |
| File format | AI, EPS, or high-res PNG | Preserves quality across print methods |
Previewing designs with mockups before ordering significantly reduces rework and helps confirm that placement, scale, and color read correctly on an actual garment shape. Mockups are free in most design tools and take five minutes. Use them every time.
Which printing methods are best for custom apparel?
The right printing method depends on your artwork complexity, order size, fabric type, and how the finished garment should look and feel. No single method wins every scenario. Understanding the tradeoffs lets you match the technique to the job.
Screen printing, embroidery, and DTF each serve different design and business needs, and choosing the wrong one for your order type is one of the most common and costly mistakes in custom apparel.
| Method | Best For | Minimum Order | Key Limitation |
|---|---|---|---|
| Screen printing | Bulk orders, solid colors | 24+ units | Setup fee per color per location |
| Embroidery | Polos, hats, premium logos | 12+ units | Cannot reproduce photographic detail |
| DTF transfer | Short runs, complex designs | 1 unit | Slightly raised texture on fabric |
| Heat transfer vinyl | Simple single-color designs | 1 unit | Less durable than DTF or screen print |
Screen printing produces the most vibrant, durable results for large orders with limited colors. Each ink color per location requires a dedicated screen, so setup fees of $20 to $30 per screen add up fast on small orders. At 24 units, setup costs can run $4.17 per shirt. At 250 units, that same cost drops to $0.40 per shirt. The math strongly favors larger quantities.
Direct-to-Film (DTF) printing works by printing your design onto a PET film, applying adhesive powder, curing the ink, and then heat pressing the transfer onto the garment. The DTF printing process produces full-color, photo-quality results with no minimum order requirement, making it the go-to method for short runs, complex artwork, and mixed-fabric garments. Transferkingz specializes in this method and explains the full DTF workflow for apparel in detail.
Embroidery adds a textured, premium look that screen printing and DTF cannot replicate. It works best on structured garments like polo shirts, baseball caps, and jackets. Photographic detail and gradients are not reproducible in embroidery, so designs must be simplified to solid shapes and limited thread colors.
Pro Tip: If you need both a professional polo for client meetings and casual tees for events, use embroidery for the polo logo and DTF or screen printing for the tees. Mixing methods by garment type keeps costs down while maintaining a consistent brand look.
What are the practical steps to place an order and ensure print quality?
Placing a custom apparel order is not just uploading a file and clicking submit. The steps between artwork approval and delivery determine whether your finished product matches your expectations.
- Choose a vendor with verified reviews and clear communication. Look for vendors who provide digital proofs as a standard part of the process, not as an add-on. A vendor who skips proofs is a vendor who ships surprises.
- Request a digital proof and review it against your original file. Check placement, color, and scale. Exact placement dimensions should be specified in inches or centimeters, not described as “left chest” or “centered.” Vague placement instructions produce inconsistent results across garment sizes.
- Order a physical sample for large runs. A digital proof shows color and layout but not texture, hand feel, or how the print sits on the actual fabric. For orders above 50 units, a physical sample is worth the extra cost.
- Confirm your timeline and account for rush fees. Rush production adds 20 to 35 percent to your total cost for a 3 to 5 day turnaround, and same-week rush can double the base price. Build in at least two weeks for standard production.
- Collect size inputs before placing the order. For team or group orders, planning deadlines for size collection reduces substitutions and production delays that push back your delivery date.
Pro Tip: Create a simple Google Form to collect size inputs from your team or customers. Set a hard deadline two days before your order cutoff. Late responses cause the most preventable delays in group apparel orders.
How can small businesses and independent designers maximize branding impact?
Custom apparel is a marketing asset, not just a uniform or giveaway. The brands that get the most value from their apparel orders treat design and ordering as a repeatable system, not a one-time project.
- Use embroidered polos for client-facing staff and screen printed or DTF tees for casual brand presence at events
- Keep your logo files in vector format so they are always ready for any vendor or method
- Limit your design to two or three colors to control screen printing costs on bulk orders
- Left chest placement is the most recognized logo position for professional apparel; full back prints work better for casual event shirts where visibility at a distance matters
- Build simple, bold designs that read clearly at thumbnail size, since a design that works small will always work large
Budget by quantity, not by unit price alone. Small orders feel expensive because setup fees spread across fewer units. If your budget allows, consolidating two small orders into one larger run cuts your per-unit cost significantly. For recurring needs like seasonal merch or annual event shirts, plan your order calendar three months out to avoid rush fees and size collection chaos.
Pro Tip: Save your approved artwork files, vendor contacts, and order specs in a shared folder after every order. Recreating this information from scratch for each new run wastes time and introduces errors.
Key takeaways
Effective custom apparel design requires matching your artwork quality, printing method, and order quantity to your specific purpose and budget before placing a single order.
| Point | Details |
|---|---|
| Define purpose before designing | Your apparel’s use case determines garment type, fabric, and design complexity. |
| Prepare print-ready files correctly | Use CMYK, 300 DPI, vector formats, and 0.125-inch bleed to avoid reprints. |
| Match printing method to order size | DTF suits small runs and complex art; screen printing wins on bulk solid-color orders. |
| Specify exact placement dimensions | Vague placement instructions cause inconsistent results across garment sizes. |
| Plan quantity to control costs | Larger runs dramatically reduce per-unit setup costs, especially for screen printing. |
What I’ve learned after years of watching apparel orders go wrong
The most consistent pattern I see is designers who treat the printing method as an afterthought. They build a beautiful, 12-color gradient design and then ask which printer can handle it, rather than designing within the constraints of their chosen method from the start. Screen printing that design costs a fortune. DTF handles it fine, but the designer didn’t know that when they started.
The second pattern is over-reliance on verbal instructions during proofing. “Put the logo on the left chest, medium sized” means something different to every production team. Specifying “logo at 3.5 inches wide, centered 4 inches from the left seam” leaves no room for interpretation. I’ve seen entire runs reprinted because of this single issue.
Modern tools like Printify Product Creator and Canva’s mockup generator have removed most of the guesswork from the design stage. Use them. A five-minute mockup review before you submit your file catches 90 percent of placement and scale problems. The designers who skip this step are the ones who call vendors after delivery wondering why their logo looks the size of a postage stamp.
If you are ordering for the first time, start smaller than you think you need. A run of 24 units teaches you more about your design, your vendor, and your audience than any amount of planning. Then scale up with confidence.
— Anthony
Get your custom apparel printed with Transferkingz
Ready to put your design into production? Transferkingz specializes in high-quality DTF transfers that handle everything from single-piece orders to large production runs, with no minimums required. Their custom DTF printing services deliver vibrant, wash-durable results on virtually any fabric, making them a strong fit for small businesses, independent designers, and hobbyists who need professional output without a massive order commitment.

Transferkingz uses premium inks and films with fast turnaround times, and their gang sheet builder lets you maximize every transfer sheet to reduce waste and cost. Whether you are printing a single logo or a full merch drop, their platform is built to handle it. If you are in Texas, their DTF printing in Texas service offers statewide coverage with the same quality standards. Upload your artwork, preview your order, and ship in days.
FAQ
What file format should I use for custom apparel design?
Vector files in AI or EPS format are the preferred choice for logos and clean graphics because they scale without quality loss. For raster artwork, submit a PNG or TIFF at 300 DPI minimum in CMYK color mode.
How many colors should my design have for screen printing?
Fewer colors lower your cost significantly. Each ink color per print location requires a separate screen, and setup fees run $20 to $30 per screen. Designs with two or three colors are the most cost-effective for screen printing.
What is DTF printing and when should I use it?
DTF (Direct-to-Film) printing transfers full-color designs from a PET film onto fabric using heat and adhesive powder. It is the best choice for short runs, complex multi-color artwork, and orders with no minimum quantity requirement.
How do I avoid placement errors on my custom apparel order?
Specify placement in exact measurements rather than general descriptions. For example, state “logo centered at 3.5 inches wide, 4 inches below the collar” instead of “left chest, medium size.” Always review a digital proof before approving production.
Does rush production significantly increase my apparel order cost?
Yes. Rush turnaround adds 20 to 35 percent for a 3 to 5 day production window, and same-week rush can double your base price. Planning your order at least two weeks ahead eliminates this cost entirely.
0 comments