

To launch a custom merch program, you need five product categories, one reliable production method, and a print-ready file before you spend a dollar on inventory. Start with apparel (t-shirts and hoodies), drinkware, tote bags, stickers, and at least one tech accessory. For most U.S. small businesses, DTF transfers are the sharpest production route: no order minimums, vibrant color on virtually any fabric, and fast turnaround that fits small-batch schedules. Your next step is simple: order a sample sheet, press one garment, and run a wash test before committing to a full run.
- Apparel (t-shirts, hoodies): highest retention, widest audience
- Drinkware (bottles, mugs): daily use, strong brand impressions
- Bags (totes, backpacks): practical, high-visibility carry
- Stickers and labels: low cost, high shareability
- Tech accessories (chargers, phone cases): premium feel, Gen Z appeal
Branded merchandise builds awareness, inspires loyalty, and opens new revenue streams when you pick the right categories. The categories above cover all three outcomes.
Pro Tip: Order one sample of each product type before placing a bulk run. A $30 sample saves a $300 mistake.
Key Takeaways
Starting a custom merch program comes down to five product categories, one print-ready file, and a production method that fits your run size: DTF transfers cover most small-business scenarios with no minimums and fast turnaround.
| Point | Details |
|---|---|
| Start with five categories | Apparel, drinkware, bags, stickers, and tech accessories cover most audiences and campaign types. |
| File quality is the gatekeeper | Submit a 300 DPI PNG with a transparent background in RGB; wrong files cause delays and reprints. |
| DTF transfers for small runs | No minimums, full color on mixed fabrics, and 1–3 business day turnaround make DTF the practical default. |
| Match fulfillment to your scenario | POD for ecommerce testing, bulk for events, transfer-based pressing for maximum flexibility. |
| Run a preflight before every order | Confirm artwork, proof, trademark clearance, sizing, and lead time before placing any production order. |
| Transferkingz for DTF transfers | Upload artwork, build a gang sheet, order a sample, and press on demand with no minimum order requirement. |
Table of Contents
- What are the custom merchandise essentials every small brand needs?
- What design rules actually matter for print-ready custom merch files?
- Which production method is right for your merch?
- How do you choose the right fulfillment model?
- What drives the cost of custom merch, and how do you price it?
- How do you sell and promote your first merch drop?
- Pre-order checklist: what to confirm before you place the order
- Why DTF transfers work well for U.S. small businesses
- What actually matters when you’re shipping merch for small brands
- Transferkingz makes it straightforward to get your first transfers ordered
- Sources
What are the custom merchandise essentials every small brand needs?
Choosing the right products is the single most important decision in a merch program. Utility beats novelty every time: items that slot into a person’s daily routine generate more brand impressions than clever gadgets that sit in a drawer. Product selection determines program success when you filter by durability, brand fit, decoration suitability, shipping efficiency, and total landed cost. Skip any item that fails two or more of those filters.
T-shirts and hoodies are the default starting point for good reason. They fit almost every audience, carry large print areas, and work across events, retail, and employee onboarding. Choose a premium blank (at least 6 oz cotton or a quality cotton-poly blend) when the item will be sold at retail; a lighter, budget option works fine for high-volume event giveaways where cost-per-unit matters more than longevity.
Drinkware (insulated bottles, ceramic mugs, tumblers) earns its place because people use it every day. A well-branded bottle on someone’s desk is a passive ad for months. Drinkware and bags consistently rank among the highest-retention promotional categories, according to industry research cited by Boundless Network.

Tote bags and backpacks travel. They go to the gym, the grocery store, the office. For events and retail, a tote is often the first item to sell out because it’s immediately useful.
Stickers and labels are the lowest-cost entry point and the easiest item to test a new design on. They’re shareable, they travel on laptops and water bottles, and they require almost no fulfillment overhead.
Tech accessories (wireless chargers, phone cases, cable organizers) skew toward a younger audience and carry a premium perception. They work well as add-ons in a bundle or as a standalone gift for clients and employees.
On SKU count: start with three to five SKUs maximum. A focused line is easier to photograph, easier to manage, and easier to reorder. Expanding is straightforward once you know what sells.
Matching products to audience segments matters as much as the product itself: employees want practical daily items, event attendees need something portable and immediately useful, and clients appreciate understated premium gifts. Pick your primary audience first, then build the SKU list around them.
What design rules actually matter for print-ready custom merch files?
The single most important requirement: submit a high-resolution file with a transparent background, in the correct color mode for your production method. Everything else flows from that.
Artwork file checklist
- DTF and DTG printing: high-res PNG or TIFF, 300 DPI minimum at print size, RGB color mode, transparent background
- Embroidery and vinyl cutlines: SVG or vector (AI, EPS) files; embroidery requires a digitized DST or EMB file
- Screen printing: vector artwork preferred; spot colors called out in Pantone references
- Color mode: RGB for DTF/DTG (the printer converts internally); CMYK for offset or traditional screen; Pantone/spot for exact brand color matching on screen or embroidery
Placement and safe area
Standard chest placement on a t-shirt sits 3–4 inches below the collar, centered. Left-chest logos run roughly 3.5 × 3.5 inches. Full-back prints typically max out at 12 × 14 inches. For hard goods like mugs or bottles, wrap artwork needs to account for the seam and handle position. Always request a template from your decorator before finalizing art.
Safe area means keeping all critical design elements at least 0.25 inches inside the edge of your intended print zone. Anything closer risks being cut off or distorted during pressing.
Legibility and accessibility
Minimum type size for readable body text on fabric is 8 pt at print size, and that’s pushing it on textured surfaces. Thin strokes under 1 pt tend to fill in or disappear on DTG and embroidery. High contrast between text and background is non-negotiable: light text on a dark garment, dark text on a light one. Avoid placing fine detail on insulated drinkware surfaces, where texture can break up small elements.
Common mistakes to avoid:
- Submitting a JPEG pulled from a website (72 DPI, compressed, wrong color mode)
- Using thin decorative fonts that collapse at small sizes
- Crowding the design with too many elements or a logo that dominates the entire chest
- Ignoring the garment color when designing (a white background in your file becomes the shirt color in print)
- Skipping the proof step entirely
Pro Tip: Subtle branding increases how long people keep and wear a product. A small, well-placed logo on quality material outperforms a large logo on a cheap blank. Design that avoids the “walking billboard” look is consistently kept longer.
For a deeper walkthrough of file prep and artwork requirements, the custom merchandise design guide from Transferkingz covers the full process from upload to approval.
Which production method is right for your merch?
The method you choose determines your minimum order, your per-unit cost, your turnaround, and how your design looks after 50 washes. Here’s how the main options stack up.
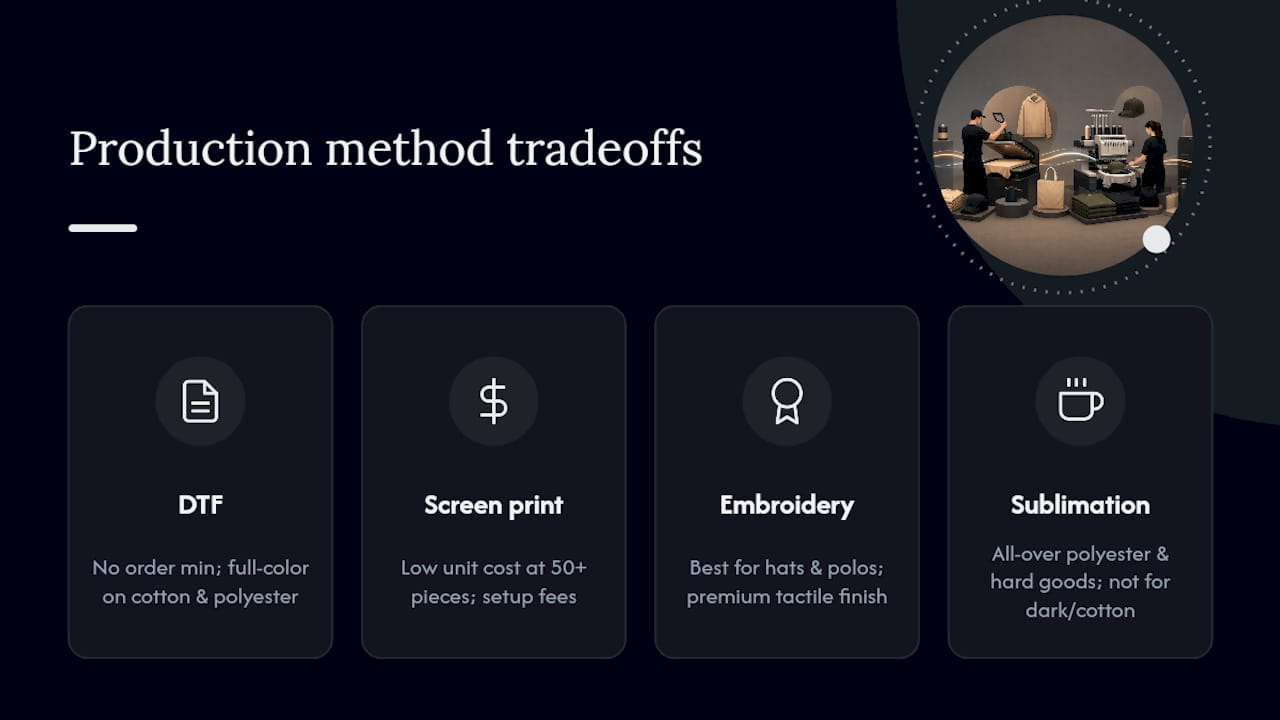
DTF transfers are the practical default for most small U.S. businesses: they handle full-color, photographic designs on cotton, polyester, blends, and even denim without a separate setup fee per color. Transferkingz offers DTF transfers with no order minimums, which means you can order a single test sheet before committing to a production run. That’s a meaningful advantage when you’re still validating a design or a product.
Screen printing wins on cost-per-unit at volume (50+ pieces, same design, limited colors) but requires setup fees and longer lead times. Embroidery is the right call for structured hats, polos, and anything that needs a premium, tactile finish. Sublimation is unbeatable for all-over polyester prints and hard goods like mugs, but it won’t work on dark or cotton fabrics.
A hybrid approach often makes sense: use DTF transfers for your apparel line (mixed fabrics, small batches, fast reorders) and sublimation for drinkware and hard goods. That combination covers most small-brand SKU lists without locking you into large minimums on any single item.
For more on print durability and wash performance, Transferkingz publishes technical guidance on how different transfer types hold up over time.
How do you choose the right fulfillment model?
Your fulfillment model determines how much inventory you hold, how fast orders ship, and how much of your margin disappears into logistics. The right model depends on your distribution scenario, not your product list.
Print-on-demand (POD) is the lowest-risk entry point. You pay per item only when an order comes in, hold zero inventory, and ship directly to the customer. The trade-off is a higher per-unit cost and less control over packaging and presentation. POD works well for ecommerce-first brands testing new designs or selling to a geographically dispersed audience. Selling custom merch without inventory is a real option for small brands that want to validate demand before investing in stock.
Bulk ordering with warehousing flips the math: lower per-unit cost, but you carry inventory risk and need storage space. This model fits brands running recurring events, corporate onboarding programs, or retail storefronts where demand is predictable and volume justifies the upfront investment.
Transfer-based production with local pressing is the middle path. You order DTF transfer sheets (no minimums, fast turnaround), press them yourself or through a local decorator, and fulfill on demand. Per-unit cost sits between POD and full bulk, and you control the timeline. For a small brand with a heat press, this is often the most flexible and cost-effective setup.
Common scenarios mapped to models:
- Event swag (100–500 pieces, one date): bulk order with a single decorator; negotiate a fixed per-unit price and ship to the venue
- Ecommerce storefront: POD for low-risk SKU testing; shift to bulk for top sellers once you know what moves
- Remote employee onboarding kits: direct-ship from a fulfillment partner or use a storefront/redemption model to solve sizing issues
- Subscription boxes: bulk stock of core items; use transfers for the custom-printed element to keep flexibility
Well-run programs often combine models: bulk stock for predictable event items, direct-ship for remote recipients, and storefront redemption for ongoing programs. That combination reduces waste and eliminates the sizing-return problem that plagues bulk apparel programs.
What drives the cost of custom merch, and how do you price it?
Three factors determine your landed cost: the product base cost, the decoration or print cost, and fulfillment and shipping. Everything else is a line item inside one of those three.
Base product cost varies widely by category. A blank t-shirt from a quality supplier might run $4–$8 wholesale; a premium insulated tumbler can be $12–$20 before decoration. The blank is the floor your margin sits on.
Decoration cost depends on method and quantity. DTF transfers are priced by sheet size and quantity; a gang sheet (a full sheet packed with multiple designs) brings the per-design cost down significantly. Screen printing charges a setup fee per color plus a per-unit run cost that drops at higher quantities. Embroidery charges by stitch count.
Fulfillment and shipping is where small brands lose margin they didn’t know they had. A $6 t-shirt with $4 of decoration and $8 of shipping is a $18 landed cost before you’ve added packaging. Bulky or heavy items (backpacks, drinkware cases) can eliminate bulk savings entirely through freight costs.
Add-on fees to watch for: art setup fees (sometimes waived for vector files), proof fees, rush charges, and packaging costs if you’re building gift boxes.
A simple pricing formula:
Example: $8 blank + $3 DTF transfer + $5 shipping = $16 landed cost. At a 50% margin: $16 ÷ 0.50 = $32 retail price.
For event giveaways where you’re not charging the recipient, the math shifts to cost-per-impression: how many people will see or use this item, and what’s an acceptable cost per brand touchpoint? For client gifts, perceived value matters more than margin, so packaging and presentation can justify a higher landed cost. For direct retail, aim for a 50–60% gross margin to cover returns, discounts, and platform fees.
How do you sell and promote your first merch drop?
The three highest-impact tactics for a new merch launch are quality product photography, a limited-time drop window, and a bundled offer that increases average order value. Everything else is amplification.
Photography is where most small brands underinvest. A flat-lay on a clean background and one lifestyle shot (the product being worn or used) are the minimum. You don’t need a studio: a window with natural light, a neutral background, and a phone camera with a good lens produce usable images. If you’re selling apparel, a model photo converts better than a flat-lay alone.
Channel options:
- Your own ecommerce storefront (Shopify, WooCommerce, BigCommerce): highest margin, full brand control, requires traffic
- Marketplace listings (Etsy, Amazon Merch): built-in audience, lower margin, more competition
- Social commerce (Instagram Shopping, TikTok Shop): works well for visual products and impulse buys; requires consistent content
- In-person events: highest conversion rate, immediate feedback on what sells, no shipping complexity
Launch checklist:
Product pages: write a description that covers the material, sizing, care instructions, and the story behind the design. Buyers want to know what they’re getting and why it exists.
Sample reviews: send samples to five to ten people in your audience before launch. A handful of honest reviews on launch day builds trust faster than any ad spend.
Inventory vs. POD: if you’re unsure about demand, launch with POD and switch the top sellers to bulk after 30 days of data.
Promotional timing: align drops with a calendar moment your audience cares about (a product launch, a season, an event). Scarcity is real when the window is genuinely limited.
Bundle ideas to increase order value: pair a t-shirt with a sticker pack, offer a “starter kit” with a tote and a mug, or create a tiered bundle (buy two, get a sticker sheet free). Bundles increase average order value without discounting individual items.
For more merch marketing ideas that work for small brands, Transferkingz covers launch tactics and channel strategy in detail.
Pre-order checklist: what to confirm before you place the order
Run through this list before every production order, whether it’s your first run or your fifteenth.
- Artwork approved: final file is high-res, correct color mode, transparent background, and matches the approved proof
- Color proof reviewed: you’ve seen a digital or physical proof and signed off on colors, placement, and size
- Sample ordered: at least one physical sample pressed and inspected before the full run ships
- Trademark and licensing cleared: your design doesn’t use protected logos, characters, fonts, or slogans without a license; if it does, the license is in hand
- Sizing and SKU verified: size run confirmed (S–XL, or whatever your range is), quantities per size locked in, no duplicate SKUs
- Care label and packaging confirmed: care labels meet FTC requirements for fiber content and care instructions; packaging matches the campaign (poly bag, gift box, or hang tag as needed)
- Lead time and logistics locked: production timeline confirmed, shipping method selected, delivery date meets your event or launch date with buffer
- Payment and PO reviewed: pricing matches the quote, payment terms confirmed, purchase order or order confirmation on file
On samples vs. digital proofs: order a physical sample any time you’re printing on a new blank, using a new color combination, or launching a product you plan to sell at retail. A digital proof is sufficient for a reorder of an already-approved design on the same blank.
Returns and contingency: confirm the decorator’s policy on misprints before you order. Build at least five business days of buffer between your expected delivery and your event or launch date. If production misses the deadline, know in advance whether you can expedite shipping or pivot to a local decorator.
Why DTF transfers work well for U.S. small businesses
DTF transfers balance color fidelity, low minimums, and straightforward application across a wider range of fabrics than any other single method. That combination is why they’ve become a practical default for small U.S. brands running mixed-fabric assortments.
A small apparel brand can order transfer sheets from Transferkingz, press them onto a mix of cotton tees, polyester hoodies, and canvas totes, and ship the same week, without holding decorated inventory or committing to a minimum run. The gang sheet builder lets you pack multiple designs onto a single sheet, which brings the per-design cost down and makes it practical to test several colorways or sizes at once.
Operational tips for getting the most from DTF transfers:
- Test one sheet first: press a single transfer on a scrap piece of the actual blank you’ll use, not a substitute fabric
- Run a wash test: wash the pressed garment three to five times before approving the full run; check for edge lifting, color shift, or cracking
- Follow temperature and pressure specs: DTF transfers typically require 300–320°F, medium-to-firm pressure, 10–15 seconds; always confirm with the transfer supplier’s spec sheet
- Peel cold: most DTF transfers are cold-peel; pulling the carrier sheet while hot causes edge lifting
Turnaround at Transferkingz includes same-day local pickup for Dallas-area customers and nationwide shipping for everyone else, which means a small brand can get transfers in hand within a few business days and press on demand. That speed matters when you’re filling a last-minute event order or testing a new design before a product launch.
Pro Tip: Press one transfer on the lightest and darkest blank in your assortment. Colors read differently on white vs. black fabric, and catching that before the full run saves a reorder.
For durable logo transfers and application best practices, Transferkingz publishes guidance that covers both standard apparel and structured items like hats and bags.
What actually matters when you’re shipping merch for small brands
Most merch advice focuses on design and product selection. The operational side, specifically packaging, inventory discipline, and branding restraint, is where small brands actually win or lose margin and customer loyalty.
Three lessons that show up repeatedly in small-batch merch fulfillment:
Inventory discipline beats optimism. The instinct is to order more units to get a better per-unit price. The reality is that unsold inventory in three sizes ties up cash and storage space for months. Start with a tighter size run (S, M, L, XL) and reorder fast-moving sizes rather than stocking deep across the full range. A storefront or redemption model, where recipients select their own size at order time, eliminates the sizing-return problem almost entirely.
Packaging is part of the product. A t-shirt in a poly bag is a commodity. The same shirt in a tissue-wrapped box with a branded sticker and a handwritten note is a gift. Packaging and context materially affect perceived value, and for client gifts or premium retail items, the unboxing experience is worth the extra $1–$2 per unit in packaging cost.
Subtle branding keeps items in rotation. A logo that takes up the entire chest of a hoodie gets worn once, maybe twice. A small, well-placed logo on a quality blank gets worn until the fabric wears out. The brands whose merch you see in the wild years after a campaign ended are almost always the ones that treated the product as the hero and the logo as the accent.
Transferkingz makes it straightforward to get your first transfers ordered
For small U.S. businesses that need fast, high-quality DTF transfers without a minimum order commitment, Transferkingz is a direct, practical option. You upload your artwork, configure your gang sheet, and get production-ready transfers shipped nationwide or available for same-day local pickup in Dallas.

The relevant services for a new merch program: custom DTF transfers in any quantity, UV DTF transfers for hard goods (glass, acrylic, metal), sticker printing, and a gang sheet builder that lets you pack multiple designs onto one sheet to lower per-design cost. No subscriptions, no long-term contracts, and no minimums on transfers.
Getting started takes four steps: upload your artwork at the correct specs, request a sample sheet, approve the proof after pressing and washing one piece, then place your production order. The DTF transfers service page has pricing, file spec requirements, and order configuration tools. For a broader look at what’s possible with the full transfer lineup, the Print Point page covers the complete workflow from file to finished transfer.
Sources
- Branding Merchandise: How To Create Fun Branded Merch (2025) - Shopify
- Custom Branded Merchandise: Ideas, Examples & Complete Guide (2026) | Brandmerch Guides
- How to Design Branded Merchandise People Actually Want
- A Practical Guide to Choosing Branded Merch People Actually Keep | Brimco
0 comments