

Set DTF artwork to 300 DPI at the final print size, full stop. The only real exception is oversized graphics meant to be viewed from a few feet away, like large back prints, where 150 to 200 DPI still reads sharp. To confirm any file, multiply the printed width in inches by 300 and check that the pixel width matches.
TL;DR:
- DTF artwork should always be set to 300 DPI at final print size, with exceptions only for oversized images viewed from a distance.
- Native printer resolutions between 720 and 1440 DPI do not require higher resolution files since they affect ink placement, not detail.
- Files must be in PNG or TIFF format with true transparency and RGB color mode, avoiding flattened JPGs to ensure precise white underbase printing.
- Checking pixel dimensions against final size in design software is critical, as a file labeled 300 DPI but rescaled without resampling can produce blurry prints.
- Requesting a sample print before large orders helps identify resolution or transparency issues that may cause blurry or imperfect results.
Table of Contents
- What DPI Should DTF Artwork Be?
- How Do You Calculate Pixel Dimensions for DTF Files?
- What File Format and Color Settings Do DTF Files Need?
- Why Are Some DTF Prints Blurry, and How Do You Fix It?
- Your Preflight Checklist Before Uploading a DTF File
- How Transfer Kingz Applies These DTF Print Quality Standards
- What I See Go Wrong Most Often With DTF Files
- Get Your DTF Files Checked Before You Commit to a Full Run
- Where to Verify These DTF Print Quality Standards Yourself
- Sources
What DPI Should DTF Artwork Be?
Three hundred DPI at final print size is the number every serious DTF shop builds its file requirements around, and it’s not an arbitrary round figure. DPI describes how many dots of ink land per inch of output, and at 300 DPI, the human eye stops detecting individual pixels on standard viewing distances for shirts, hoodies, and totes. Below that threshold, edges soften and fine text starts to look fuzzy under normal lighting.
There’s a difference between artwork DPI and printer native DPI that trips up a lot of first-time designers. DTF printers themselves operate at native device resolutions between 720 and 1440 dpi, which sounds like it demands ultra-high-resolution files. It doesn’t. That native resolution refers to how finely the printhead lays down ink dots, not how much pixel data your artwork needs to supply. Your 300 DPI file is already feeding more detail than the human eye can resolve at typical wearing distance, so the printer’s higher native resolution smooths gradients and color transitions rather than asking for more pixels from you.
Lower DPI is acceptable in specific situations:
- Large-format prints viewed from a few feet away are acceptable at lower DPI settings since fine detail matters less at typical viewing distances.
- Simple graphics with flat color and no fine detail, since there’s nothing for low resolution to blur.
- Banner-style or oversized promotional transfers meant for stage or event use rather than close inspection.
Cranking a file up to 600 or 1200 DPI “to be safe” doesn’t buy you anything. The DTF printing standard sits at 300 DPI because that’s the ceiling of visible detail on textile substrates. Anything past it just inflates file size and slows uploads without sharpening a single edge.
How Do You Calculate Pixel Dimensions for DTF Files?
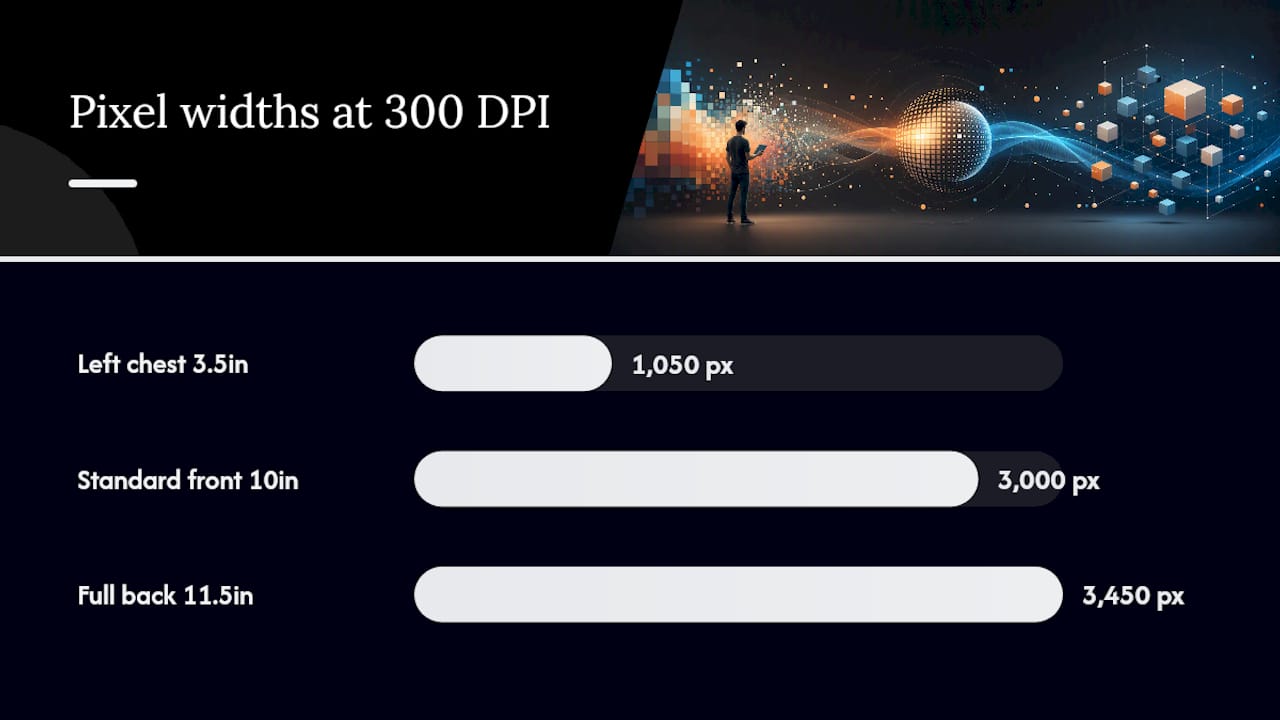
The formula behind every dtf printing resolution decision is simple: pixels equal inches multiplied by DPI. Once you know the finished size of your design, the pixel count follows automatically.
- Left chest logo, 3.5 inches wide: 3.5 × 300 = 1,050 pixels wide.
- Standard front print, 10 inches wide: 10 × 300 = 3,000 pixels wide.
- Full back design, 11.5 inches wide: 11.5 × 300 = 3,450 pixels wide.
Apply the same math to the height dimension, and you’ve got your canvas size before you open a single design tool.
In Photoshop, check Image > Image Size and look at the resolution field. If it reads anything under 300 and the “Resample” box is checked, raising the number will stretch existing pixels rather than add real detail. Uncheck resample first if you’re only correcting the DPI label on a file that already has enough pixels. Illustrator sidesteps most of this because vector artwork scales without quality loss. Just confirm your export settings under File > Export > Export for Screens target 300 DPI at the intended dimensions. GIMP works almost identically to Photoshop. Use Image > Print Size to set both the physical dimensions and resolution together.
When source art comes in too small, converting it to vector paths in Illustrator or a tool like Vectorizer preserves crisp edges at any size. Careful upscaling in Photoshop can stretch a file 10 to 15% without visible loss, but push much further and soft edges turn to mush.
Pro Tip: Before you export anything, zoom to 100% in your editor and scroll across the whole design. If it looks soft on your screen at full size, it will look soft on the shirt.
What File Format and Color Settings Do DTF Files Need?
PNG or TIFF, transparent background, RGB color mode. Those three settings solve most of the file-rejection problems suppliers see.
PNG and TIFF preserve transparency, which matters enormously for DTF because the printer’s white underbase needs to know exactly where your design starts and stops. JPG flattens everything onto a solid background, and that background prints as a visible rectangle around your artwork, since the file has no way to store transparent pixels.
On color mode, stick with RGB unless a supplier specifically requests otherwise. It feels backward if you’ve worked in offset or screen printing, where CMYK rules everything, but DTF workflows run through a RIP (raster image processor) that handles the RGB to CMYK plus white underbase conversion on its end. Submitting a file you’ve already converted to CMYK can actually mute colors, since you’re asking the RIP to reinterpret data that’s already been compressed once.
Before export, run through this:
- Confirm the canvas matches your calculated pixel dimensions at 300 DPI.
- Flatten or delete any semi-transparent layers, shadows, or glows below full opacity, since partial transparency can cause spotty adhesion in the white ink layer.
- Save as PNG, then run it through a compressor to keep file size under your supplier’s upload cap without touching resolution.
Why Are Some DTF Prints Blurry, and How Do You Fix It?
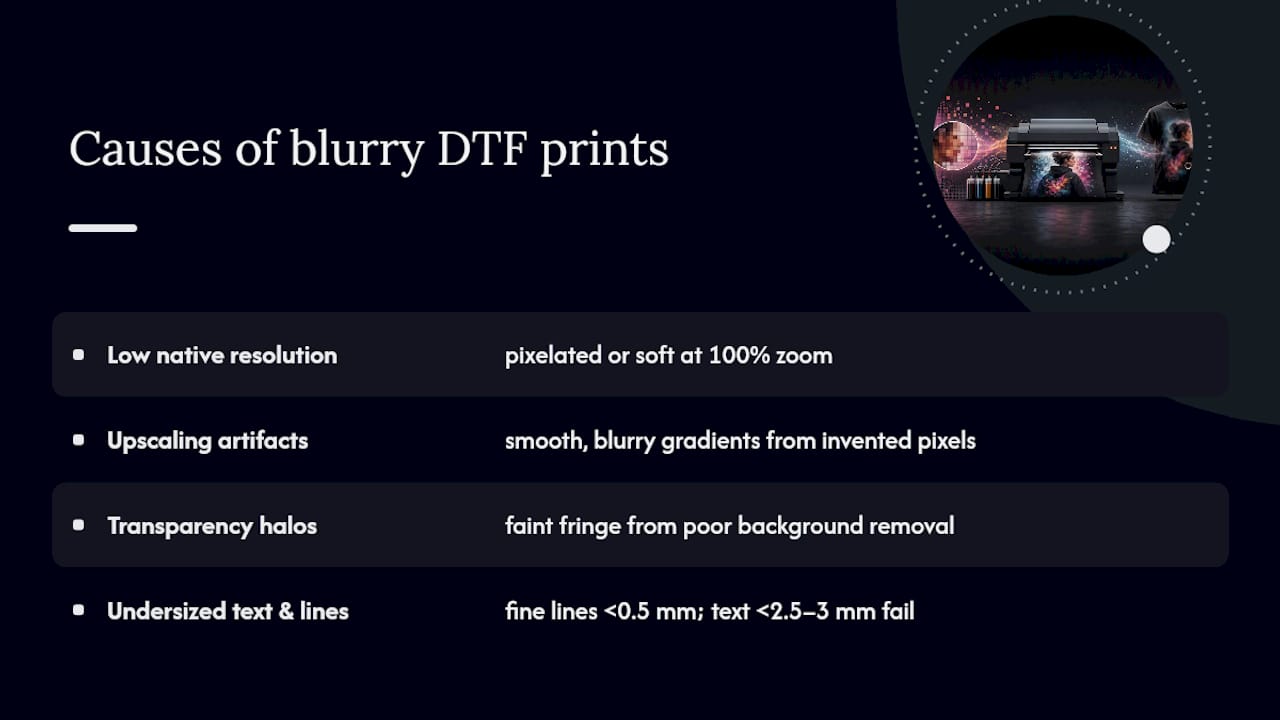
Blurry prints almost always trace back to one of four causes, and each one has a distinct fingerprint if you know where to look.
Low native resolution is the most common culprit. Zoom to 100% in your editor. If the edges look pixelated or soft at that zoom level, they’ll look the same on fabric, since your screen is showing you the actual pixel data. Upscaling artifacts show up as a slightly different kind of softness: smooth, blurry gradients where sharp lines used to be, because software invented pixels that were never in the original file. A modest stretch of 10 to 15% often passes unnoticed, but doubling a small logo’s dimensions in Photoshop rarely holds up, and rebuilding the design in vector format beats stretching it every time.
Transparency halos appear as a faint ring or fringe around a design’s edges, usually left over from a poor background removal that didn’t fully clear anti-aliased pixels along the border.
Undersized text and thin lines fail for a physical reason, not a resolution one. Fine lines under roughly 0.5 mm and text below about 2.5 to 3 mm can crack, fill in, or disappear entirely once the film transfers to fabric, regardless of how high your DPI is set.
Before placing a large order, ask your supplier what native dpi and screening settings their RIP uses, and whether their white underbase handling has specific opacity minimums, since those settings interact directly with how forgiving your file needs to be.
Your Preflight Checklist Before Uploading a DTF File
Run this list before every upload, not just the first time:
- Verify pixel dimensions match your final size at 300 DPI (a 10 inch wide front print needs 3,000 pixels).
- Confirm file type is PNG or TIFF with a genuinely transparent background, not a white one.
- Flatten problematic transparencies and double check color mode is RGB unless told otherwise.
- Check gang-sheet spacing, aiming for roughly 0.25 to 0.5 inches between designs, and confirm your file sits under the supplier’s upload cap.
Pro Tip: When color accuracy or fabric texture matters for a big order, run one sample transfer first. It costs less than reprinting fifty shirts because a red looked orange.
How Transfer Kingz Applies These DTF Print Quality Standards
Transfer Kingz builds its own file requirements around the same numbers covered here: 300 DPI at intended size, PNG files with a genuine transparent background, sensible gang-sheet spacing, and defined upload caps to keep large files moving through the system without stalling. None of that is arbitrary. It’s the same math and the same format logic that governs any DTF workflow, applied consistently across every order that comes through.
For readers who want the brand-specific version of these rules laid out in more depth, the detailed artwork requirements guide covers file setup expectations line by line. If you’re still getting comfortable with tools like Photoshop or Illustrator for DTF-specific export settings, the transfer file setup guide walks through the editor side step by step.
- Standard rule: 300 DPI at final print size, no exceptions for standard apparel runs.
- Format rule: PNG with true transparency, never a flattened JPG.
- Spacing rule: gang sheets built with consistent gaps between designs to avoid cutting errors.
- Upload rule: files optimized to stay under the platform’s size caps without sacrificing resolution.
What I See Go Wrong Most Often With DTF Files
The single biggest mistake isn’t low DPI. It’s designers checking DPI in their editor without checking the actual pixel dimensions against the final print size. A file can say “300 DPI” in its metadata and still be garbage if someone resized the canvas without resampling correctly first.
If it looks soft on your monitor at full resolution, no amount of DPI labeling saves it. This single check catches most reprint-causing errors before they ever reach a printer.
For deeper troubleshooting once a print comes out wrong, the troubleshooting guide breaks down fixes for edge issues, color shifts, and adhesion problems by symptom.
— Anthony
Get Your DTF Files Checked Before You Commit to a Full Run
Transfer Kingz reviews artwork at upload, which means a file with the wrong pixel dimensions or a missing transparent background gets flagged before it ever reaches production, not after fifty shirts come out wrong.

If you’re unsure whether your logo will hold up at 10 inches or your gang sheet spacing is tight enough, request a single sample print before committing to a bulk order. It’s the cheapest insurance against a reprint. Sample test runs are available without minimum order requirements, making it cost-effective to check prints before placing a full batch order. Head to the Dallas DTF transfer page to start an order, upload your file, and see exactly how it checks out before you print at scale.
Where to Verify These DTF Print Quality Standards Yourself
Cross-check these numbers against the DTF artwork checklist, the resolution and DPI settings guide, and the DPI reference on Wikipedia for the technical definition behind the math.
Sources
- Prepare Artwork for DTF Printing: 5-Point File Checklist (2026)
- DTF Printing Resolution Guide: DPI Settings For Perfect Prints 2026
- DTF Printing File Prep: Resolution, DPI, and File Settings Explained – Castle Ink
0 comments