

Print your design onto PET film, coat it with hot-melt adhesive powder, cure the powder, then press at 280–300°F for 10–15 seconds with medium pressure and cold peel. That’s the core workflow.
- Verdict: DTF bonds to cotton via surface adhesion, not dye infusion, so it works on any cotton color without pre-treatment.
- Starter settings: 280–300°F, 10–15 seconds, medium pressure, cold peel.
- Next step: Pre-press your garment 3–5 seconds to remove moisture, align your transfer, and press.
Key Takeaways
DTF bonds to cotton through surface adhesion, not dye infusion, making it the most flexible full-color printing method for both light and dark cotton garments without pre-treatment.
| Point | Details |
|---|---|
| Starter press settings | Press 100% cotton at 280–300°F for 10–15 seconds with medium pressure and cold peel. |
| Cold peel is critical | Always let the garment cool fully before peeling; early peel causes film lift on cotton. |
| Durability range | Properly applied DTF on cotton survives 50–100 home-wash cycles under good production practices. |
| Wash care | Turn garments inside-out, wash cold or warm, and avoid bleach and high-heat drying. |
| Transferkingz option | Order press-ready custom DTF transfers with no minimums and gang sheet pricing for cotton jobs. |
Table of Contents
- How does DTF printing actually bond to cotton fibers?
- What supplies do you need for DTF transfers on cotton?
- Step-by-step: how to apply a DTF transfer to a cotton garment
- Recommended press settings for cotton and common blends
- How long does DTF last on cotton, and how should you wash it?
- Common DTF-on-cotton problems and how to fix them
- Practical tips for consistent shop-quality results on cotton
- The real question: should you DIY or order pre-printed transfers?
- Transferkingz makes cotton DTF jobs faster and simpler
- Sources
How does DTF printing actually bond to cotton fibers?
Direct-to-Film (DTF) printing is a three-part system: pigment inks are printed onto a clear PET film, hot-melt adhesive powder is applied while the ink is wet, and a heat press melts the powder into both the film and the fabric surface. The result is a flexible, opaque layer that sits on top of the cotton rather than penetrating the fiber.
Cotton’s cellulose structure is naturally hydrophilic, meaning its fibers have microscopic surface texture that gives the adhesive something to grip. When the powder melts under heat, it flows into those fiber valleys and locks in place as it cools. That’s why cold peel matters on cotton: letting the adhesive fully solidify before you pull the film gives you a cleaner bond.
Compare that to sublimation, which requires polyester content to work at all, and DTG, which needs pre-treatment on dark cotton and produces softer hand-feel but less opacity. DTF skips both constraints.
For full-color, photorealistic designs on dark or light cotton, DTF is the most flexible option. No weeding, no pre-treatment, and no polyester requirement. You can learn more about how DTF compares to sublimation when choosing between methods for different fabric types.
What supplies do you need for DTF transfers on cotton?
Get these right before you press a single shirt.
- DTF-capable printer or vendor-printed film: An Epson-based DTF printer with modified ink channels, or simply order pre-printed transfer sheets from a supplier like Transferkingz.
- CMYK + white pigment inks: White ink is the underbase layer that makes colors pop on dark cotton. Without it, colors on black or navy fabric look washed out.
- PET DTF film: Clear or matte, typically 75–100 microns. Thinner film transfers more cleanly; thicker film is more forgiving during handling.
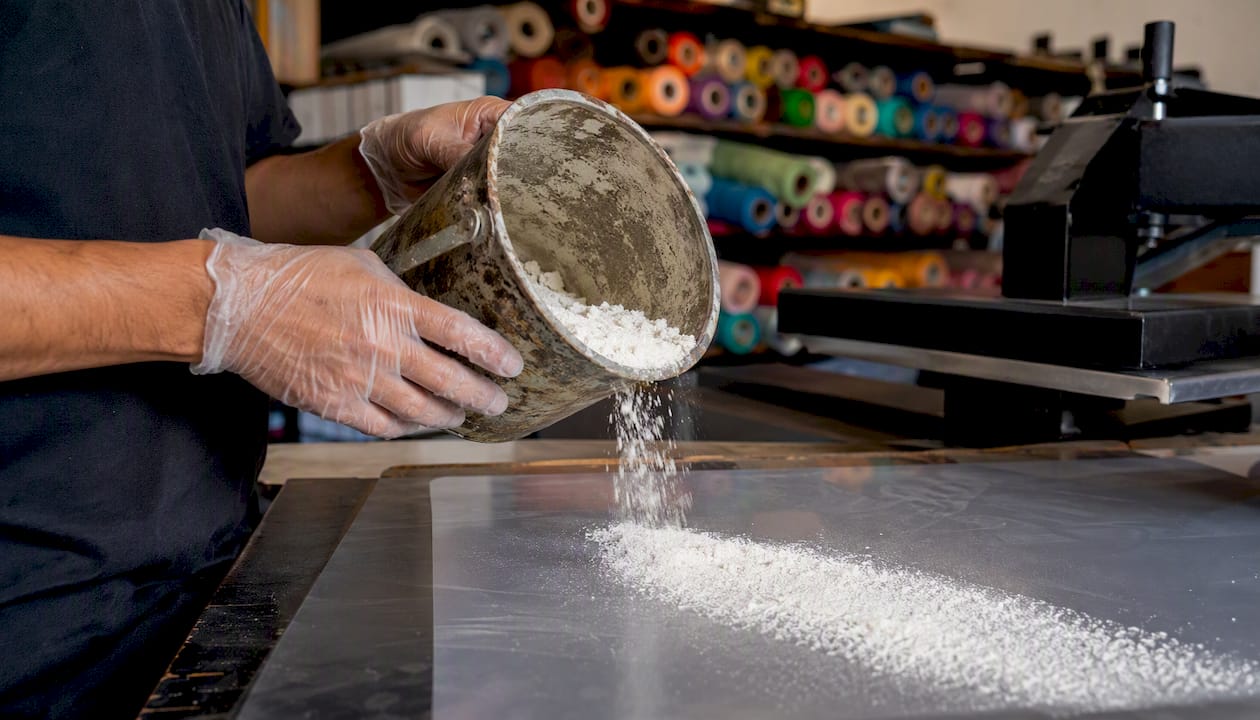
- Hot-melt adhesive powder: Fine-grain powder (80–120 micron) for detailed designs; medium-grain for larger fills. Powders formulated specifically for cotton allow more stretch and reduce cracking on areas that flex, like sleeves and chest panels.
- Heat press: Clamshell or swing-away, with consistent platen pressure. Inconsistent platens are the most common cause of edge lift on cotton.
- Curing oven or shaker oven (optional but recommended): A dedicated shaker oven melts the powder evenly before pressing. A heat gun works for small batches but introduces variability.
Powder storage matters. Adhesive powder absorbs humidity and clumps, which causes uneven melt and adhesion failures.
Pro Tip: If you’re running cotton jobs in a humid shop, pre-warm your powder container for 2–3 minutes before use. Clumped powder won’t coat the film evenly, and you’ll see it immediately as patchy adhesion after pressing.
According to Transferkingz’s durability guide, ink formulation and powder quality are among the primary drivers of wash performance on cotton, which means skimping on either will show up in the wash, not just at the press.
Step-by-step: how to apply a DTF transfer to a cotton garment
Preparation
Pre-press the garment for 3–5 seconds to drive out moisture and flatten any wrinkles. Lint-roll the print area. Moisture trapped under the transfer is one of the most common causes of adhesion failure on cotton, and it takes less than five seconds to eliminate.
Printing and powdering
- Print your design in mirror image with white underbase enabled in your RIP software.
- While the ink is still wet, apply adhesive powder evenly across the entire printed surface.
- Shake off all excess powder. Any powder sitting on unprinted film will create a hazy border around your design.
- Cure the powder in a shaker oven or under a heat gun until it turns from white and granular to clear and matte. This step is non-negotiable: uncured powder won’t bond properly, and over-cured powder loses elasticity.
Heat-press transfer
- Place the cured film face-down on the pre-pressed garment, design centered.
- Press at 300°F (150°C) for 10–15 seconds with medium pressure, as beginner application guides recommend.
- Remove the garment from the press and let it cool completely before peeling. Cold peel is standard for cotton because it allows the adhesive to fully set into the fiber surface before the film releases.
- Peel the film slowly at a low angle. If any part of the design lifts with the film, lay it back down and press for another 5 seconds.
- Final repress: cover the transfer with parchment paper and press for 5–7 seconds at the same temperature. This smooths the surface and locks the edges.
Quality check
Before running a full production batch, press one test garment and wash it twice on a normal cycle. Check for edge lift, cracking, and color shift. If any of those appear, adjust settings before committing to a full run.
Recommended press settings for cotton and common blends
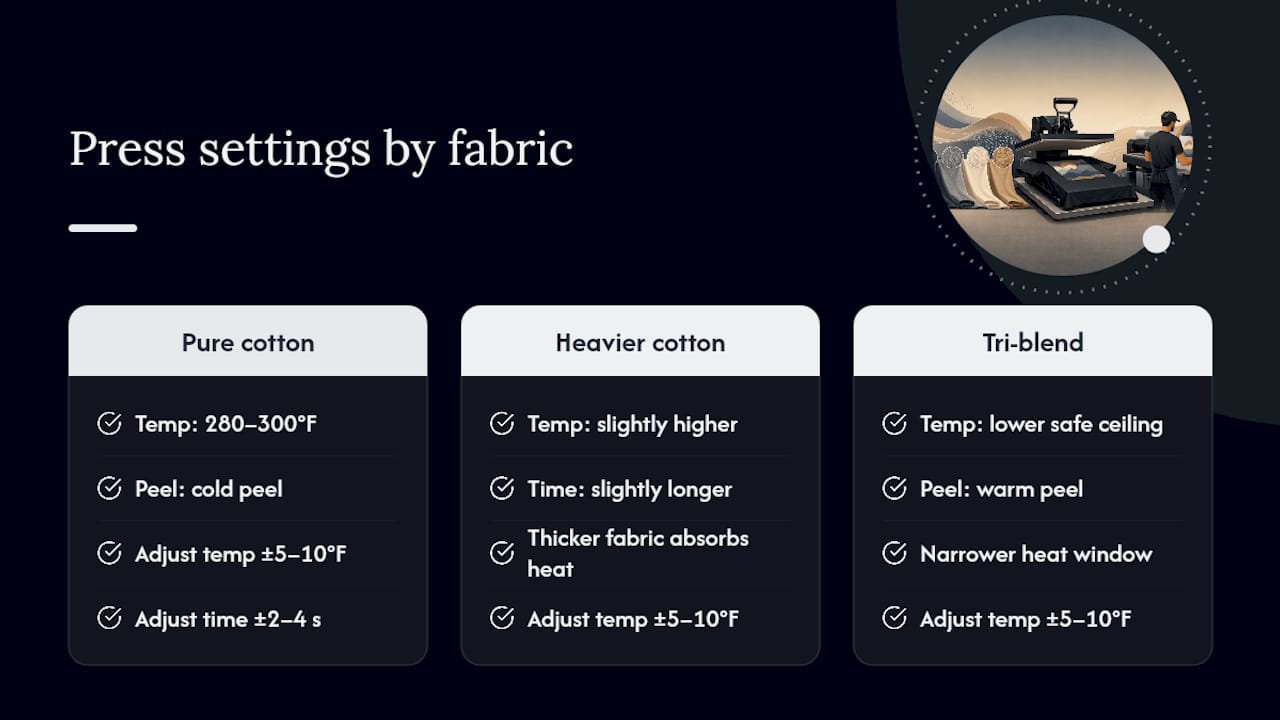
These are starting points. Every press runs slightly differently, and fabric weight affects heat transfer. Expect to micro-adjust temperature by ±5–10°F and time by ±2–4 seconds based on your specific platen and garment weight, per Transferkingz’s heat-press settings chart.
For pure cotton, xTool’s press guidance recommends 280–300°F and emphasizes cold peel for better adhesion. Heavier fabrics like hoodies need slightly more time and temperature because the thick substrate absorbs heat before the adhesive reaches melt point.
Pro Tip: Run a test strip on a scrap piece of the same fabric before pressing production garments. Cut a 2-inch strip of your transfer, press it, cold peel, and tug firmly at the edges. If it lifts, increase pressure or add 2 seconds before touching the full run.
Tri-blends are the trickiest. The polyester content lowers the safe heat ceiling, so you’re working in a narrower window. Go warm peel on tri-blends to reduce the risk of the transfer lifting as it cools.
How long does DTF last on cotton, and how should you wash it?
Properly printed, cured, and applied DTF transfers on cotton can survive 50–100 home-wash cycles with minimal fading or cracking. That range is wide because longevity depends heavily on ink quality, powder grade, curing completeness, and press settings — not just the fabric.
Recommended care:
- Wash inside-out in cold or warm water (not hot).
- Use a mild detergent. Avoid bleach and fabric softeners, which degrade the adhesive layer.
- Air-dry when possible, or tumble dry on low heat.
- Do not iron directly on the transfer.
Institutional laundering (commercial washers with high-alkaline detergents and high-heat drying) shortens lifespan considerably. If you’re decorating workwear or uniforms that will go through commercial laundry, communicate care instructions clearly and set expectations at 30–50 cycles rather than 100.
The durability drivers Transferkingz identifies — ink formulation, powder quality, correct curing, and proper press settings — are the same variables that separate a transfer that lasts two seasons from one that cracks after five washes.
Common DTF-on-cotton problems and how to fix them
Most failures trace back to one of four causes: pressure, temperature, powder quality, or peel timing.
Edge lift:
- Cause: Insufficient pressure, uneven platen, or powder that didn’t fully melt.
- Fix: Increase pressure one step, verify platen contact across the full print area, and check that powder was fully cured before pressing.
Cracking after washing:
- Cause: Excessive heat, incompatible powder (too coarse or wrong formulation for cotton), or under-cured adhesive.
- Fix: Drop temperature by 5–10°F, switch to a cotton-rated medium-grain powder, and extend curing time.
Dull or washed-out colors:
- Cause: Insufficient white underbase, low ink density, or pressing at too low a temperature.
- Fix: Increase white underbase opacity in your RIP settings, and confirm press temperature with an infrared thermometer.
Film lifting during peel:
- Cause: Peeling too soon (hot peel on a cotton-spec transfer).
- Fix: Wait until the garment is fully cool before peeling. If you’re in a hurry, use a fan to accelerate cooling rather than peeling early.
Pro Tip: Keep a press log for the first 20 garments on any new fabric or transfer batch. Note temperature, time, pressure, and peel result. Patterns emerge fast, and you’ll dial in your settings in a fraction of the time it takes to troubleshoot blind.
On-press troubleshooting sequence
- Press one test strip on the target fabric.
- Cold peel and inspect edges and center.
- If edges lift: increase pressure.
- If center lifts: increase temperature by 5°F.
- If colors look dull: check white underbase settings.
- If cracking appears immediately: reduce temperature and check powder grade.
- Wash the test strip before committing to a production run.
Practical tips for consistent shop-quality results on cotton
Pre-press every garment. Three to five seconds on a bare platen removes moisture and sets the fabric flat. Skipping this step on cotton is the fastest way to get inconsistent adhesion across a batch.
White underbase placement: For dark cotton, the white layer needs to be slightly larger than your color artwork (a “choke” of 0.5–1mm inward on the white, expanded outward). This prevents white edges from showing around the design after pressing.
Halftone handling: Cotton’s texture can break up fine halftone dots.
Batch testing: When you receive a new roll of film or a new powder lot, press three test transfers before running production. Powder lots vary in particle size and melt point, and a five-minute test run saves hours of rework.
Pro Tip: QC sample one garment per 25 units during a production run, not just at the start. Heat press platens drift in temperature over a long session, and catching a setting shift at unit 26 is far better than discovering it at unit 100.
Store unused transfers flat, away from direct sunlight and humidity. Transfers left in a humid environment absorb moisture into the adhesive layer, which causes bubbling during pressing.
The real question: should you DIY or order pre-printed transfers?
The conventional answer is “buy equipment when volume justifies it,” but that framing misses a few things worth considering.
In-house DTF makes sense when you’re pressing 200+ units per month on consistent designs, have stable fabric SKUs, and can absorb the learning curve on powder, curing, and press calibration. The per-unit cost drops significantly at volume, and quick iteration on design changes is a genuine operational advantage.
But for most small decorators and hobbyists, the real cost of in-house DTF isn’t the printer. It’s the time spent on calibration, powder management, RIP software, and the waste from failed test runs. A shop doing 30–50 cotton pieces a month on varied designs will often spend more on labor and materials than they’d pay for finished transfers from a specialist.
Complex designs with fine detail, gradients, or photorealistic elements are also a case where ordering makes sense. A supplier running production-grade equipment and premium inks will consistently outperform a small-format in-house setup on those jobs, and the difference shows in the wash.
The honest calculus: if your monthly volume is low, your designs are complex, or you’re still learning the process, ordering finished transfers is the faster and often cheaper path. In-house investment pays off when you have the volume, the consistency, and the time to run it properly.
Transferkingz makes cotton DTF jobs faster and simpler
Skip the calibration headaches. Transferkingz prints custom DTF transfers on production-grade equipment with premium inks and cotton-rated adhesive powders, so you get press-ready sheets that perform from the first garment to the last. No minimum order means you can test a design on five shirts before committing to 500.

The gang sheet builder lets you pack multiple designs onto a single sheet, cutting cost per transfer on small runs. Same-day local pickup and nationwide shipping mean you’re not waiting a week to start pressing. Upload your artwork, choose your size, and order a test run today at Transferkingz.
0 comments