
Inconsistent adhesion, colors that fade after one wash, and transfers that peel at the edges — these are the frustrations that quietly kill productivity for independent artists and small business owners. A poorly managed DTF workflow doesn’t just waste film and ink; it wastes your time and reputation. The good news is that most of these problems trace back to a handful of fixable steps. This guide walks you through every stage of the DTF transfer process, from choosing the right tools to pressing and peeling with confidence, so you can produce professional-quality custom products consistently and without the guesswork.
Table of Contents
- Understanding DTF transfer: What artists need to know
- Essential tools and materials for a smooth DTF workflow
- Step-by-step DTF transfer workflow: From design to finished product
- Troubleshooting and refining your DTF transfer results
- Comparing DTF workflow approaches: Efficiency tips for artists
- Our take: The real key to flawless DTF workflows for artists
- Ready to improve your DTF workflow? Solutions for artists
- Frequently asked questions
Key Takeaways
| Point | Details |
|---|---|
| DTF suits small runs | Direct to film transfers are ideal for artists and small businesses producing less than 50 customized items. |
| Preparation is essential | Moisture removal, accurate heat settings, and quality supplies directly affect print quality and adhesion. |
| Troubleshooting saves time | Addressing common issues like poor adhesion or color fade at each stage of your workflow ensures reliable final results. |
| Optimize for scale | Batching and standardizing your DTF process can boost both efficiency and consistency for growing businesses. |
Understanding DTF transfer: What artists need to know
DTF stands for Direct to Film, a printing method where designs are printed onto a special film, coated with hot-melt adhesive powder, cured, and then heat-pressed onto fabric. Unlike screen printing, there are no screens to burn, no color separation fees, and no minimum order requirements. That alone makes it a game-changer for artists producing small custom runs.
One of the biggest advantages of DTF is its compatibility with a wide range of materials. You can press onto cotton, polyester, nylon, leather, canvas, and most fabric blends without reformulating your process. That flexibility is hard to match with other decoration methods.
Here’s a quick comparison to put DTF in context:
| Feature | DTF transfer | Screen printing |
|---|---|---|
| Minimum order | None | Usually 12+ |
| Color range | Unlimited | Limited by screens |
| Setup time | Minutes | Hours |
| Best fabric | All types | Cotton-heavy |
| Cost per unit (small run) | Low | High |
| Durability | High | Very high |
As a full-color transfer comparison notes, DTF excels in small runs with unlimited colors and versatile fabric support, while screen printing is better suited for bulk orders where per-unit cost needs to drop significantly.
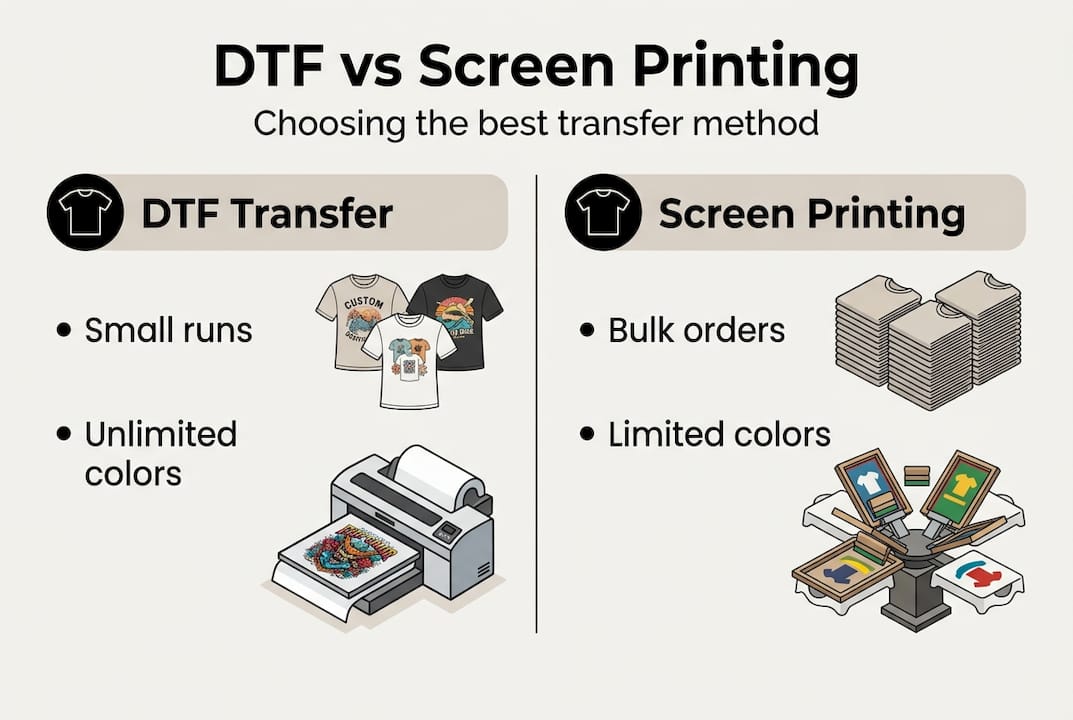
For artists building a brand or testing new merch designs, DTF is the smarter starting point. You can read a deeper breakdown in our DTF vs screen printing guide, or compare it with heat transfer vinyl in our DTF vs HTV breakdown.
Common use cases for DTF transfers include:
- Custom t-shirts and hoodies for artist merch
- One-off or limited-edition apparel drops
- Branded uniforms and promotional products
- Sample runs before committing to bulk screen printing
- Personalized gifts and small-batch retail items
The bottom line: if you’re printing fewer than 50 units, dealing with multi-color artwork, or working across different fabric types, DTF is almost always the most practical and cost-effective option.
Essential tools and materials for a smooth DTF workflow
Getting consistent results starts before you ever press a transfer. Your equipment and consumables directly determine print quality, and cutting corners here is where most workflow problems begin.
Core equipment you need:
- A DTF-capable printer (modified Epson or purpose-built DTF unit)
- RIP software to manage color output and white underbase layers
- A quality heat press with adjustable pressure and digital temperature control
- An IR thermometer to verify actual platen surface temperature
- A powder shaker or manual application setup for hot-melt adhesive
- A curing oven or heat tunnel (or your heat press in a pinch)
Consumables checklist:
- DTF film (matte or glossy depending on finish preference)
- CMYK plus white DTF inks
- Hot-melt adhesive powder (fine grain for soft hand feel, coarse for durability)
- Lint roller and gloves for contamination-free prep
- Parchment or silicone-coated pressing sheet
Understanding how DTF printing works helps you make smarter equipment choices from the start. The printer and RIP software combination is especially critical because RIP controls how white ink is laid down as the underbase, which affects color vibrancy on darker fabrics.
| Tool | Why it matters |
|---|---|
| IR thermometer | Confirms actual press temp, not just dial reading |
| Lint roller | Removes debris that causes adhesion gaps |
| Gloves | Prevents skin oils from contaminating film |
| Silicone sheet | Protects garment surface and distributes pressure evenly |
Pro Tip: Your heat press dial is often inaccurate by 10 to 20 degrees. Always verify with an IR thermometer before your first press of the day. As troubleshooting tips confirm, verifying temperature and pre-pressing garments to remove moisture are the two most effective fixes for the majority of DTF problems.
Step-by-step DTF transfer workflow: From design to finished product
A reliable process is repeatable. Follow these steps every time and you’ll eliminate most variables that cause failed prints.
-
Prepare your artwork. Set your file to 300 DPI minimum, use CMYK color mode, and design with a white underbase layer beneath all color elements. Transparent backgrounds are essential. Avoid thin lines under 1pt as they may not hold during transfer.
-
Print the transfer. Load your DTF film print-side up and run the job through your RIP software. The printer lays down color first, then white ink on top as the underbase.
-
Apply adhesive powder. While the ink is still wet, coat the printed side evenly with hot-melt powder. Shake off excess immediately. Uneven powder is one of the top causes of patchy adhesion.
-
Cure the film. Pass the powdered film through a curing oven or hover your heat press at 250 to 275°F for 2 to 3 minutes. A properly cured film looks solid and slightly glossy, not dull or tacky.
-
Pre-press your garment. Place the garment on the platen and press for 3 to 5 seconds to remove moisture and wrinkles. This step is skipped constantly and causes more failures than almost anything else.
-
Align and press the transfer. Position your transfer, cover with a silicone sheet, and press at 300 to 320°F for 15 to 20 seconds at firm pressure.
-
Cool and peel. For cold peel films, wait 15 to 30 seconds before peeling slowly from one corner. For hot peel, remove immediately at a low angle.
-
Final inspection. Check edges, fine details, and color uniformity. Any lifting or dull spots indicate a re-press or process adjustment is needed.
As DTF transfer problem fixes confirm, proper workflow steps directly reduce adhesion and durability issues. You can also explore our flawless DTF workflow guide, our DTF transfer workflow tutorial, and our DTF print workflow guide for additional depth.
“The pre-press step takes five seconds and saves you from reprinting an entire batch. It’s the most underrated step in the whole process.”
Pro Tip: Batch your pre-pressing. If you’re doing 10 garments, pre-press all of them before you start transferring. It keeps your workflow moving without interruption.
Troubleshooting and refining your DTF transfer results
Even with a solid process, issues show up. Knowing how to read the problem and fix it fast is what separates efficient artists from those who waste half a roll of film diagnosing a single bad batch.
Common DTF problems and their causes:
- Poor adhesion: Temperature too low (under 310°F), pressure too light, or moisture in the garment
- Color fading: Low DPI artwork, wrong color profile, or insufficient white underbase coverage
- Peeling edges: Uneven pressure at the press edges or not enough cure time on the powder
- Cracking after wash: Over-curing the film, pressing too long, or using the wrong powder grain size
- Ghosting or double image: Garment or film shifted during press, or peeling too quickly
As DTF issue solutions show, poor adhesion, cracking, and color fade almost always trace back to heat, moisture, or print setup errors. These are controllable variables, not random failures.
Moisture management is critical. Fabrics absorb humidity, especially in warm or coastal environments. Always pre-press, and if you’re working in a humid space, consider storing garments in sealed bags before production.
Pro Tip: Keep a simple log of your press settings, film brand, and results for each job. After 10 to 15 sessions, patterns emerge and you’ll know exactly what settings work for each fabric type in your specific environment.
For a structured approach to diagnosing problems, our DTF troubleshooting guide and flawless transfer troubleshooting resource cover the most common scenarios with specific fixes.
Comparing DTF workflow approaches: Efficiency tips for artists
Once your process is dialed in, the next step is making it faster and more consistent at higher volumes. Small workflow changes compound quickly when you’re pressing 30 garments instead of 3.
Batch processing strategies:
- Print all transfers for a job before pressing any of them
- Pre-press all garments in sequence before starting the transfer stage
- Organize transfers by size and placement to minimize repositioning time
- Use a gang sheet to print multiple designs on one film sheet, reducing waste
| Workflow approach | Best for | Speed | Cost efficiency |
|---|---|---|---|
| DTF (small batch) | Under 50 units, multi-color | Fast setup | High per unit |
| DTF (gang sheet) | Mixed designs, samples | Very fast | Very high |
| Screen printing | Over 100 units, single color | Slow setup | Low per unit |
As a transfer method comparison confirms, DTF is best for runs under 50 with unlimited color and faster setup, while screen printing wins on bulk durability and per-unit cost above 100 units. Knowing when to switch methods is a real efficiency skill.
For artists scaling up, the gang sheet approach is the single biggest time and cost saver. Instead of printing one design per sheet, you fill the film with multiple designs and press them all in one batch. Our screen printing vs DTF guide helps you decide when it makes sense to switch methods as volume grows.
Repeatable workflow checklist:
- Verify press temperature with IR thermometer before each session
- Lint roll every garment before pressing
- Document settings for each fabric type
- Inspect every transfer before and after pressing
- Store unused transfers flat in a cool, dry place
Our take: The real key to flawless DTF workflows for artists
Here’s something most guides won’t tell you: the artists getting the most consistent DTF results aren’t using the most expensive equipment. They’re using documented, repeatable processes and they’re honest about what went wrong when a print fails.
We’ve seen artists invest in premium printers and still produce inconsistent work because they skip the pre-press step or eyeball their powder application. Meanwhile, others with mid-range setups produce flawless results every time because they treat each variable as controllable and worth tracking.
The underestimated factor is decision fatigue. When you’re running a creative business, every judgment call you make during production drains mental energy. Locking in your settings, batching your steps, and following a written checklist removes those micro-decisions and frees your brain for actual creative work.
Our workflow case study shows how small process tweaks, not gear upgrades, are what move the needle. Test one variable at a time, log your results, and build a settings library for your most common fabric and design combinations. That library becomes your competitive advantage.
Ready to improve your DTF workflow? Solutions for artists
If building and maintaining your own DTF setup feels like too much overhead right now, there’s a smarter path. Sourcing professionally printed transfers lets you skip the equipment costs and focus entirely on pressing, fulfilling, and growing your business.

Transfer Kingz offers ready-to-press custom DTF transfers Dallas artists and businesses rely on for consistent, vibrant results. Whether you’re local or shipping nationwide, our DTF transfers Texas service delivers fast turnaround with no minimums. Curious how the industry is shifting? See how DTF shirt transfers revolution is changing what’s possible for independent creators at every scale.
Frequently asked questions
What are the most common DTF transfer mistakes artists make?
The most frequent mistakes are pressing at too low a temperature (under 310°F), skipping the pre-press moisture removal step, and applying adhesive powder unevenly across the film. Each of these directly causes poor adhesion and peeling.
How can I prevent color fading in DTF transfers?
Use 300 DPI or higher artwork, set your file to CMYK color mode, and make sure your white underbase layer has full, even coverage beneath all color elements. Color fade from low DPI or a weak underbase is one of the most preventable issues in DTF printing.
Is DTF best for small or large custom apparel runs?
DTF is the right choice for runs under 50 units, especially with multi-color designs, while screen printing becomes more cost-effective above 100 units. The DTF best for runs under 50 rule holds across most fabric types and design complexities.
How do I know if my DTF print is properly cured?
A properly cured transfer looks smooth and has a consistent, slightly glossy surface with no dull patches or tackiness. Improper curing causes dull film and weak adhesion, so always verify your curing temperature with an IR thermometer rather than relying on timer estimates alone.
0 comments