
TL;DR:
- Hot peel transfer in DTF printing allows for faster production by removing the carrier film while still hot, ensuring clean adhesion and a softer finish. It is ideal for high-speed workflows with cotton and blends, whereas cold peel suits specialty fabrics requiring a cooling period for better results. Mastering hot peel techniques enhances small business agility, enabling rapid prototyping and efficient scaling while minimizing quality issues through proper setup and testing.
Many clothing business owners assume all heat transfers work the same way. Press, wait, peel, done. But that assumption costs you time, money, and sometimes entire production runs. Hot peel transfer is a specific technique within DTF printing that delivers faster throughput, cleaner results, and more flexibility for small-batch apparel decoration. Understanding exactly how it works, how it compares to cold peel, and where it fits in your workflow can genuinely change how efficiently you run your custom apparel business.
Table of Contents
- What is hot peel transfer in DTF printing?
- Hot peel vs. cold peel: Key differences for apparel businesses
- How to apply hot peel transfers for crisp results
- Troubleshooting and optimizing your hot peel transfers
- A professional’s take: Why hot peel is a game-changer for small brands
- Start using hot peel DTF transfers for stunning results
- Frequently asked questions
Key Takeaways
| Point | Details |
|---|---|
| Efficient production | Hot peel transfers save time by allowing instant peeling right after pressing. |
| Customizable results | Hot peel works well with many fabric types for both soft feel and vibrant designs. |
| Simple troubleshooting | Most hot peel problems are solved by adjusting temperature, pressure, or peeling technique. |
| Business advantage | Mastering hot peel DTF gives small brands a faster path to high-quality, custom apparel. |
What is hot peel transfer in DTF printing?
Hot peel transfer refers to the process of removing the carrier film from a DTF print immediately after the heat press opens, while the transfer is still warm. Unlike other methods that require a cooling period, hot peel is designed so the adhesive releases cleanly from the film at elevated temperatures, bonding directly to the fabric fibers in the same motion.
In a standard DTF workflow, the design is printed onto a special PET film, coated with hot melt adhesive powder, cured in an oven, and then heat-pressed onto the garment. With hot peel, the film is engineered to release at pressing temperatures, typically between 280°F and 320°F, rather than after cooling. This is not an accident of the process. It is a deliberate design choice in how the film and adhesive are manufactured.
A solid overview of heat press application basics shows how this technique fits within the broader landscape of apparel decoration, where precision and repeatability are non-negotiable for consistent quality. You can also explore DTF heat transfer types to see where hot peel sits relative to other popular methods used in custom printing today.
Key practical advantages of hot peel for apparel decorators include:
- Speed: No waiting for the garment to cool means you can move on to the next press immediately
- Soft hand-feel: The transfer adheres more tightly to the fabric surface, creating a less rubbery, more natural feel
- Reduced labor time: Less handling between press cycles keeps your workflow tight and reduces bottlenecks
- Consistent quality: Immediate peel minimizes the chance of the garment shifting during a cooling phase
- Scalability: Faster individual cycle times translate directly into higher output per hour
Pro Tip: Always check your specific fabric’s heat tolerance before committing to a hot peel workflow. Thin polyester blends and moisture-wicking athletic fabrics can scorch or distort at higher temperatures, so a quick material check upfront saves you from expensive mistakes.
Hot peel vs. cold peel: Key differences for apparel businesses
With that foundation, it is important to understand how hot peel stacks up to its main alternative: cold peel. Both have legitimate use cases, and choosing the wrong one for the job will cost you quality, time, or both.
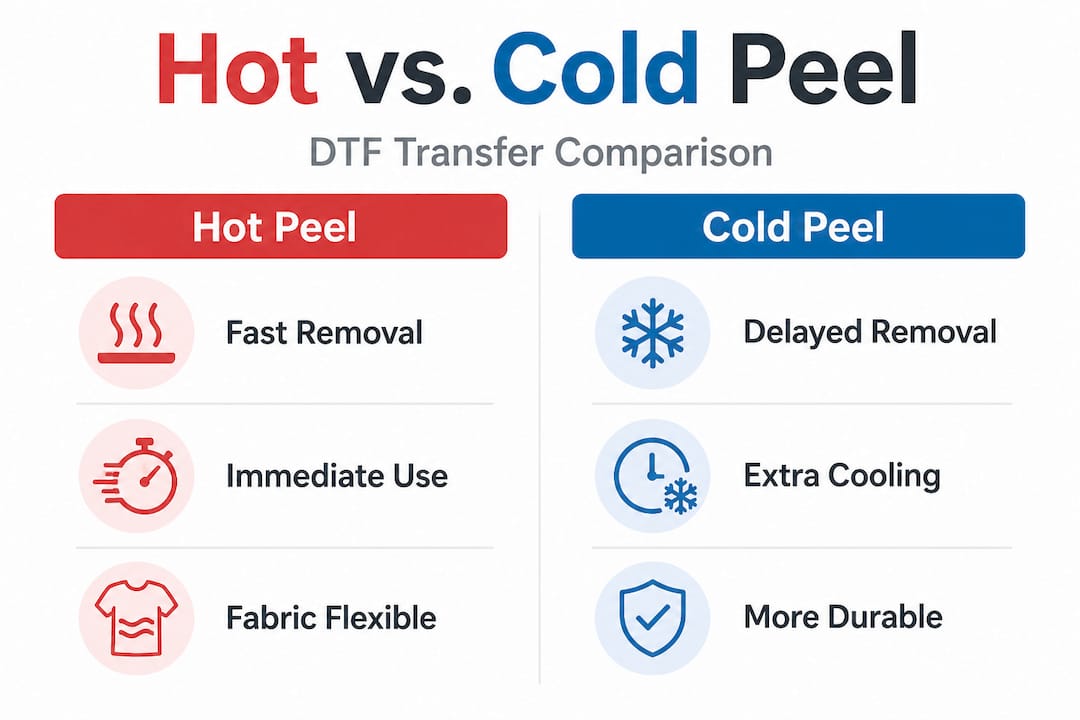
| Feature | Hot peel | Cold peel |
|---|---|---|
| When you peel | Immediately after pressing | After film cools completely |
| Surface feel | Softer, more integrated | Glossier, slightly raised |
| Production speed | Faster, higher cycle rate | Slower, requires wait time |
| Best for | Cotton, cotton blends, most standard tees | Athletic wear, nylon, special-effect finishes |
| Risk if done wrong | Partial adhesion if fabric is wrong | Film sticking if not fully cooled |
| Output per hour | Higher | Lower |
Cold peel transfers have their strengths. They tend to produce a slightly shinier, higher-contrast finish that works well for designs with very fine lines or photographic detail. Some specialty fabrics bond better using the cold peel approach because the longer cooling window allows the adhesive to set more evenly across unusual textures. The DTF material guide breaks down which substrates respond best to each method, covering everything from standard cotton jersey to performance polyester and canvas.
When to choose hot peel:
- You are running a production batch of standard cotton or cotton-poly blend tees
- Speed is your primary concern and you need maximum press cycles per hour
- You want a softer finish that feels integrated into the fabric rather than sitting on top
- You are decorating hoodies, sweatshirts, or fleece where a matte, soft result is preferred
- Your order volume is high enough that every saved minute compounds into meaningful time savings
When to stick with cold peel:
- You are working with nylon, athletic performance wear, or heat-sensitive substrates
- The design requires an ultra-sharp, high-gloss finish for fashion-forward or retail-quality branding
- You are printing on specialty materials you have not tested with hot peel yet
- The design contains extremely fine detail where any slight shift during peel could distort edges
For small clothing businesses running mixed orders, the smart approach is keeping both options available and knowing exactly which situation calls for which method.
How to apply hot peel transfers for crisp results
So, how do you actually use hot peel for consistent, high-quality prints? Let us break it down step by step.
Applying hot peel DTF transfers correctly is less complicated than most people expect, but it does require attention to each stage of the process. Skipping a step or guessing at settings will produce inconsistent results. Following these steps consistently will not. A complete walkthrough for applying DTF hot peel transfers gives you detailed guidance that goes beyond the basics, and the DTF transfer application checklist is worth keeping next to your press for quick reference when onboarding new team members.
-
Preheat your garment. Place the garment on the heat press and press for 3 to 5 seconds with light pressure. This removes moisture and wrinkles, giving the adhesive a clean, flat surface to bond to. Even a small amount of residual moisture can prevent full adhesion.
-
Position the transfer. Place the DTF transfer film-side up on the garment, printed side down against the fabric. Align it precisely. Hot peel does not give you a repositioning window once the press closes.
-
Set your press parameters. For most cotton and cotton-poly fabrics, the standard hot peel press setting is 300°F to 315°F, with medium-to-firm pressure, for 10 to 15 seconds. Pressure should be consistent across the entire platen. Uneven pressure is one of the top causes of partial adhesion.
-
Press and open. Close the press firmly, complete the full time cycle, and then open it. Do not rush this phase. The full dwell time is what activates the adhesive properly.
-
Peel immediately. While the garment and film are still hot, grab a corner of the film and peel it back at a consistent 45-degree angle in one smooth motion. Peeling too slowly or in a jerky motion can drag the ink. Peeling at a sharp 90-degree angle can cause edge lifting.
-
Inspect the print. Check for any areas where the ink did not fully transfer, color inconsistencies, or edge issues. Catch these now before moving on to the next item.
-
Final press (optional but recommended). Place a silicone sheet or parchment paper over the finished print and press again for 5 seconds at the same temperature. This seals the ink further into the fabric and gives you a smoother, more durable finish.
Hot peel can save up to 30% of your total press time per garment compared to cold peel workflows, particularly when you factor in the wait time cold peel requires between cycles. For a shop pressing 100 shirts in a day, that time savings adds up to a significant throughput improvement without adding equipment or labor.
Pro Tip: Always run a test press on a scrap piece of the same fabric before starting a full production run. This catches any setting mismatches specific to that fabric’s weight and composition, and it costs you one transfer instead of a ruined order.
Troubleshooting and optimizing your hot peel transfers
Even with the best workflow, issues can arise with hot peel. Here is how to resolve and prevent them.
Common hot peel transfer problems you will encounter include:
- Film not peeling cleanly: The film tears or ink lifts when you peel
- Dull or faded colors after peeling: The finished print looks washed out compared to the film
- Partial adhesion: Sections of the design did not transfer fully to the fabric
- Edge lifting: The edges of the design begin separating from the fabric after a few washes
- Fabric distortion: The garment warped, scorched, or stretched during pressing
Detailed guidance for each of these is covered thoroughly in the resources for troubleshoot DTF hot peel issues and additional DTF troubleshooting tips that address the most persistent quality problems in production environments.
| Problem | Likely cause | Solution |
|---|---|---|
| Film tears during peel | Temperature too low, adhesive not fully released | Increase temp by 5°F, test again |
| Dull colors | Under-pressed, insufficient heat or time | Extend press time by 3 to 5 seconds |
| Partial adhesion | Uneven pressure or moisture in fabric | Pre-press garment longer, check platen pressure |
| Edge lifting after washing | Peeled too slowly or at wrong angle | Peel faster at a consistent 45-degree angle |
| Fabric distortion | Temperature too high for fabric type | Reduce temperature, use a protective sheet |
“The single biggest quality issue in hot peel production is inconsistency. Operators who use the same settings every time, check pressure across the full platen, and pre-press every garment will outperform shops using better equipment but skipping the basics.”
Quality assurance starts before you press a single shirt. Check your platen pressure regularly using a pressure gauge or even a simple sheet of paper pulled across all four corners of the platen. Verify your heat press thermometer is calibrated. Use only transfers from a supplier whose films are specifically labeled for hot peel, not generic or unlabeled films that may require cold peel to release properly. Good habits at setup eliminate most problems before they appear. You can find a deeper breakdown of the principles behind mastering DTF heat application to sharpen your technical understanding even further.
A professional’s take: Why hot peel is a game-changer for small brands
We have covered the mechanics, but what does this mean for your clothing line’s real-world success?
Here is something most articles miss entirely: hot peel is not just a production speed trick. For small clothing brands and independent designers, it fundamentally changes how you approach product development. When your per-garment press time drops and your peel confidence increases, you can prototype new colorways and designs in the same afternoon rather than planning them out over days. That speed of iteration is a competitive edge that larger brands with complex production pipelines cannot easily replicate.
Small volume launches become much lower risk. If you want to test a new design on 12 shirts before committing to 200, hot peel makes that a realistic, affordable experiment rather than a logistical headache. The real-world DTF insights behind successful small-batch production all point toward workflow flexibility as the defining advantage for growing brands.
That said, the pitfall we see most often is overconfidence. A business owner learns hot peel, sees the speed gains on cotton tees, and immediately tries it on every fabric in their line without testing. Rushing hot peel on a heat-sensitive polyester performance jersey or a nylon-spandex blend can cause scorching, color bleed, or adhesion failure. The technique is forgiving on common fabrics. It is not universally forgiving.
The brands that genuinely leap ahead are the ones who treat hot peel as a craft, not just a shortcut. They know their fabrics, they maintain their equipment, and they run test presses as a standard part of their workflow rather than an afterthought. Mastering this one technique, done with real discipline, puts you ahead of competitors who are still guessing at their press settings.
Pro Tip: For unique or custom fabric colorways, especially deeply dyed or treated textiles, always run a full wash test after your first hot peel application before committing to a full production order.
Start using hot peel DTF transfers for stunning results
Finding a reliable source for hot peel DTF transfers is often the first real barrier for small apparel businesses. You need consistent film quality, accurate hot peel labeling, and transfers that actually behave the way the technique promises.

Transfer Kingz supplies premium DTF transfers specifically engineered for hot peel workflows, giving you the color vibrancy, adhesion strength, and film release consistency your production demands. Whether you are running a home-based custom apparel operation or a growing decoration shop, the quality of your transfer supplier directly impacts your finished product. For businesses in the region, custom DTF transfers in Dallas and DTF printing services in Texas are available with fast turnaround and no minimums, so you can test, prototype, and scale without committing to large upfront quantities. Upload your artwork, use the gang sheet builder for maximum efficiency, and get transfers that perform exactly as expected, every press.
Frequently asked questions
What is the difference between hot peel and cold peel DTF transfers?
Hot peel vs cold peel comes down to timing: hot peel lets you remove the film right after pressing, which speeds up production, while cold peel requires the transfer to cool fully before removal to bond correctly.
Which fabrics work best with hot peel transfers?
Hot peel works well on most cotton, polyester, and cotton-poly blends, but as the DTF transfer material types guide explains, specialty or heat-sensitive fabrics should always be tested first to confirm adhesion and finish quality.
How do you ensure a clean peel every time?
Press at the correct temperature (300°F to 315°F for most fabrics), maintain even pressure across the full platen, and peel the film in one smooth, consistent motion immediately after the press opens, as outlined in the guide for flawless apparel prints.
What should I do if colors look dull after peeling?
Dull colors typically mean the transfer was under-pressed, so increase your press time by 3 to 5 seconds, verify your temperature settings, and consider a second press with a protective sheet to restore vibrancy, which is a common fix documented in DTF transfer troubleshooting.
0 comments