
Getting consistent, high-quality results with DTF transfers can feel tricky when every design counts for your business. For independent creators and small clothing shops, mastering these methods means fewer wasted garments and happier customers around the world. This guide highlights the proper alignment of graphics and pressure so you can avoid common pitfalls, delivering garments that stand out with clear, lasting prints.
Table of Contents
- Step 2: Position and Arrange the DTF Transfer
- Step 3: Set and Adjust Heat Press Settings
- Step 4: Press and Apply the DTF Transfer
- Step 5: Peel and Finish for Lasting Results
- Step 6: Check Quality and Ensure Adherence
Quick Summary
| Key Message | Explanation |
|---|---|
| 1. Position Transfers Accurately | Properly aligning your DTF transfer ensures a professional appearance and prevents design misalignment. Take your time for the best result. |
| 2. Set Consistent Heat Press Settings | Use correct temperature and pressure to ensure the transfer bonds well and withstands washing. Document your ideal settings for future reference. |
| 3. Apply Even Pressure During Pressing | Maintain equal pressure across the entire transfer to avoid weak spots that could peel or crack later. This is crucial for a durable finish. |
| 4. Choose Between Cold and Hot Peel | Decide on cold or hot peel methods based on your comfort level and the design’s complexity for optimal results and durability. |
| 5. Conduct Thorough Quality Checks | Inspect your printed garment for adherence and visual issues to prevent customer complaints and ensure satisfaction with your work. |
…
Step 2: Position and Arrange the DTF Transfer
Now that your garment is prepped and ready, positioning your DTF transfer correctly is what separates a professional-looking print from one that looks off. This step determines whether your design lands exactly where you want it or ends up skewed and disappointing. Getting the placement right takes a bit of attention, but it’s absolutely worth the care you put in.
Start by laying your garment flat on your heat press platen or work surface. Smooth out any wrinkles in the fabric itself, paying special attention to the area where your design will land. Your transfer film comes printed with your design already mirrored, which means the image is reversed on the film and will flip back to normal once heat is applied. Take your printed DTF transfer and position it face down onto your garment, aligning it with your predetermined placement marks or measurements. This is where proper alignment of graphics directly impacts the final print’s sharpness and overall appearance. Use your hands to gently press and smooth the transfer film onto the textile, working from the center outward to eliminate any wrinkles or bubbles. If air pockets form underneath, use a squeegee or the edge of a card to push them out carefully. The film should make full contact with the garment fabric without gaps or lifted edges.
Once positioned, take a moment to visually confirm everything looks correct before you move to heat pressing. Double check that edges align with seams or hems if that’s part of your design intention, and that the transfer sits level and even. If something feels off, now is the time to adjust it. Using tools or platens to keep your garment steady during this phase prevents accidental shifting. You’re essentially creating the foundation for a perfect transfer, so patience here pays dividends in your final result.
Pro tip Keep a small ruler or measuring tape nearby to mark transfer placement on larger garments before positioning the film, ensuring consistency across multiple pieces and eliminating guesswork.
Step 3: Set and Adjust Heat Press Settings
This is where precision matters most. Getting your heat press temperature and pressure dialed in correctly determines whether your transfer bonds permanently to the garment or peels away after a few washes. The good news is that once you nail these settings, you can replicate them consistently across every single print you make.
Start by pre-pressing your garment before applying the transfer. Set your heat press to around 320 degrees Fahrenheit and press the blank garment for about 10 to 15 seconds with firm, even pressure. This step removes moisture from the fabric and smooths out any remaining wrinkles, creating an ideal surface for the transfer to adhere to. After pre-pressing, let the garment cool slightly but keep it on the platen so it stays flat. Now it’s time to apply the actual transfer. Close the heat press with your positioned DTF transfer still face down on the garment and set your temperature to 320 to 330 degrees Fahrenheit. The consistent heat and pressure across your entire print prevents peeling and ensures durability that lasts through countless washes. Set your timer for 20 to 30 seconds, depending on your specific press and fabric thickness. Thicker materials like sweatshirts may need the full 30 seconds, while lighter cotton tees might only require 20 seconds. Apply firm, even pressure throughout the pressing duration. Uneven pressure or heat creates weak spots where the transfer can later separate from the fabric.
When the timer sounds, carefully open your heat press and check that the transfer has fully bonded. The film should stick to the garment without peeling at the edges. If edges are lifting, you may need to increase temperature by 5 to 10 degrees or extend pressing time by a few seconds. Make notes of what works best for your specific equipment since every heat press behaves slightly differently due to age, brand, and calibration. Temperature consistency is what separates prints that last from prints that fail, so invest in a reliable heat press thermometer if you’re serious about quality.
Pro tip Create a simple laminated card showing your ideal temperature, pressure, and timing settings for different fabric types and file it next to your heat press so you never have to guess twice.
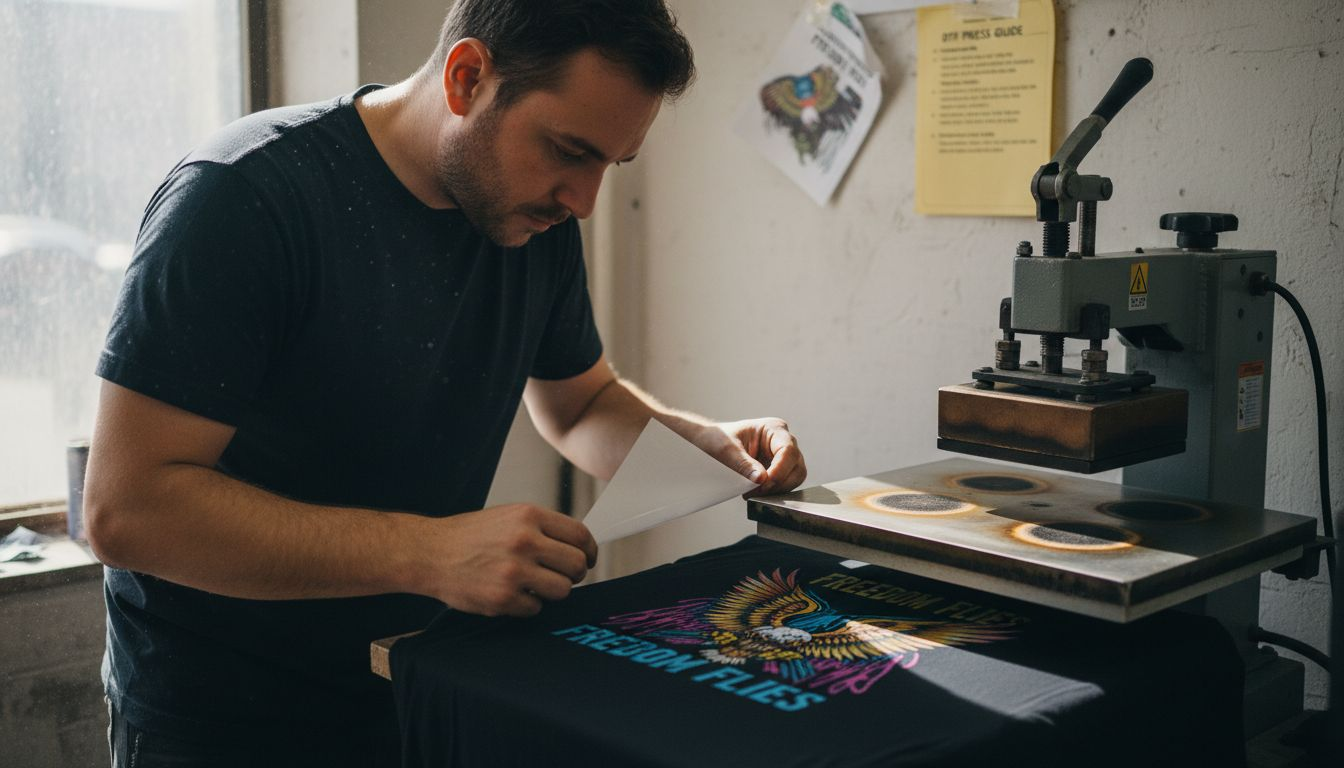
Step 4: Press and Apply the DTF Transfer
You’re at the moment of truth. Everything you’ve prepared leads to this single pressing action that bonds your design permanently to the garment. This is where the magic happens, where heat and pressure transform a loose film into a vibrant, durable print that will withstand washing and wearing for years to come.
With your garment positioned and your heat press settings locked in, it’s time to close the platen and apply pressure. Lower the heat press firmly and smoothly, making sure the entire transfer receives equal pressure from edge to edge. This is critical because uneven pressure creates weak spots where the design can later peel or crack. Once the platen closes, the heat press combines heat and pressure to fuse the thermoplastic powder and ink into the fabric. During this pressing stage, the thermoplastic coating on the transfer melts and bonds with the fabric fibers, creating a permanent union. Don’t open the press or shift the garment during the pressing cycle. Any movement disrupts this bonding process and compromises your final result. Simply let your timer count down and wait for the beep. When it sounds, you’re almost done.
Now comes the satisfying part. Carefully raise the platen and peel back the carrier film slowly and deliberately. Start from one corner and pull at a slight angle, watching as your design stays bonded to the garment instead of lifting away with the film. If any parts of the design lift with the film, immediately press it back down and apply heat for another 5 to 10 seconds. This rarely happens if your settings are correct, but it’s good to know the fix. Once the film is completely removed, inspect your print. The design should sit flat against the fabric with no bubbles, wrinkles, or lifted edges. Run your hand over it gently. It should feel smooth and integrated into the garment rather than sitting on top of it. Let the garment cool completely before handling it further or packaging it up.
Pro tip Allow your freshly pressed garment to cool for at least 30 minutes before washing or wearing it, giving the adhesive bond maximum time to fully cure and set permanently.
Step 5: Peel and Finish for Lasting Results
The carrier film has to come off, but how and when you remove it determines whether your print looks crisp or cloudy, smooth or cracked. This final separation is what reveals your actual finished product, and getting this right ensures your prints look professional and wear beautifully for years.
You have two peeling approaches to choose from, and each offers different advantages depending on your situation. Cold peel involves waiting 60 to 90 seconds after pressing for the garment to cool completely before removing the carrier film. This method prevents smudging and ensures better durability because the thermoplastic has fully set and hardened before you handle it. Start at one corner and peel slowly and deliberately, pulling the film back at a shallow angle rather than straight up. The cold peel approach prevents smudging and cracks that can happen when you rush the process. Hot peel, by contrast, means removing the film immediately while the transfer is still warm. This is faster but requires a delicate touch because the thermoplastic is still flexible and more prone to tearing on intricate design details. If you choose hot peel, work quickly but carefully, peeling at that same shallow angle. For beginners and anyone concerned about durability, cold peel is the safer choice and almost always produces superior results.
Here’s a quick reference comparing cold peel and hot peel methods in DTF printing:
| Peel Method | Best For | Key Advantages | Potential Drawbacks |
|---|---|---|---|
| Cold Peel | Beginners, complex designs | Prevents smudging, highest durability | Slower process, adds wait time |
| Hot Peel | Experienced users, simple shapes | Faster workflow, immediate results | Risk of smudging, less forgiving on details |
Once the carrier film is completely removed, take a moment to inspect your finished print. Run your hand across it gently. The design should feel smooth and integrated into the fabric, not raised or rubbery. Check for any incomplete areas where the film lifted too soon or any bubbles trapped beneath the surface. If you spot issues, you can sometimes reheat and press again, but prevention is always easier than fixing. Now let your garment sit undisturbed for at least 24 hours before you wear it, wash it, or package it for sale. This curing period allows the thermoplastic to fully stabilize and bond with the fabric at a molecular level, maximizing wash resistance and longevity. Your print will last through hundreds of washes when you allow proper curing time.
Pro tip Keep a cool, flat surface like a tile or marble countertop nearby for cold peel garments to rest on immediately after peeling, preventing any wrinkles or creases while the thermoplastic finishes setting.
Step 6: Check Quality and Ensure Adherence
Before you consider a print finished, you need to verify that your transfer actually bonded correctly and will stand up to real world wear. Quality checks catch problems while you can still fix them, protecting your reputation and your customer’s satisfaction. Think of this as your final inspection before the garment leaves your hands.
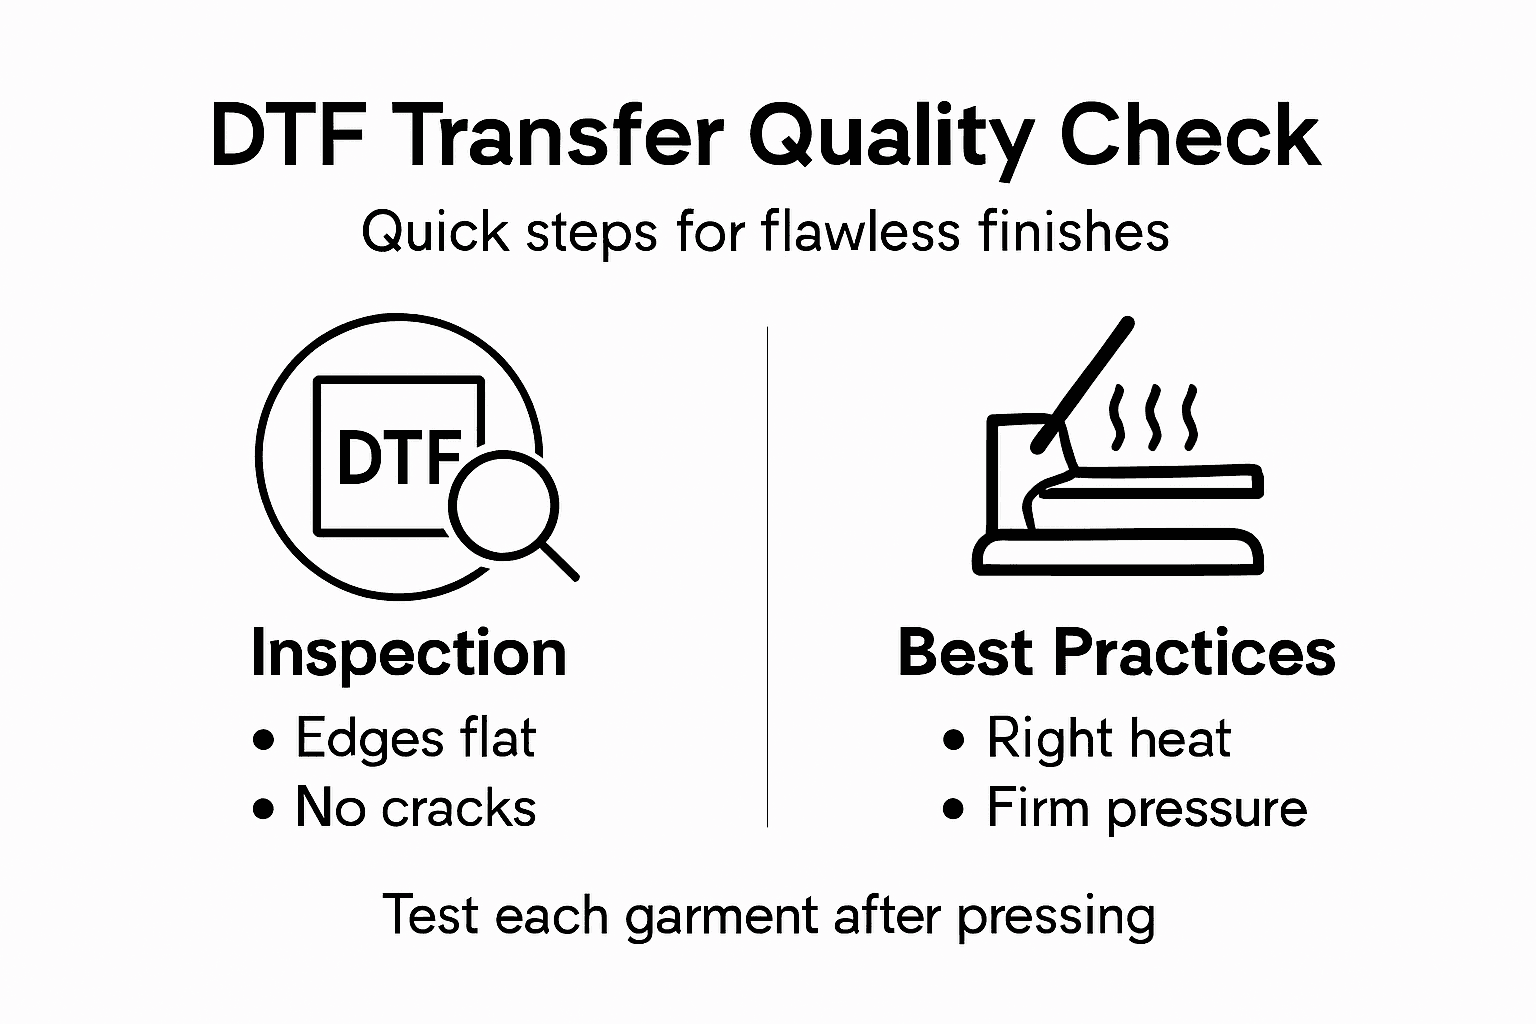
Start with a thorough visual inspection. Hold the garment up to good lighting and look for any areas where the design appears incomplete, faded, or transparent. Check the edges carefully, making sure the transfer bonded all the way to the boundaries without lifting or peeling. Run your fingers across the entire printed area and feel for bubbles, wrinkles, or raised edges where the thermoplastic didn’t fully integrate with the fabric. Look for any color inconsistencies or areas where the ink coverage appears thin. These visual checks catch the obvious problems immediately. Next, perform an adhesion test by grabbing a corner of the design and attempting a gentle peel test. Pull firmly but not aggressively on the edge of the transfer. It should not lift or separate from the fabric. Quality assurance in DTF printing involves verifying transfer quality post-application for adhesion strength, uniform coverage, and wash durability. If any part of your design peels away, your settings were incorrect and you need to adjust your temperature or pressure before producing more garments. This is exactly why test pieces matter.
Here is a summary of essential quality checks to ensure a lasting DTF print result:
| Quality Check | What to Look For | Tip to Fix Issues |
|---|---|---|
| Visual Inspection | Smooth, full-color design | Re-press if film lifts |
| Edge Adhesion | No lifting or peeling | Increase heat or time |
| Touch Test | Integrated, not rubbery feel | Adjust pressure setting |
| Color Consistency | Even, vibrant appearance | Check ink and press calibration |
Environmental conditions played a role in your success, so document what worked. Was the humidity high or low? Was your workspace warm or cool? These factors influence how thermoplastic bonds with different fabrics. Keep notes on your successful prints so you can replicate them consistently. If you’re producing multiple pieces, check every single one before packaging, especially when you’re new to DTF. This extra attention prevents customer complaints and builds trust in your work. Your quality standards today become the reputation you build tomorrow, one garment at a time.
Pro tip Document each successful print with photos and notes about temperature, time, pressure, and environmental conditions, creating a personal quality reference guide you can consult whenever you need to troubleshoot future batches.
Achieve Perfect DTF Transfers Every Time with Transfer Kingz
Applying flawless DTF transfers requires precision with temperature, pressure, and placement to avoid common challenges like peeling, bubbling, or misalignment. If you want to skip the hassle of trial and error and ensure consistent, vibrant prints that last, our DTF transfers offer premium quality films and inks designed for easy application and durable results. We understand how critical proper heat press settings and careful peeling are — that is why we provide detailed guides to support your success.

Explore how Transfer Kingz can help you master every step from positioning to peeling. Start your next project with confidence by visiting our main site today. For professionals and hobbyists ready to print without minimums or delays, our full custom printing supplies collection equips you with fast turnaround and reliable products. Don’t let application challenges hold you back — get the right materials now and print apparel that impresses with quality and longevity.
Frequently Asked Questions
How do I position my DTF transfer on a garment?
Start by laying the garment flat and smoothing out any wrinkles. Position the transfer face down, aligning it with your predetermined marks to ensure it sits level and even for the best print quality.
What temperature and pressure should I set for my heat press when applying DTF transfers?
Set your heat press to 320 to 330 degrees Fahrenheit with firm, even pressure. Pre-press the garment for about 10 to 15 seconds, then press the transfer for 20 to 30 seconds based on the garment’s thickness.
How can I tell if my DTF transfer has bonded correctly?
Perform a visual inspection to check for lifting edges or incomplete areas. Additionally, gently pull on a corner of the design; if it doesn’t lift, your transfer has bonded properly.
What are the differences between cold peel and hot peel methods, and when should I use them?
Cold peel involves waiting 60 to 90 seconds after pressing to remove the carrier film, which ensures durability without smudging. Hot peel is quicker but may risk lifting design details, so use cold peel for complex designs.
How can I improve the durability of my DTF prints?
Ensure proper temperature and pressure settings to achieve a strong bond. Wait at least 24 hours before washing or wearing the garment to allow the adhesive to fully cure, maximizing its longevity.
What should I do if my DTF transfer starts to lift or peel after application?
If any parts of your design lift, reheat and press the area for another 5 to 10 seconds with firm pressure. Adjust your temperature or pressure settings accordingly for future prints to avoid similar issues.
0 comments