
TL;DR:
- Creating efficient gang sheets minimizes film waste and reduces production costs by packing multiple designs onto one sheet. Using the right software, such as Canva for beginners or Illustrator for professionals, ensures precise layout, proper resolution, and compatibility with DTF printers. Planning and automating layout processes, along with reusing templates, significantly improve workflow speed, cost savings, and overall production efficiency.
Printing multiple designs separately wastes film, time, and money. If you’ve ever paid for a full sheet of DTF transfer film just to print one small logo, you already understand the problem. Knowing how to create gang sheets effectively changes that equation completely. A gang sheet, the term used in direct-to-film (DTF) and screen printing workflows, lets you pack multiple graphics onto a single sheet of film or paper, cutting costs and production time in one move. This guide walks you through the tools, steps, and strategies to build gang sheets that work.
Table of Contents
- Key takeaways
- How to create gang sheets effectively: the right tools
- Step-by-step process for building your gang sheet
- Common challenges and how to fix them
- Maximizing efficiency and cost savings
- My take on mastering gang sheet creation
- How Transferkingz supports your gang sheet workflow
- FAQ
Key takeaways
| Point | Details |
|---|---|
| Gang sheets reduce waste | Grouping multiple designs on one sheet minimizes film usage and lowers your cost per transfer. |
| Software choice matters | Beginners can start with Canva; advanced users get more control with Illustrator or integrated DTF tools. |
| Resolution and format are critical | Export at 300 DPI minimum in PNG with a transparent background to meet most DTF printer requirements. |
| Smart nesting saves setup time | Auto-arrange features in specialized tools optimize spacing so you use nearly every inch of film. |
| Reuse pays off | Saving gang sheet templates for repeat orders cuts layout time on future jobs significantly. |
How to create gang sheets effectively: the right tools
Before you touch a single design, you need the right software. The tool you pick shapes how fast you work and how well your layouts hold up under printer specs. Here is a breakdown of the most common options.
Adobe Illustrator is the go-to for professional apparel designers. Its precision controls, artboard sizing, and vector-based workflow handle high-resolution print files without quality loss. The learning curve is steep, but the control you get over spacing, alignment, and file output is unmatched for production-level work.
Adobe Photoshop works well for raster-based artwork like photography or detailed illustrations. If your designs are already in PSD format, building your gang sheet directly in Photoshop keeps everything in one place. The downside is that large canvases with multiple high-resolution layers can slow your system considerably.
Canva is the friendliest starting point for hobbyists and small business owners new to this process. Canva supports custom canvas sizes, element duplication, and alignment tools, giving you a practical gang sheet workflow without a design degree. It won’t replace Illustrator for complex production runs, but it gets the job done for smaller operations.
Specialized DTF software deserves its own mention. Platforms built specifically for DTF printing, like integrated printer ecosystems, combine design and print preparation in one tool, cutting the number of steps between layout and output. Some include Smart Nesting features that automatically arrange your graphics for maximum coverage. The top DTF gang sheet software options in 2026 have made this kind of automation far more accessible than it used to be.
| Tool | Best for | Key advantage | Limitation |
|---|---|---|---|
| Adobe Illustrator | Professional designers | Precision, vector control | Steep learning curve |
| Adobe Photoshop | Raster/photo-based art | Familiar for photo editing | Heavy on system resources |
| Canva | Beginners, hobbyists | Easy to use, accessible | Limited export options for print |
| Integrated DTF software | Production-focused shops | Smart Nesting, one-stop workflow | Tied to specific printer ecosystems |
Pro Tip: If you’re just starting out, use Canva to learn the logic of gang sheet layout. Once you understand spacing, margins, and resolution requirements, move to Illustrator or a dedicated DTF tool for production work. Jumping straight into complex software before you understand the basics wastes more time than it saves.
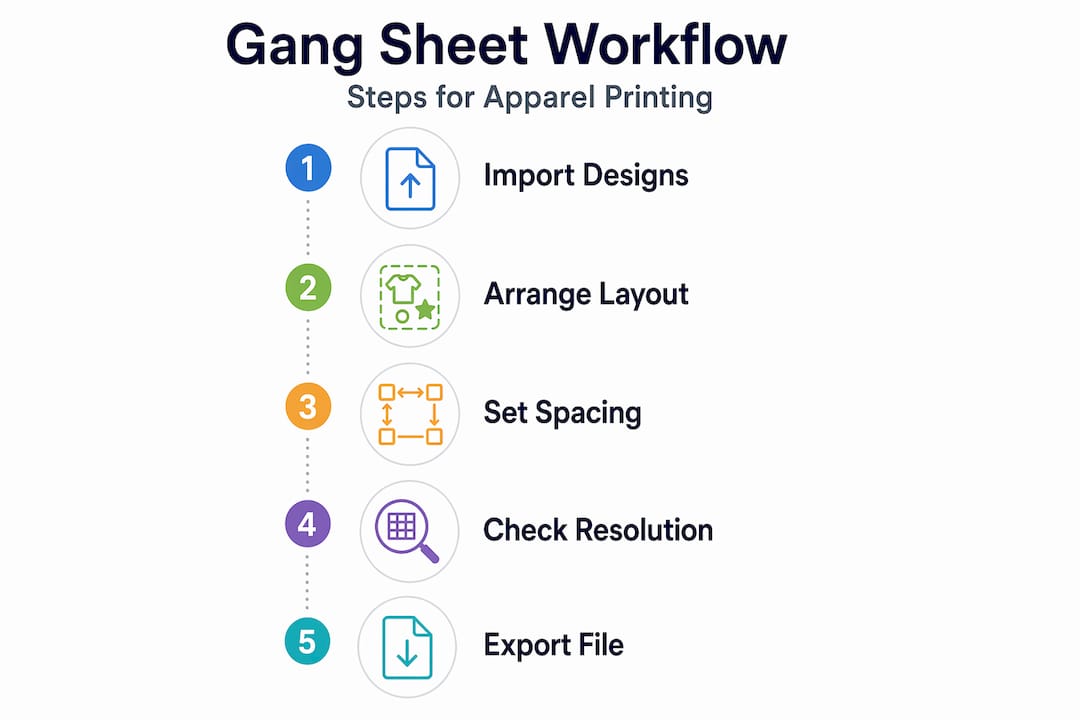
Step-by-step process for building your gang sheet
A clean workflow saves you from redoing layouts and catching errors at the printer. Follow these steps and you will avoid the most common mistakes.
-
Prepare your artwork first. Every design should be finalized before you open your gang sheet canvas. That means confirmed colors, correct sizing, and clean edges. Making design changes after you’ve arranged everything forces you to redo the layout.
-
Set your canvas size. Match it to your printer’s maximum film width. Common DTF film widths run 13 inches and 22 inches. Set your resolution to 300 DPI minimum. This is non-negotiable for sharp print output.
-
Arrange your designs strategically. Place larger designs first, then fill gaps with smaller graphics. Think of it like packing a suitcase: the big items go in first, small ones fill the corners. Leave at least 0.25 inches of spacing between designs to prevent transfer overlap during application.
-
Account for bleed and margins. Keep designs away from the sheet edges by at least 0.5 inches. Some printers have dead zones near the edges where ink coverage drops. Check your printer’s spec sheet before finalizing the layout.
-
Use alignment tools. Whether you’re in Illustrator or Canva, use the grid and snap-to-grid features. Eyeballing spacing creates inconsistencies that show up in the final product.
-
Export in the right format. PNG with a transparent background is the standard for DTF printing. Some printers also accept PDF or SVG. Always confirm the format with your print provider before sending files. Canva Pro handles transparent PNG export natively; free users may need a workaround.
-
Review before submitting. Zoom in to 100% and check every design edge, color, and spacing. What looks fine at 25% zoom often reveals problems at full scale.
Here is a detailed gang sheet creation workflow that walks through each of these stages with apparel-specific examples.
Pro Tip: Group your designs by application size on the garment, not just by how they fit on the sheet. A 4-inch chest logo and a 12-inch back print may both fit on the same sheet, but pressing them at the same time gets complicated if they go on different garment locations. Organize for your production workflow, not just for space.
Common challenges and how to fix them
Even with a solid process, gang sheet creation throws curveballs. Here are the problems that come up most and how to handle them.
File size and software crashes are the most frustrating issue. Large gang sheet designs can crash browser-based tools like Canva or slow down even capable computers. The fix is straightforward: work in smaller sections, save frequently, and clear your browser cache if you’re working online. Desktop applications handle large files better than browser tools.
Overlapping designs happen when you rush the layout. Use snap-to-grid and set explicit spacing rules before you start placing anything. A consistent 0.25-inch gap between all designs prevents overlap and makes cutting easier after transfer application.
Poor print quality often traces back to low-resolution source files. If a design looks soft or pixelated at 300 DPI on screen, it will print that way too. Always source or create artwork at print resolution from the start.
Export and compatibility problems catch people off guard. A file that looks correct in Canva may export with a white background instead of transparency, which creates white boxes around your transfers. Test your export settings on one design before committing to a full sheet.
Best practices to keep your workflow clean:
- Save your working file and a flattened export version separately
- Keep a folder of print-ready individual designs at 300 DPI so you always have clean source files
- Label your canvas layers by design name, not generic labels like “Layer 1”
- Run a pre-flight check against your printer’s spec sheet before every submission
- Use desktop software for sheets larger than 22 inches wide to avoid performance issues
Maximizing efficiency and cost savings
This is where gang sheets go from a nice practice to a real business advantage. Gang sheets cut costs by reducing film waste, minimizing setup time, and letting you print more variety per run. When print services charge by the square foot, every unused inch of film is money left on the table.
Smart Nesting is the feature that makes this practical at scale. Auto-arrange tools in specialized DTF software analyze your designs and pack them with minimal white space between them. What used to take 20 minutes of manual layout gets done in seconds. Some tools even notify you when additional sheets are needed, which helps with order planning for larger jobs.
Storing and reusing gang sheet templates is an underused strategy. If you run recurring orders, save your completed gang sheet as a template. The next time that order comes in, you open the file, confirm specs, and submit. This approach, paired with production optimization tactics, can cut turnaround time on repeat orders by more than half.
| Workflow | Material use | Setup time | Cost per design |
|---|---|---|---|
| Individual design printing | High waste, one design per sheet | Longer per order | Higher |
| Manual gang sheet layout | Moderate waste, multiple designs | Moderate setup time | Moderate |
| Smart Nesting gang sheet | Minimal waste, maximum coverage | Minimal after initial setup | Lowest |
For small businesses handling multiple client orders simultaneously, gang sheets also reduce the number of print runs. Combining designs from two or three small orders onto one sheet means one press run instead of three. That math compounds quickly when you’re managing DTG printing order management across a growing client base.
My take on mastering gang sheet creation
I’ve watched a lot of small apparel businesses get hung up on gang sheets for the wrong reason. They focus on the technical details, the exact pixel spacing, the software settings, and miss the bigger picture. The real skill is thinking about your gang sheets as a production tool, not just a layout task.
What I’ve learned working with print workflows is that the biggest efficiency gains come from standardizing your process before you automate it. Rushing into Smart Nesting without clean, consistently sized source files just automates a mess. Once you lock in your file prep standards and your canvas dimensions, the automation does its job and you stop touching the same problems over and over.
The other thing that took me a while to figure out: gang sheets reward planning at the order intake stage, not at the layout stage. When you know in advance what sizes and quantities are coming in, you can batch similar orders and fill sheets more efficiently. That upstream thinking is what separates shops that break even on print costs from ones that actually grow margins over time. If you want to go deeper on the comparison between manual and automated methods, the DTF gang sheet overview from Transferkingz covers this well.
— Anthony
How Transferkingz supports your gang sheet workflow
Knowing the process is one thing. Having a reliable print partner who handles the output end makes the whole system work.

Transferkingz specializes in custom DTF transfers that are built for gang sheet workflows. Whether you’re submitting a fully packed sheet of small designs or a single large graphic, Transferkingz delivers sharp, vibrant transfers with quick turnaround and no minimum order requirements. That flexibility matters when you’re testing new designs or fulfilling small client runs. Their platform also supports direct file uploads, so your gang sheet goes straight from your design software to production without friction. If you have questions about file specs or format requirements, their support team has the answers you need to get it right the first time.
FAQ
What is a gang sheet in DTF printing?
A gang sheet is a single film sheet that holds multiple designs arranged together for one print run. It reduces film waste and production time compared to printing each design separately.
What resolution should my gang sheet be?
Use 300 DPI minimum for all DTF gang sheets. Lower resolution files print with visible softness or pixelation, especially on small or detailed graphics.
What file format works best for DTF gang sheets?
PNG with a transparent background is the preferred format for most DTF printers. Some providers also accept PDF or SVG, so always confirm with your print partner before submitting.
How much space should I leave between designs on a gang sheet?
Leave at least 0.25 inches between each design to prevent overlap during transfer application and to make cutting easier. Keep all designs at least 0.5 inches from the sheet edges.
Can beginners create gang sheets without professional design software?
Yes. Canva supports custom canvas sizes and alignment tools that make gang sheet creation accessible for beginners. It handles most small-scale production needs without requiring professional design experience.
Recommended
- Step-by-step guide to gang sheet creation for custom apparel – Transfer Kingz
- Optimize your apparel production with gang sheets in 2026 – Transfer Kingz
- What is a gang sheet? Save costs & boost apparel printing – Transfer Kingz
- Advantages of Gang Sheet Printing for Apparel Businesses – Transfer Kingz
0 comments