
TL;DR:
- DTF printing provides vibrant, detailed, and durable custom apparel results.
- Proper file preparation, material choice, and workflow are essential for quality prints.
- Small batch DTF allows easy iteration and refinement for brand growth.
You want sharp, professional custom apparel for your brand, but the results keep falling short. Blurry prints, washed-out colors, peeling transfers after a few washes — it’s a frustrating cycle that costs you time and money. The good news is that DTF printing delivers detailed, vibrant designs that solve the most common issues with older methods, and you don’t need a design degree or a production facility to get there. This guide walks you through every step, from gathering your tools to reviewing your finished garments, so you can launch custom apparel that actually looks the way you imagined it.
Table of Contents
- What you need to get started with custom apparel design
- Designing artwork for custom apparel: Step-by-step
- Choosing the best printing method: DTF vs alternatives
- Avoiding common mistakes and troubleshooting design-to-print
- From design to delivery: what to expect
- The critical mindset shift: Treating your apparel designs like digital products
- Start your custom apparel journey with trusted DTF transfer experts
- Frequently asked questions
Key Takeaways
| Point | Details |
|---|---|
| DTF delivers pro results | Direct-to-film transfers make it easy to achieve sharp, vibrant custom apparel prints. |
| Design prep is crucial | Proper file formats and high-res graphics help prevent print issues and ensure brand consistency. |
| Choose the right materials | Fabric and transfer quality directly impact durability and final look of your custom clothing. |
| Expect quick turnaround | With correct prep, most DTF orders can be produced and shipped in a week or less. |
| Iterate your designs | Testing, feedback, and small production runs help refine your creations for better long-term results. |
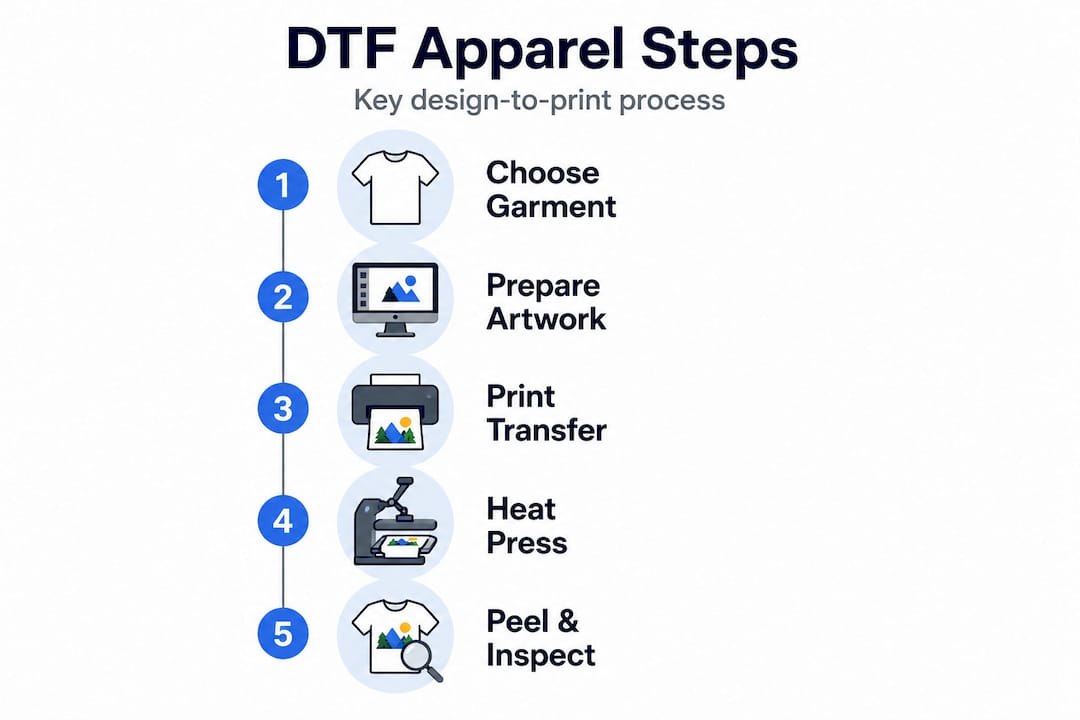
What you need to get started with custom apparel design
Before you open a design program or place a single order, you need the right foundation. Skipping this step is the number one reason beginners end up with disappointing results.
Hardware and physical materials
At minimum, you need a heat press (not a household iron), blank garments, and either a DTF-capable printer or access to a DTF transfer service. A quality heat press applies consistent pressure and temperature, which is non-negotiable for adhesion. If you’re ordering pre-printed DTF transfers rather than printing in-house, you can skip the printer entirely and focus on your blanks.
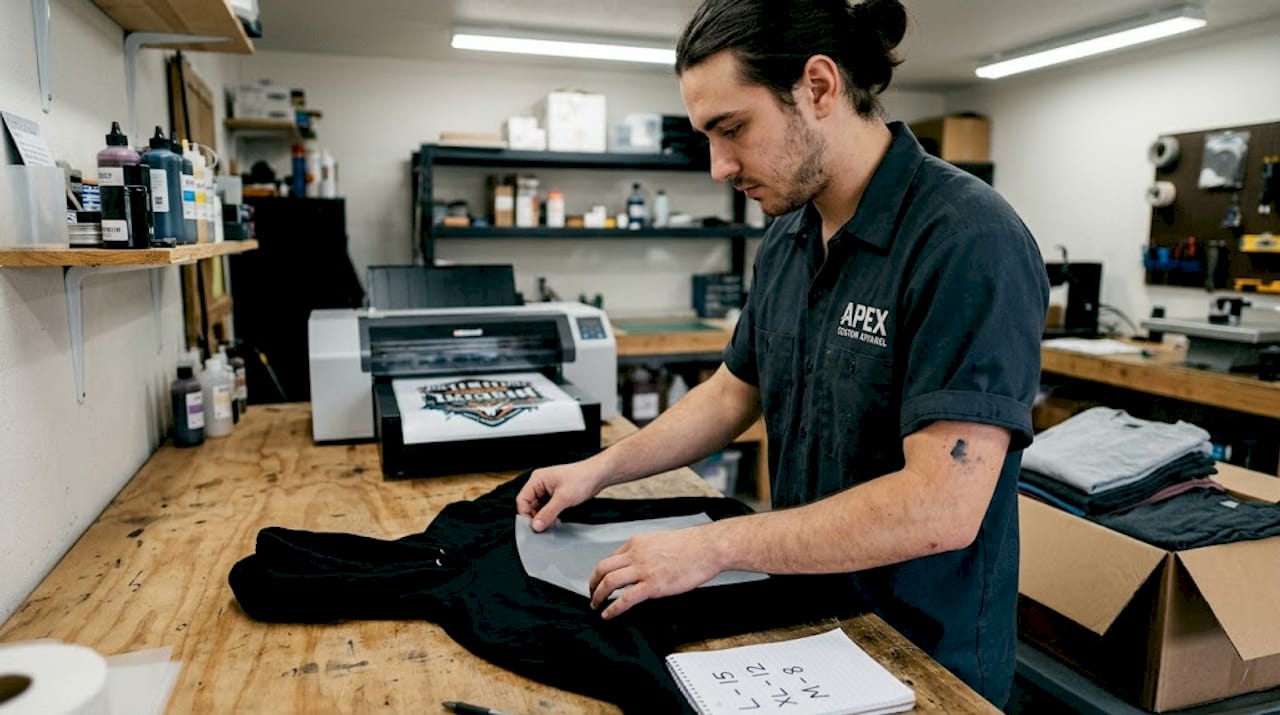
When it comes to best fabrics for DTF printing, cotton and cotton-poly blends (50/50 or 60/40) perform best. Pure polyester works, but it requires lower press temperatures to avoid scorching. Avoid heavily textured fabrics for your first runs because uneven surfaces cause transfer gaps.
Software and file tools
For design software, you have two main categories:
- Vector programs (Adobe Illustrator, CorelDRAW, Affinity Designer): Best for logos, text, and clean graphics. Files scale without quality loss.
- Raster programs (Adobe Photoshop, GIMP): Best for photo-based art and complex textures. Must be set to at least 300 DPI at print size.
Summary table: tools matched to design goals
| Design goal | Recommended software | File format | Notes |
|---|---|---|---|
| Logo or brand mark | Adobe Illustrator | AI, SVG, PDF | Infinite scalability |
| Photo-realistic art | Adobe Photoshop | PNG (300 DPI) | Transparent background |
| Text-heavy design | Affinity Designer | PDF, SVG | Outline all fonts |
| Beginner-friendly | Canva (export PNG) | PNG (300 DPI) | Check resolution before export |
Proper choosing transfer films matters just as much as your design file. Cold-peel films give you a matte finish; hot-peel films are faster to apply. Your fabric type and desired finish should drive that choice. Selecting the right fabric and transfer film is critical for vibrant, durable prints, so don’t treat it as an afterthought.
Pro Tip: Order a sample pack of blank garments from at least two suppliers before committing to bulk. Press one transfer on each and wash it three times. The one that holds color and shape wins your business.
Designing artwork for custom apparel: Step-by-step
Once you’ve gathered the right tools and supplies, it’s time to bring your design to life. Here’s how to do it step by step.
Step 1: Define your concept and placement
Start with a clear brief, even if you’re the only one reading it. Write down the target garment (t-shirt, hoodie, tote), the placement (left chest, full front, sleeve), and the approximate print size. Placement affects everything from file dimensions to how you center the transfer during pressing.
Step 2: Build your artwork at the correct resolution
Open your design at the exact print size, not a scaled-down version you plan to enlarge later. For raster files, set the canvas to 300 DPI. For vector files, confirm your artboard matches the intended print dimensions. This is where most beginners go wrong, and it’s an easy fix when caught early.
Step 3: Set your color profile
DTF printers typically use CMYK color output, but many design programs default to RGB. Work in RGB if your service provider converts on their end, but confirm this with them first. Colors like neon orange and electric blue can shift significantly between RGB and CMYK, so always request a color proof before a full run. The DTF print workflow guide covers color settings, file formats, and resolution in detail, and it’s worth bookmarking.
Step 4: Add a transparent background and check bleed
DTF transfers print on clear film, so your background must be transparent (not white). Export as PNG with a transparent background. If your design has elements that go to the edge of the print area, add 1/8 inch of bleed to prevent white borders after pressing.
Step 5: Proof and export
Before you send anything to print, zoom into your design at 100% on screen. Check for pixelation, font rendering issues, and color accuracy. Then export as a high-resolution PNG or PDF. Following DTF printing tips at this stage prevents expensive reprints. Proper file formats, color settings, and artwork resolution are key to ensuring your design prints correctly on apparel.
Pro Tip: Create a digital mockup by placing your design on a garment photo using Photoshop or a free tool like Placeit. Seeing it on an actual shirt silhouette catches alignment and proportion issues that flat files hide.
Choosing the best printing method: DTF vs alternatives
With your design ready, the next critical decision is how to bring it to life on fabric. Here’s how DTF compares to other methods.
Method comparison table
| Method | Print quality | Cost for small runs | Learning curve | Fabric compatibility |
|---|---|---|---|---|
| DTF | Excellent, full color | Low, no minimums | Moderate | Most fabrics |
| DTG (Direct-to-Garment) | Excellent on cotton | Moderate | High | Cotton only |
| Sublimation | Vibrant, but limited | Low | Moderate | Polyester only |
| Screen printing | High, but limited colors | High (setup fees) | High | Most fabrics |
“DTF offers greater versatility and intricate detail compared to other methods such as sublimation or screen printing, making it the standout choice for independent designers working with multi-color artwork and mixed fabric types.”
When DTF is the clear winner
DTF printing is specifically built for situations where other methods struggle:
- You need full-color, photorealistic, or gradient-heavy designs
- Your order quantity is small (even a single piece)
- You’re printing on dark garments without a white underbase step
- You want to print on cotton, blends, nylon, or canvas in the same run
Comparing inkjet vs DTF printing shows that standard inkjet transfers fade faster and lack the adhesion strength of DTF films. And if you’re still weighing options, reviewing the types of t-shirt printing available gives you a complete picture of where each method fits in a real production workflow.
Avoiding common mistakes and troubleshooting design-to-print
Choosing the right printing method sets the stage for quality. Now, here’s how to make sure your designs actually look and last as intended.
The top 5 mistakes and how to fix them
- Resolution too low: Anything below 300 DPI at print size will look soft or pixelated on fabric. Fix: Always confirm DPI before exporting, not after.
- Colors look different on the garment: Screen colors and print colors are not the same. Fix: Request a printed color proof or use a CMYK-calibrated monitor.
- Print not centered: Eyeballing placement is unreliable. Fix: Use a ruler or alignment tool to measure from the collar and side seams before pressing.
- Transfer peeling after washing: Usually caused by insufficient press time, temperature, or pressure. Fix: Follow the transfer supplier’s exact press settings and test wash one piece before the full run.
- Wrong garment type: Heavily textured or moisture-wicking fabrics repel adhesion. Fix: Stick to recommended fabric types and always test a swatch first.
Quality DTF transfers dramatically reduce failed prints and misalignments compared to older transfer methods, but even the best transfer can fail if the press settings or fabric are wrong. The DTF design process outlines exactly how to set up your workflow to catch these issues before they become waste.
A stat worth knowing: Shops that switch to high-fidelity DTF transfers report a significant drop in reprint requests, with many seeing failed print rates fall by more than half compared to iron-on or inkjet transfer methods.
Pro Tip: Always press a test swatch on the same fabric as your production run before pressing the full batch. A single test piece takes two minutes and can save an entire order from going to waste.
From design to delivery: what to expect
Even with sharp design and careful production, it pays to know what happens after your job is submitted and how to confirm quality upon delivery.
Typical production timeline
| Stage | Estimated time | Notes |
|---|---|---|
| File review and approval | 1 business day | Faster with correct file formats |
| Transfer printing | 1 to 2 business days | Depends on order size |
| Shipping | 2 to 5 business days | Varies by location and carrier |
| Total (standard) | 4 to 8 business days | Rush options may be available |
Well-prepared digital files and proper material selection help ensure timely delivery and better print consistency. Submitting a clean, correctly formatted file on the first try is the single biggest factor in keeping your timeline on track.
How to review your shipment before final approval
- Open the package in good lighting and lay garments flat on a clean surface.
- Check color accuracy against your digital proof or mockup.
- Inspect edges of the transfer for lifting, bubbling, or incomplete adhesion.
- Measure placement against your original design specs (collar distance, center alignment).
- Wash one piece inside out on a gentle cycle, then check for fading or peeling before approving the full batch.
Understanding how DTF printing works at each stage helps you ask the right questions and spot issues early, before they turn into a costly reorder.
The critical mindset shift: Treating your apparel designs like digital products
Here’s something most guides won’t tell you: the biggest difference between designers who build successful apparel brands and those who stay stuck isn’t skill. It’s how they think about the design process itself.
Most newcomers treat a custom apparel design as a finished product the moment it ships. They pick a design, press it, sell it, and move on. But the most successful small apparel brands treat every design like a software launch, something that gets tested, measured, iterated, and improved over time.
Think about it this way. A small streetwear brand might launch five colorways of the same graphic. One colorway outsells the others three to one. A one-and-done mindset loses that data. An iterative mindset uses it to inform the next drop, adjusting colors, placement, and even garment style based on what customers actually responded to.
The same logic applies to your print quality. If a design gets complaints about fading after washing, that’s feedback, not failure. It tells you to revisit your press settings, your fabric choice, or your film selection. Following DTF apparel tips as a living checklist rather than a one-time read is exactly this mindset in practice.
Small batch DTF printing makes iteration affordable. You can test a new design in quantities as low as one piece, gather real-world feedback, and refine before scaling up. That’s a massive advantage over screen printing, where setup costs force you to commit to large quantities before you know if the design works.
The brands that grow fastest are not the ones with the most talent. They’re the ones who treat every order as a learning opportunity and use that knowledge to make the next run better than the last.
Start your custom apparel journey with trusted DTF transfer experts
If you’re ready to put your new knowledge to work, partnering with DTF print specialists ensures your designs are production-ready and shop-worthy.

Transfer Kingz makes it straightforward for small businesses and independent designers to get professional results without the complexity. Whether you’re launching your first collection or scaling an existing line, you get access to high-quality transfers with no minimum order requirements, fast turnaround times, and premium inks that hold up wash after wash. The gang sheet builder lets you maximize every print run, and if you’re local, DTF transfers in Dallas are available with even faster options. Upload your artwork, choose your specs, and let the experts handle the rest so you can focus on building your brand.
Frequently asked questions
What kind of files work best for DTF apparel designs?
Vector files (AI, PDF, SVG) or 300 DPI PNGs with transparent backgrounds are ideal for the sharpest DTF prints. As the DTF Print Workflow Guide confirms, proper file formats, color settings, and artwork resolution are key to ensuring your design prints correctly on apparel.
How do you prevent custom prints from peeling or fading?
Choose high-quality DTF films and fabrics, and wash garments inside out on a gentle cycle to maximize longevity. Selecting the right fabric and transfer film is critical for vibrant, durable prints that hold up over time.
Is DTF printing more cost-effective than screen printing for small runs?
Yes, DTF is more budget-friendly for small batches since it doesn’t require screens or extensive setup costs. DTF offers greater versatility and intricate detail compared to screen printing, making it the smarter choice for limited runs.
How long does it take to receive my custom DTF apparel?
Once artwork is finalized and approved, most DTF orders are shipped within 3 to 7 business days. Well-prepared digital files and proper material selection help ensure timely delivery and better print consistency.
Can DTF handle very detailed or colorful designs?
DTF printing excels at intricate, multicolor designs and gradients, outperforming most older print methods. DTF’s greater versatility and intricate detail make it the top choice for designs that would be impossible or prohibitively expensive with sublimation or screen printing.
0 comments