

TL;DR:
- Validating one niche and testing designs with print-on-demand or DTF transfers enables a profitable merch business.
- Following a 90-day roadmap from foundation to scaling helps gather real sales data and prove demand before large investments.
You can launch a profitable merch business by validating one niche, testing several designs with print-on-demand or DTF transfers, and following a short MVP plan. Most sellers reach their first sale within 2–8 weeks; consistent income ($500+/month) usually takes 3–6 months of active listing and optimization. Budget paths range from $0 upfront (using pure print-on-demand through a platform like Printful), to a $500 path covering samples and a Shopify Basic store, up to $5,000 for a professional launch with paid ads and initial bulk inventory. For small-run quality testing before you commit to bulk, Transferkingz DTF transfers let you order single sheets with no minimum.
Your first three moves:
- Pick one niche and write down the specific person you are designing for.
- Create several designs (or brief a designer) and order physical samples to check color and fit.
- List on a POD platform or order a small DTF run, then drive traffic and measure what sells.
Table of Contents
- How to start a merch business: your step-by-step roadmap
- How do you validate a niche before spending money on inventory?
- Which production model is right for your stage?
- Which print method gives you the best quality for the money?
- How do you build a brand and handle design rights?
- How do you price merch to actually make money?
- Where should you sell your merch?
- What does a 90-day marketing plan look like for a new merch brand?
- What legal and admin steps do U.S. merch sellers need to complete?
- How does fulfillment actually work for small merch sellers?
- What mistakes do new merch sellers make, and how do you scale past them?
- Key Takeaways
- The part most guides skip about starting a merch business
- Transferkingz: quality small-run DTF transfers with no minimum order
- Useful sources and resources
How to start a merch business: your step-by-step roadmap
Think of the first 90 days as four phases. Each one has a clear deliverable, so you always know whether you are on track or stalling.
Phase 1: Foundation (Days 1–14)
- Choose your niche and audience. Write one sentence describing your buyer: who they are, what they care about, and why they would wear or use your product.
- Research competitors. Browse Etsy, Amazon Merch, and niche subreddits. Note which designs sell, which price points repeat, and where gaps exist.
- Select your first 3–5 product types. Custom t-shirts, sweatshirts, and mugs are consistently the top-performing POD categories. Start there unless your niche clearly points elsewhere.
- Pick a production model. POD for zero inventory risk; DTF transfers for small-run quality control; bulk for proven SKUs after validation. More on this in the production section below.
- Create or commission 5 designs. Request layered SVG or AI source files from any hired designer.
Deliverable: niche defined, 5 designs ready, production model chosen.
Phase 2: Soft launch (Days 15–30)
- Build a minimal store — A Shopify Basic store or an Etsy shop takes less than a day to set up.
Deliverable: store live, first sample in hand, preorder or email list started.
Phase 3: Public launch (Days 31–60)
- Go live with your full listing catalog.
- Launch a small paid ad test ($5–$10/day on Meta or Pinterest) to validate click-through and conversion.
- Reach out to 5–10 micro-influencers in your niche for gifting or affiliate deals.
- Collect your first 30-day sales data: units sold, conversion rate, average order value, and return rate.
Deliverable: first sale recorded, 30-day data set started.
Phase 4: Iterate and scale (Days 61–90)
- Double down on the 1–2 designs that sold. Order a larger DTF run or move to bulk for proven winners.
- Cut or redesign anything with zero sales after 60 days.
- Add one new product category based on customer feedback or data.
- Review margins and adjust pricing if needed.
Deliverable: proven SKUs identified, scale decision made.
| Phase | Days | Critical milestone |
|---|---|---|
| Foundation | 1–14 | Niche defined, 5 designs ready |
| Soft launch | 15–30 | Samples ordered, store live |
| Public launch | 31–60 | First sale, 30-day data collected |
| Scale | 61–90 | Proven SKUs scaled, catalog expanded |
How do you validate a niche before spending money on inventory?
Skipping validation is the most common mistake new merch sellers make. The fix is cheap and fast: test demand before you touch inventory.
Validation checklist:
- Audience interviews. Talk to 5–10 people in your target community (Discord servers, Facebook groups, Reddit threads). Ask what merch they already own and what they wish existed.
- Micro-surveys. A 3-question Google Form shared in a niche community takes 20 minutes to build and can return 50+ responses in 48 hours.
- Landing page test. Build a one-page site with a product mockup and an email capture. A 1% or higher conversion rate on cold traffic signals real demand.
- Preorders. Collect payment before you produce. If nobody buys at your target price, the design or niche needs work.
- Low-budget ad test. Run $50 on Meta or Pinterest targeting your niche. Track click-through rate and cost per click as early signals.
| Validation metric | Healthy benchmark | What it tells you |
|---|---|---|
| Landing page conversion | 1%+ | Enough demand to justify production |
| Ad click-through rate | 1.5%+ | Creative and targeting are working |
| Cost per acquisition (first buyers) | $10–$30 | Unit economics are viable |
| Preorders in 7 days | 10+ | Strong product-market fit |
| Email list signups | 50+ in 2 weeks | Audience exists and is reachable |
Merch succeeds when it connects with a specific audience rather than offering generic products. A design that resonates with competitive trail runners will outsell a generic “run” graphic every time, even at a higher price.
Pro Tip: Order a small DTF run or a single POD sample before you finalize your listing photos. Color on screen and color on fabric are rarely identical, and a sample catches sizing issues that cost you returns later. Transferkingz ships with no minimum order, so a one-sheet test costs almost nothing.
You can also sell custom merch without holding inventory by combining a POD listing with a DTF sample for photography, giving you real product images without committing to stock.
Which production model is right for your stage?
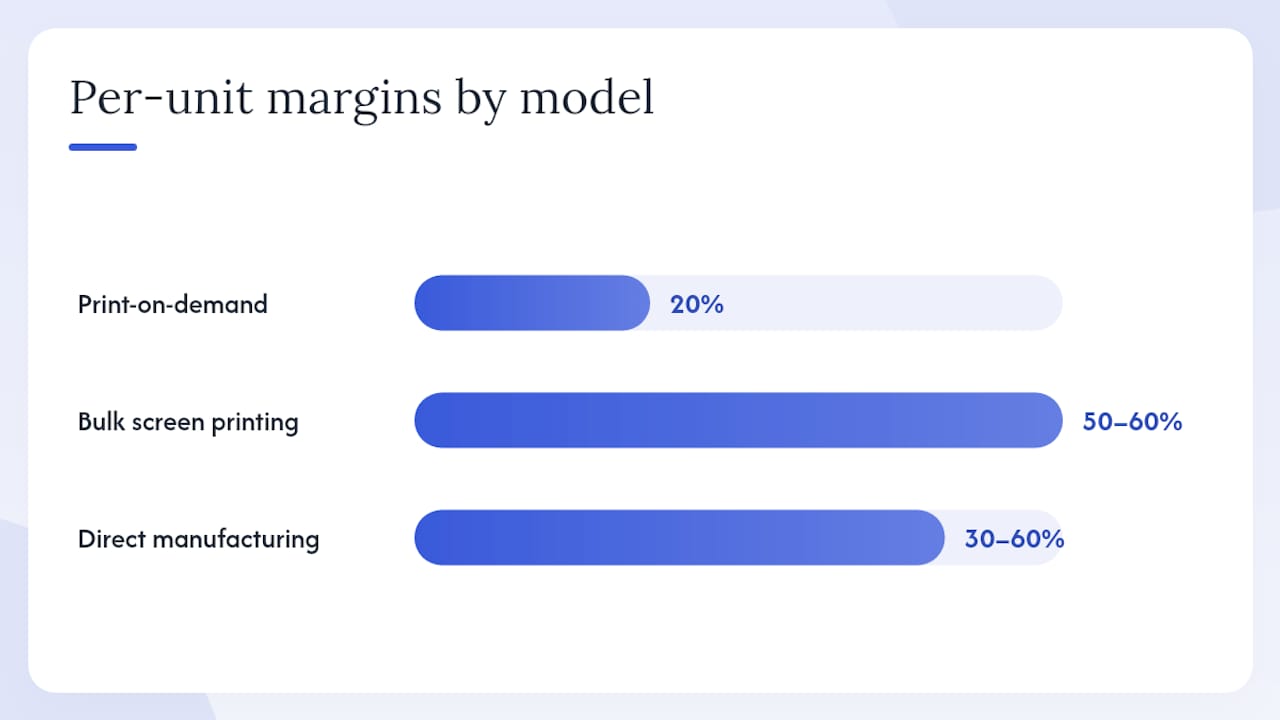
There are three main production models: print-on-demand, bulk inventory, and direct manufacturing, and each suits a different stage of growth. Most new sellers should start with POD or small-run DTF transfers, then graduate to bulk only after demand is proven.
| Model | Best for | Upfront cost | Per-unit margin | Fulfillment speed | Customization | MOQ | Platform integrations |
|---|---|---|---|---|---|---|---|
| Print-on-demand (e.g., Printful) | Testing, zero inventory | $0 | 20% | 3–7 days | Good (standard products) | None | Shopify, Etsy, Amazon |
| DTF transfers (e.g., Transferkingz) | Small runs, quality control, samples | Low ($20–$100/sheet) | — | 1–3 days | Excellent (any design, any fabric) | None | Any workflow |
| Bulk screen printing | Proven SKUs, volume | $500 | 50–60% | 3–7 days | Limited (fewer colors) | 72 pcs | Manual or 3PL |
| Direct manufacturing | High annual volume | $5,000+ | 30–60% | several weeks | Full | 100–500 pcs | Custom |
Partner evaluation checklist:
- Order a sample before committing to any provider (recommended practice).
- Confirm turnaround time in writing, not just on the website.
- Check shipping regions and rates for your customer base.
- Read the returns policy for misprints and damaged goods.
- Verify integration with your storefront (Shopify app, API, or manual CSV).
Printful integrates directly with Shopify and handles fulfillment automatically, which makes it the lowest-friction POD starting point. Shopify, meanwhile, gives you full brand control, email list ownership, and the ability to add any production workflow as you scale. Transferkingz fits the gap between those two: when you need better print quality or a custom design on a specific blank that POD providers do not stock, a small DTF run lets you produce exactly what you want without a large minimum order.
For a deeper look at how merchandise customization options compare across print methods, Transferkingz breaks down the practical trade-offs for small businesses.
Which print method gives you the best quality for the money?
The print method you choose affects color vibrancy, wash durability, per-unit cost, and which fabrics you can use. Getting this wrong early means reprinting, refunds, and unhappy customers.
| Method | Print quality | Color vibrancy | Wash durability | Ideal fabrics | Min. order | Per-unit cost range |
|---|---|---|---|---|---|---|
| DTF (Direct-to-Film) | Excellent | Very high | 50+ washes | Cotton, poly, blends, nylon | None | — |
| DTG (Direct-to-Garment) | Very good | High | 30–50 washes | 100% cotton preferred | None | $5–$15 |
| Screen printing | Excellent | Very high | 50+ washes | Cotton, cotton blends | 72 pcs | $3–$10 (at volume) |
| Heat transfer (vinyl) | Good | Moderate | — | Cotton, poly | None | $1–$5 |
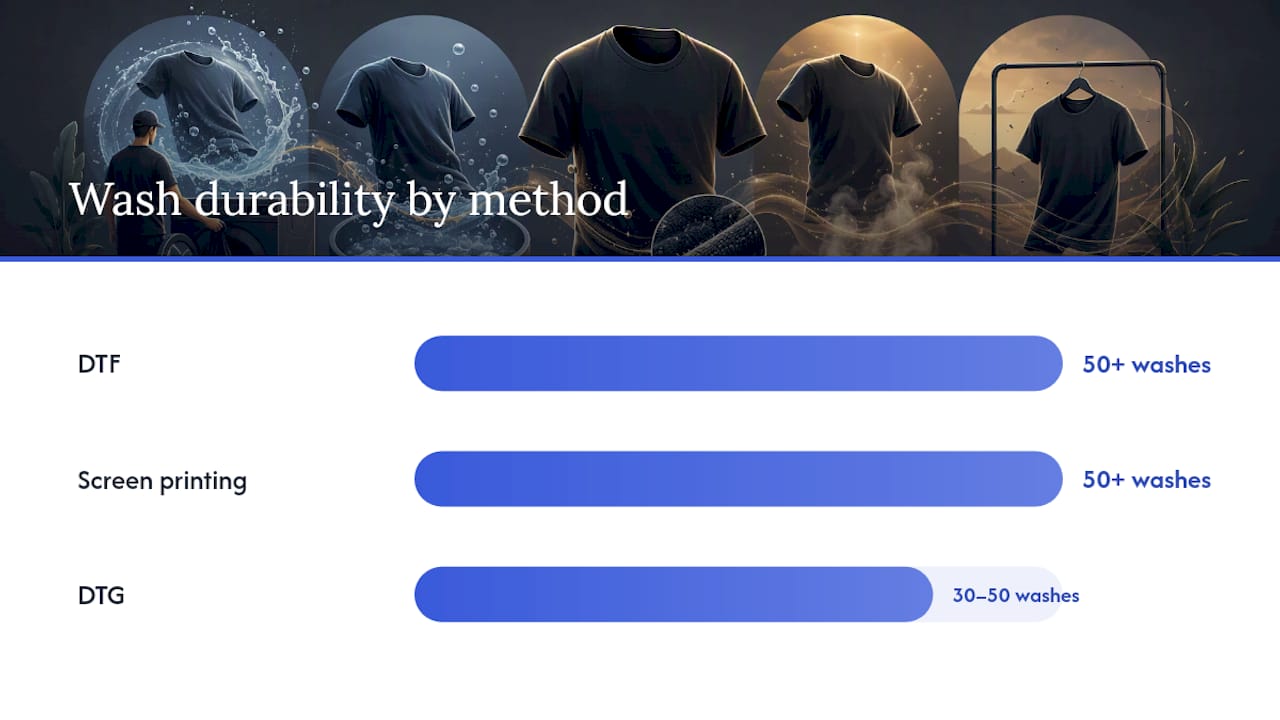
DTF transfers stand out for small runs because they handle full-color, photographic designs with no color-separation setup cost. Screen printing beats DTF on per-unit cost at volume (typically 72+ pieces), but requires color separations and a white underbase on dark garments, which adds setup time and cost. DTG is excellent on 100% cotton but struggles on polyester blends, producing muted colors without a pretreatment step.
For new sellers, the practical rule is: use DTF or POD for your first 1–60 units, then evaluate screen printing once a design has proven demand at scale. DTF printing offers cost-effective merch production precisely because it eliminates setup fees and minimum runs that make screen printing expensive at low quantities.
A note on substrate compatibility: DTF transfers apply to cotton, polyester, nylon, leather, and most blended fabrics. Screen printing is limited to flat, fabric surfaces. If your merch line includes hats, bags, or mixed-material items, DTF or heat transfer is the more flexible choice.
How do you build a brand and handle design rights?
A merch business is fundamentally brand-building. The design is the product, so brand consistency and clean IP are non-negotiable from day one.
Design checklist:
- Create mockups on the actual product (not just a flat canvas) so customers see realistic scale and placement.
- Build a sizing chart for every apparel item and include it in every listing.
- Use the correct color profile for your print method: RGB for DTG and DTF, CMYK for screen printing.
- Order physical samples from your chosen supplier before finalizing any listing photo.
- Keep all source files (SVG, AI, or high-resolution PNG at 300 DPI) organized and backed up.
Branding basics: Your brand voice, logo placement, and color palette should be consistent across every product, every listing photo, and every piece of packaging. Sub-brands work when you serve two distinct audiences (say, a kids’ line and an adult line), but launching two brand identities simultaneously splits your attention and your budget. Start with one.
IP essentials: Copyright in the U.S. attaches automatically to original creative work, but registering with the U.S. Copyright Office gives you the legal standing to sue for statutory damages if someone copies your designs. When you hire a designer, get a written work-for-hire agreement or a full IP assignment clause, otherwise the designer retains copyright by default. Never use fan art, licensed characters, or trademarked logos without explicit written permission. The risk is not theoretical: platform takedowns and legal letters are common in the merch space.
Pro Tip: Write a one-page design brief before briefing any freelancer. Include your brand colors (hex codes), target audience description, placement specs (chest print, sleeve, back), and 3 reference images. You will get better work faster, and you will own it cleanly if the contract is right. Always request layered source files (SVG or AI), not just a flat export.
For a practical walkthrough of how to design custom merchandise that translates well to print, Transferkingz covers placement, file specs, and common design mistakes.
How do you price merch to actually make money?
Pricing is where most beginners either leave money on the table or price themselves out of the market. The formula is straightforward; the discipline is in applying it consistently.
Pricing formula:
Target gross margins of 30–60% depending on your channel. Marketplaces like Etsy take 6.5% transaction fees plus listing fees, which compresses margin. An owned Shopify store costs a flat monthly fee but keeps more margin per sale.
| Production model | Per-unit production cost | Shipping (est.) | Platform fee | Retail price (example) | Gross margin |
|---|---|---|---|---|---|
| POD (t-shirt via Printful) | — | — | — | — | 30–60% |
| Small-run DTF (you press) | — | — | — | — | 30–60% |
| Bulk screen print (72 pcs) | — | — | — | — | 30–60% |
Budget paths and expected outcomes:
- $500 path: — Covers Shopify Basic (roughly $39/month), one sample order, and basic paid design assets. You get a branded store and real product photos.
Cashflow note: POD orders pay out after the customer’s payment clears, typically 3–7 days. Bulk orders require upfront payment, so budget a 30–60 day cash buffer to cover production before revenue arrives. Always set aside 10–15% of revenue for returns, misprints, and samples.
For a detailed breakdown of bulk printing cost advantages once you have proven SKUs, Transferkingz covers the math on when bulk becomes the smarter move.
Where should you sell your merch?
The right sales mix depends on where you are in your growth curve. Early on, marketplaces give you built-in traffic. Long-term, an owned store gives you customer data and margin control.
| Channel | Best for | Upfront cost | Margin | Fulfillment | Customization | MOQ | Integrations |
|---|---|---|---|---|---|---|---|
| Shopify | Brand control, scaling | $39/month | High | POD or self-ship | Full | None | Printful, DTF workflows, email |
| Etsy | Discovery, handmade/niche | — | Medium | POD or self-ship | Limited | None | Printful, Printify |
| Amazon Merch | High traffic, passive | $0 (invite only) | Low | Amazon handles | Very limited | None | Amazon only |
| Instagram/TikTok Shop | Social discovery | $0 | Medium | Self-ship or POD | Full | None | Shopify, manual |
Shopify provides brand control and scalability while Etsy and Amazon provide built-in traffic and discovery. The practical strategy: list on Etsy or Amazon first to generate early sales data with minimal setup, then build your Shopify store as your primary brand home once you know which products sell.
Integration checklist:
- Connect your POD provider (Printful, Printify) to your storefront via the native app
A niche workwear brand is a good example of the multi-channel approach in action. Brands building a construction clothes shop online often start on a marketplace for discovery, then migrate loyal buyers to an owned store where margins and customer data stay in-house.
What does a 90-day marketing plan look like for a new merch brand?
Marketing a new merch brand is mostly about getting real product in front of real people as fast as possible. Organic content with physical samples beats polished studio shots in the first 90 days.
90-day marketing checklist:
- Retargeting (Days 45–90): — Set up a Meta pixel retargeting campaign for store visitors who did not purchase. This is often the highest-ROI ad spend for small merch brands.
Channel quick guide:
What to measure in the first 90 days: click-through rate on ads (target 1.5%+), store conversion rate (target 1–3%), average order value, and repeat purchase rate after 60 days. If repeat rate is above 15%, your product and brand are working.
For tactical POD listing tips that improve discoverability on marketplaces, the print-on-demand guide for small brands covers photography, keyword placement, and listing structure.
What legal and admin steps do U.S. merch sellers need to complete?
Getting the business structure right early saves headaches later. None of this is complicated, but skipping it creates real liability and tax problems.
Legal and admin checklist:
- Business structure: Most sellers start as sole proprietors (no filing required) and form an LLC once revenue is consistent. State LLC filing fees vary depending on the state. The SBA’s business structure guide explains the trade-offs clearly.
- Sales tax: — If you sell through Shopify or Etsy, check whether the platform collects and remits sales tax on your behalf (most major platforms do for marketplace facilitator states). For your own Shopify store, you are responsible for collecting sales tax in states where you have nexus. Check your state’s Department of Revenue for current rules.
Pro Tip: Open a dedicated business checking account the same week you make your first sale. Mixing personal and business funds is the single most common accounting mistake small sellers make, and it costs hours of cleanup at tax time.
This section is general information, not legal or tax advice. Confirm current rules with your state’s Department of Revenue or a qualified professional.
How does fulfillment actually work for small merch sellers?
Fulfillment is the part most beginners underestimate. A great product with slow or unreliable shipping kills repeat business fast.
Fulfillment options:
- POD dropship: The POD provider prints and ships directly to your customer. Zero inventory, but you have no control over packaging or shipping speed.
- Ship from inventory: You hold stock and ship orders yourself. More control, lower per-unit cost at volume, but requires storage space and time.
- 3PL (third-party logistics): You send bulk inventory to a fulfillment center; they pick, pack, and ship. Makes sense once you are shipping 50+ orders per month.
Shipping checklist:
- Offer flat-rate shipping for simplicity, or calculated rates if your products vary significantly in weight.
- For domestic U.S. orders, USPS First Class (under 1 lb) and Priority Mail are the most cost-effective for apparel.
- For international orders, factor in customs delays and duties. Consider limiting international shipping until your domestic operation is stable.
- Insure shipments over $100 in value.
Returns handling: Set a clear 14–30 day return window. Decide upfront who pays return shipping (most small brands ask the customer to pay for non-defective returns, but cover it for misprints or wrong items). Include a short returns policy in every order confirmation email. A sample policy line: “We accept returns on unworn, unwashed items within 30 days of delivery. Misprints and defects ship back on us.”
Packaging: A poly mailer with a branded sticker and a thank-you card costs under $1 per order and creates a memorable unboxing moment. Tissue paper and a branded stamp add another layer without significantly increasing cost. Keep packaging lightweight to control shipping costs.
What mistakes do new merch sellers make, and how do you scale past them?
The failure patterns in merch are predictable. Knowing them in advance is most of the battle.
Do-not-do list:
- Ordering bulk inventory before a single sale is validated.
- Launching without ordering a physical sample first.
- Ignoring platform SEO (title keywords, tags, and descriptions on Etsy and Amazon matter enormously for organic discovery).
- Designing for yourself instead of your specific buyer.
- Running paid ads before your store conversion rate is above 1%.
Three signals that tell you a SKU is ready to scale:
- The design has sold consistently for 30+ days without paid promotion.
- Your return and complaint rate on that SKU is below 5%.
- Your cost per acquisition from paid ads is below your gross margin per unit.
When all three are true, move from POD to a small DTF run or bulk order to improve margins. Do not scale all SKUs at once. Pick the top one or two performers and go deep on those first.
Scale checklist (in order):
- Increase inventory or DTF run size for proven SKUs only.
- Invest in professional product photography once you have a budget.
- Broaden the product catalog by one category at a time (add a hoodie to a t-shirt line, not five new categories simultaneously).
- Launch paid acquisition only after your store conversion rate and email list are working.
- Consider a 3PL when fulfillment is consuming more than 5 hours per week.
A common failure pattern: a seller gets one viral TikTok, orders 500 units of a design, and then watches the trend die. The corrective habit is to treat every viral moment as a validation signal, not a production trigger. Order a medium DTF run first, sell through it, then decide on bulk.
Key Takeaways
Starting a merch business in 2026 comes down to one discipline: validate demand with low-risk tools (POD or small DTF runs), launch an MVP store fast, collect 30–90 days of real sales data, and scale only what the data proves.
| Point | Details |
|---|---|
| Validate before you invest | Use POD or small DTF samples to confirm demand before ordering any bulk inventory. |
| Follow the 90-day roadmap | Foundation (Days 1–14), soft launch (Days 15–30), public launch (Days 31–60), scale (Days 61–90). |
| Match budget to stage | $0 upfront path uses POD; $500 covers samples and a Shopify store; $5,000 funds a professional launch with paid ads and initial bulk inventory. |
| Own your store long-term | Use Shopify for brand control and customer data; use Etsy or Amazon for early discovery traffic. |
| Transferkingz for small-run DTF | No minimum orders, fast turnaround, and high color fidelity make Transferkingz the practical choice for quality samples and small production runs. |
The part most guides skip about starting a merch business
The conventional advice is to “find your niche,” and that is correct but incomplete. The part that actually separates sellers who build a real brand from those who churn through designs is this: they treat the first 90 days as a research project, not a launch event.
Most early failures come from one of two places. Either the seller skips validation entirely and orders inventory based on personal taste, or they validate correctly but then scale too fast when one design gets traction. Both mistakes share the same root: confusing a signal with a certainty.
The sellers who build durable merch brands tend to stay in “test and learn” mode longer than feels comfortable. They run a small DTF batch, photograph it properly, put it in front of a real audience, and wait for the data before they commit to anything bigger. That patience is not timidity. It is the most capital-efficient thing you can do in the early stage.
One more thing worth saying plainly: the production method matters less than most people think. DTF, POD, screen printing — they are all tools. What matters is whether your design means something to a specific person. A mediocre design on a perfect print is still a mediocre design. Spend as much time on the brief and the concept as you do on the production decision.
Transferkingz: quality small-run DTF transfers with no minimum order
When you are ready to move beyond POD mockups and want real, press-ready transfers for your first physical samples or a small production run, Transferkingz is built for exactly that moment. No minimum order quantities, same-day local pickup in Dallas, and nationwide shipping mean you can order one gang sheet to test a design or a hundred to fulfill a preorder batch.

The practical advantage over standard POD for small sellers: you control the blank (the shirt, hoodie, or bag), you control the quality, and you press on demand. That means better margins than POD and more flexibility than bulk screen printing, without the 72-piece minimums. Transferkingz uses premium inks and films rated for 50+ washes, so the samples you photograph for your launch listings look as good in month six as they did on day one.
Whether you are validating a first design or scaling a proven SKU to a small batch, start your order at the Transferkingz Print Point and get transfers shipped fast. Texas-based customers can also access same-day and next-day DTF transfers in Texas for the fastest possible turnaround.
Useful sources and resources
- SBA: Choose a business structure — Official U.S. Small Business Administration guide to sole proprietor vs. LLC trade-offs; the clearest starting point for legal structure decisions.
- SBA: Register your business — Step-by-step registration guidance for U.S. sellers, including state filing requirements.
- U.S. Copyright Office — Primary source for understanding copyright registration, work-for-hire rules, and how to protect original designs.
- Shopify: How to make and sell merch — Shopify’s own guide covering store setup, POD integrations, and platform-specific tips for merch sellers.
- Transferkingz: How to design custom merchandise — Practical design guidance covering file specs, placement, and print-ready artwork for DTF transfers.
- Transferkingz: Print-on-demand guide for small brands — Step-through POD setup with common pitfalls and tips specific to small merch operations.
- Transferkingz: DTF printing for small brands — Explains when DTF transfers are the cost-effective choice over POD or screen printing for small runs.
- WorkWearComfort: Build a niche apparel shop online — A real-world example of building a niche merch brand online, useful for seeing how a specific audience focus drives product decisions.
0 comments