

Your gang sheet maximum comes down to two hardware facts: printer or film printable width (commonly 22 inches for commercial production, 13 inches for desktop machines) and how long a roll your vendor will cut or feed. Usable space is smaller than the raw number, though, once you subtract gripper zones and edge margins. The real skill isn’t finding the biggest sheet available. It’s matching sheet size to your order volume and cutting method.
TL;DR:
- Most industrial DTF printers are built around a 22-inch printable width, with practical usable space closer to 21.5 inches after margins and edge zones.
- Typical sheet sizes range from 13×19 inches for desktop models to 22×120 inches for large roll-fed production, depending on order volume and cutting methods.
- Vendors often list nominal widths; actual printable area is limited by print head travel, gripper margins, and edge adjustments, requiring direct spec confirmation.
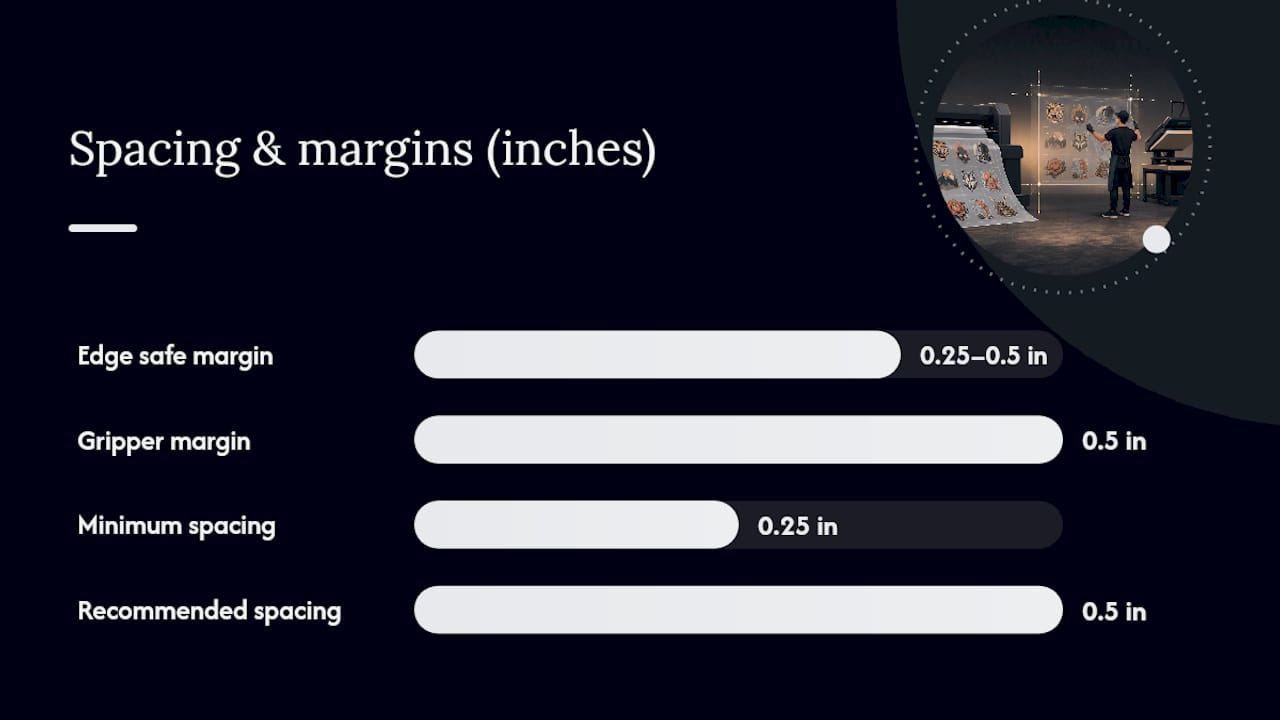
- Layout efficiency depends on proper spacing, with 0.25 inches minimum and 0.5 inches recommended between designs, and on matching sheet size to shop volume and storage capabilities.
- Long rolls are cost-effective but require careful handling, test proofs, and margin considerations to prevent waste, mistakes, and damage during storage and cutting.
Table of Contents
- Standard Widths and the Most Common Gang Sheet Dimensions
- What Printer and Film Specs Actually Limit Your Max Size
- How Many Designs Actually Fit on Each Sheet Size
- Spacing, Margins, and Cutting Tolerances That Prevent Waste
- How to Pick the Best Maximum Sheet Size for Your Shop
- Artwork Rules That Determine Whether Your Sheet Prints Right
- Fixing the Most Common Mistakes When You Push Sheet Size Limits
- Transfer Kingz’s Practical Checklist for Getting Sheet Size Right
- Why “Biggest Possible” Is the Wrong Question to Ask
- Get Your Gang Sheet Printed at the Right Size
- Sources
Standard Widths and the Most Common Gang Sheet Dimensions
Twenty-two inches has become the default width across commercial DTF production, and it’s not arbitrary. Most industrial DTF printers and film rolls are built around that measurement, which is why nearly every vendor’s size chart starts there. Desktop machines, by contrast, top out around 13 inches wide, matching standard 13×19" sheet stock rather than roll-fed film. A handful of vendors run 23" or 24" printable widths tied to wider film stock, but treat those as exceptions, not the rule, and always confirm printer max printable width before assuming a sheet will fit your press.
Length is a different story. Width is fixed by hardware; length is basically a business decision by whoever’s selling you the film.
Here’s what you’ll typically see on a size chart:
- 13×19": desktop standard, ideal for quick proofs or single small-batch orders
- 22×24": small commercial sheet, good for testing a new design before committing to a bigger run
- 22×48": mid-size option that fits a modest mixed order without excess blank film
- 22×60": a workhorse size for weekly production runs with dozens of small to mid-size designs
- 22×96": built for higher-volume batches, often multiple styles ganged together
- 22×120": the long-roll option many shops treat as the practical ceiling for a single order
Some vendors sell rolls even longer than 120 inches, cut to order in per-foot increments. That’s less a “sheet” at that point and more a bulk film order, which changes how you should think about gang sheet dimensions for planning purposes. Match the size to the job: a 22×24" sheet for a proof run, a 22×96" or 22×120" for a batch order across several designs, and everything in between for the orders that fall somewhere in the middle.
What Printer and Film Specs Actually Limit Your Max Size
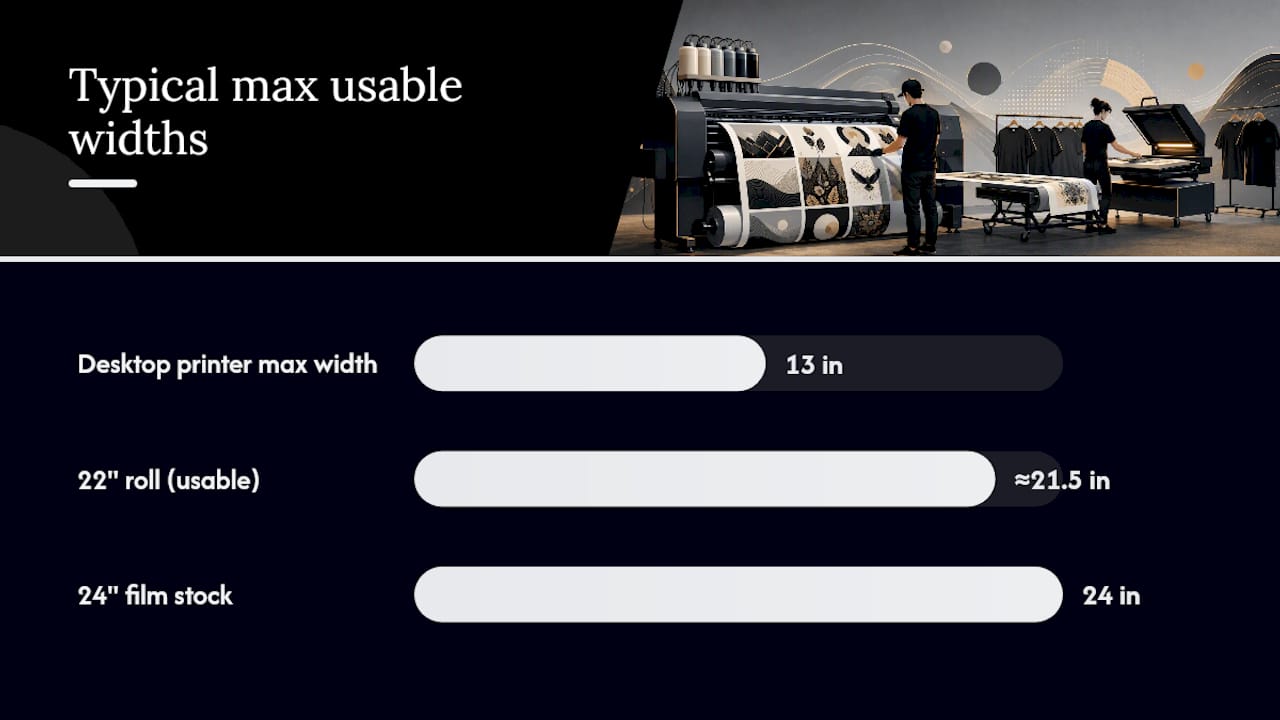
The number printed on a spec sheet is rarely the number you get to use. A “22-inch” roll is the nominal width of the film, not the guaranteed printable zone. Most systems reserve a strip along each edge for pinch rollers, sensors, or adhesive handling, which is why a 22" roll often works out to roughly 21.5 inches of usable width in practice.
Before you plan a layout around a claimed maximum, check these specs directly with your printer or vendor:
- Max printable width: the actual print head travel, not the film’s marketed width
- Max printable length: whether it’s a hard cap or an open-ended roll sold by the foot
- Recommended gripper margin: how much edge space the machine needs reserved on each side
- Length increments: fixed sizes only, or custom lengths sold per inch or per foot
Desktop and commercial machines behave differently here. A desktop DTF printer maxing out at 13 inches has almost no room to negotiate on width, while a commercial 22" system usually gives you more flexibility on length since it’s roll fed rather than sheet fed. If a vendor advertises a sheet size that seems unusually wide for the category, that’s often a sign they’re running 24" film stock rather than the 22" standard, and your layout math needs to reflect that specific number, not the industry average.
How Many Designs Actually Fit on Each Sheet Size
Numbers make this concrete faster than any general rule. Using a 0.5-inch gap between designs, simple grid packing (not auto-nested), and standard sizes shops print constantly, here’s roughly what fits:
A 22×60" sheet holding around 75 small chest designs in some vendor examples reflects tighter spacing assumptions than the 0.5-inch gap used above. Tighten your gaps to 0.25 inches and you’ll recover meaningfully more designs per sheet, at the cost of a slightly higher risk of bleed during cutting.
Row packing wastes space the moment your order mixes sizes. Auto-nesting software rearranges odd-shaped and mixed-size designs to fill gaps a simple grid leaves empty, and the yield difference on a large mixed order can be substantial.
Pro Tip: Never put one giant 11.5" back design alone on a 22×24" sheet. Batch large prints together, or hold them for a longer roll where the blank space shrinks as a percentage of the total.
Spacing, Margins, and Cutting Tolerances That Prevent Waste
Ignore margin guidance and you’ll pay for it in reprints, not just wasted film. Industry guidance commonly recommends a 0.25 to 0.5 inch safe margin along the sheet edges, plus a dedicated 0.5-inch gripper margin on whichever edge the printer feeds from first.
Between individual designs, the numbers are just as specific:
- Minimum spacing: 0.25 inches between any two designs, no exceptions
- Recommended spacing: 0.5 inches, which gives cutters more forgiving tolerance
- Common-cut layouts: acceptable only when designs share an edge intentionally and the cut line is planned for it
Cutting tolerance varies by equipment. Guillotine cutters need the widest berth since a single straight cut affects the whole row. Drag-knife and digital cutters can track tighter curves and get closer to the actual design edge, but even they benefit from that 0.25-inch minimum as a buffer against blade drift.
One margin number to remember: 0.5 inches is the spacing threshold that shows up across gripper zones, edge clearance, and inter-design gaps. If you’re ever unsure which number to default to, that’s the safe one.
How to Pick the Best Maximum Sheet Size for Your Shop
The right maximum isn’t the biggest one your printer supports. It’s the one your volume, cutter, and storage setup can actually turn into finished product without waste piling up.
Work through these questions in order:
- What’s your weekly order volume? Low volume favors 22×24" or 22×48" sheets you can turn around fast. High volume justifies 22×96" or 22×120" rolls where cost per design drops.
- Manual or automated cutting? Hand-cutting a 22×120" roll of dense small designs is slow and error-prone. Automated cutters handle density and length far better.
- Can you store long rolls properly? Rolls beyond 22×96" need dedicated rack space and careful handling to avoid creasing film before it’s applied.
- What are your shipping constraints? Longer rolls cost more to ship and box carefully; check packaging best practices if you’re mailing finished sheets to clients rather than applying them in house.
- What’s your tolerance for reprint risk? A single artwork error on a 22×120" roll wastes far more film than the same error on a 22×24" sheet.
Long rolls win on cost per square inch, almost always. But that math only holds if you catch mistakes before committing the full length, which is the real argument for shorter runs when you’re testing something new.
Artwork Rules That Determine Whether Your Sheet Prints Right
A perfectly sized sheet still fails if the artwork feeding it is wrong. Resolution is the most common failure point: files need 300 DPI at final printed size, not 300 DPI at some smaller size you plan to scale up. Stretch a 150 DPI file to fit a 10-inch print and you’ll get soft edges and visible pixelation on fabric, where flaws show up worse than on a screen.
Before uploading anything to a gang sheet builder, confirm:
- File format: PDF/X or PNG with a transparent background, never a flattened JPEG with a white box around your design
- Fonts: outlined or converted to shapes, never left as live text that could reflow
- File size: stays under your vendor’s upload cap, especially on large multi-design sheets
- Scale preview: view the file at 100% before submitting, not just thumbnail size
- White underprint placement: confirmed and aligned, especially critical on sheets combining multiple design colors
Run a low-resolution proof print when you’re testing a new layout on an unfamiliar sheet size. It catches placement and color issues cheaply before you commit to a full-length roll.
Fixing the Most Common Mistakes When You Push Sheet Size Limits
Bigger sheets multiply small mistakes. Here’s what actually goes wrong and how to fix it fast.
Edge clipping and dead zones. Designs placed too close to the nominal edge get cut off or print faded. Fix it by shrinking your usable width assumption by the full safe margin before laying anything out, and run a single test sheet before committing to a full batch.
Overpacked sheets jamming the cutter. Squeeze designs too tight and automated cutters either jam or slice into artwork. Widen your gaps back to the 0.5-inch recommendation and recheck your cutter’s nesting settings rather than fighting the machine.
Long roll storage and waste. Rolls beyond 60 inches need flat, dust-free storage, and every roll has some leader and trailer waste built in before the usable film starts.
Pro Tip: Always run a short head-and-tail proof on a new long roll before committing to the full length. It catches feed alignment and white-underprint registration issues while you’ve only burned a few inches of film instead of the whole roll.
Transfer Kingz’s Practical Checklist for Getting Sheet Size Right
Transferkingz built its gang sheet sizing guide around one idea: production efficiency beats theoretical maximum every time. The step-by-step process in How to Build a Gang Sheet That Prints Right walks through the same fundamentals covered here, applied directly to a real order.
The checklist Transferkingz recommends before finalizing any sheet:
- Verify your printer’s actual printable width, not the marketed roll width
- Reserve gripper and edge margins before laying out a single design
- Group similar-size designs together to reduce cutting time
- Run a proof print before committing to the full sheet or roll
- Confirm cutter settings match your spacing before hitting go
Shops that skip step four are the ones reprinting whole rolls over a font that didn’t outline correctly.
Why “Biggest Possible” Is the Wrong Question to Ask
The conventional advice on gang sheets treats maximum size as a hardware trivia question: what’s the biggest roll this printer can technically handle? That framing misses the actual decision shops need to make, which is about efficiency, not ceiling.
A 22×120" roll sounds impressive on a spec sheet. For a shop running 15 small orders a week, it’s a liability, not an asset, because idle film sitting on a rack doesn’t generate revenue and long rolls amplify the cost of a single artwork mistake. The math in the capacity table above should change how you think about size selection entirely: it’s not “how big can I go,” it’s “what size lets me hit near-zero waste on this specific batch.”
What gets underrated is the margin math. Shops obsess over nominal roll width and skip the gripper and edge calculations that determine what’s actually usable, then wonder why their layouts run tight or clip. Nail the margins first. Pick your maximum size second. Everything about production efficiency flows from getting that order right.
— Anthony
Get Your Gang Sheet Printed at the Right Size
This service offers size flexibility as described above, without requiring minimum order quantities. Build your layout with an online gang sheet builder, upload artwork at the resolution your design needs, and order the width and length your batch requires, from small proofs to full production runs.

If you’re local to Texas, the Dallas DTF transfer page covers regional pickup options, and the broader Texas DTF services page has details for shops across the state. Wherever you’re ordering from, start by confirming your printable width and margins using the checklist above, upload artwork at 300 DPI with a transparent background, and place your order through Transferkingz’s builder when you’re ready to run it.
Sources
For readers who want to verify the specifics covered here, these sources go deeper on vendor sizing charts, printable width standards, margin recommendations, and artwork setup: the DTF gang sheet capacity chart, The Kiwi Suite’s sizing guide, PDF Press’s step-by-step gang sheet guide, Sticker Supply Shop’s artwork setup guide, and the Microsoft paper sizes reference table for standard size codes.
- DTF Gang Sheet Sizes Chart: Capacity Math for 22" Sheets
- DTF Gang Sheet Size Guide | The Kiwi Suite
- How to Create a Gang Sheet for Print: Step-by-Step Guide | PDF Press
0 comments