

What dwell time actually does in heat pressing
Dwell time is the number of seconds you hold the heat press closed during a transfer. That window is when the adhesive melts, flows into the fabric fibers, and cures into a permanent bond. Get it right and the design locks in. Get it wrong and you’re peeling transfers off shirts after the first wash.
Heat, pressure, and time form what the industry calls the “holy trinity” of transfer success. Adjust one without touching the others and quality suffers. Dwell time is the variable most people underestimate because it’s invisible while it’s happening.
Here’s what correct dwell time delivers:
- Full adhesive activation: The heat needs time to penetrate both the transfer film and the fabric. Too little time means that the adhesive never fully liquefies.
- Complete curing: The bond doesn’t just form during pressing. It finishes curing in those final seconds before you lift the platen.
- Print longevity: A properly timed press produces a transfer that survives repeated washing without cracking or lifting at the edges.
- Consistent color saturation: For sublimation especially, dwell time determines how deeply the dye converts to gas and penetrates the polyester fibers.
Standard dwell time ranges by material typically are: cotton runs 10–15 seconds, cotton/poly blends 12–17 seconds, polyester 8–15 seconds, and sublimation on 100% polyester requires 45–60 seconds, according to 2026 industry benchmarks.
How to find the right dwell time balance for your transfers
Short dwell time and long dwell time both ruin prints, just in different ways. Cutting time short results in incomplete curing and peeling. Pressing too long scorches the fabric, makes the adhesive brittle, or causes dye migration on heat-sensitive synthetics.
The practical approach:
- Start with manufacturer specs. Every transfer film and HTV product ships with a recommended time range. Treat that as your baseline, not a suggestion.
- Use your machine’s timer. Manual counting introduces more error than most people realize. Even a 3–5 second variance changes results on stretch vinyl or thin polyester.
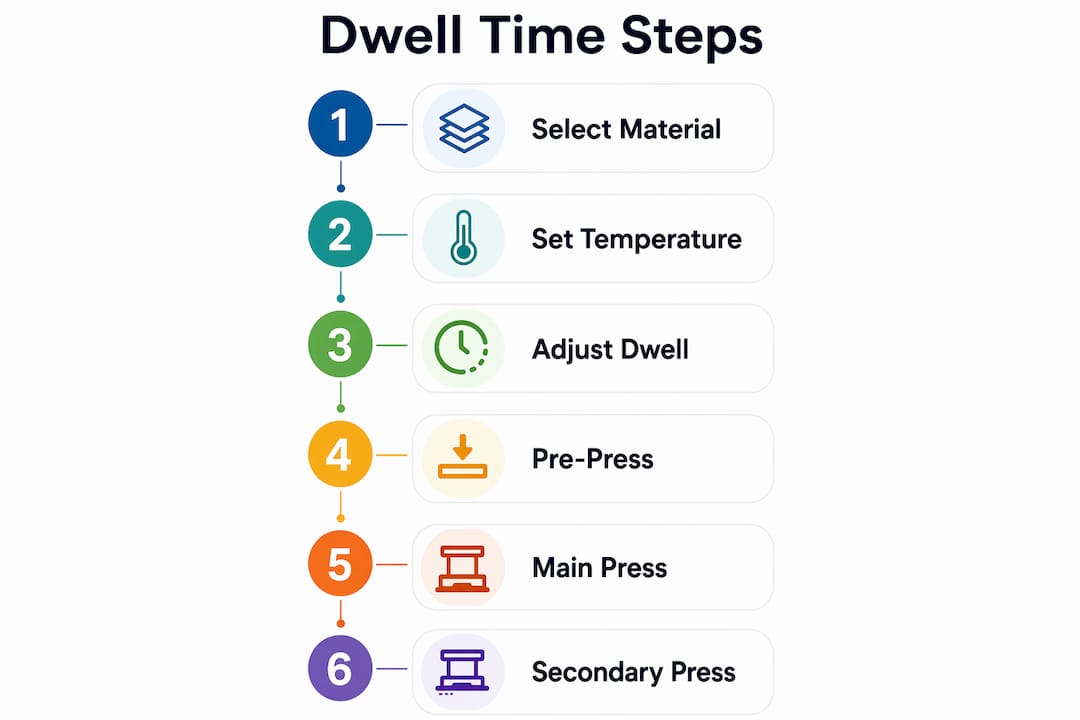
- Adjust temperature before time. When a transfer isn’t bonding, increase temperature first in 5–10°F increments, then extend dwell time by 3–5 seconds. Pressure adjustments come last.
- Test on scrap fabric. Never adjust settings and immediately press a production garment. Run a test swatch first.
- Account for environment. Humidity and garment thermal mass both shift the optimal dwell time. A humid shop in July needs slightly longer times than a dry workspace in January.
Pro Tip: When you’re pressing a batch and results start varying mid-run, timer drift is often the culprit. Recalibrate your machine timer before blaming pressure or temperature.
How fabric type and thickness change your dwell time settings
Fabric composition is the single biggest variable after transfer type. Cotton is forgiving. Polyester is not. And a thick hoodie behaves completely differently than a lightweight tee, even when both are 100% cotton.
- 100% cotton: Handles higher heat and longer times well. Standard range is 10–15 seconds, with heavier garments needing up to 3–5 seconds more to allow heat to fully penetrate.
- Polyester: Heat-sensitive and prone to dye migration. Standard range is 8–15 seconds; keep to the shorter end and always test a small area first. Performance polyester used in athletic apparel requires particular care.
- Cotton/poly blends: Standard dwell times are 12–17 seconds. The polyester content limits how hot and how long you can go, so stay closer to the lower temperature end.
- Sublimation on 100% polyester: 45–60 seconds at 385–400°F gives the dye enough time to fully convert to gas and bond with the fibers. Rushing sublimation produces washed-out, undersaturated color.
- Specialty and sensitive fabrics: Nylon, Dri-Fit, and moisture-wicking materials need shorter times and lower temperatures. Always check the fabric care label before pressing.
- Thick garments: Add 3–5 seconds beyond the standard range when pressing heavy hoodies or layered seams. The extra mass absorbs heat and slows penetration.
For a deeper look at which fabrics respond best to DTF transfers, Transferkingz covers fabric selection for DTF in detail.
Common dwell time problems and how to troubleshoot them
Most heat press failures trace back to one of three variables. Dwell time is often the last one people check, but it’s frequently the actual cause.
- Peeling after washing: Almost always incomplete curing. The adhesive activated but didn’t fully bond. Increase temperature by 5–10°F, then add 3–5 seconds to your press time, and retest on a fresh swatch.
- Cracking or brittleness: Usually over-pressing. The adhesive cured past its optimal point and became rigid. Drop dwell time by 2–3 seconds and check temperature too.
- Scorching: Extended dwell time at high temperature burns the fabric or carrier film. Use a Teflon or parchment sheet between the platen and garment, especially on light cotton.
- Dye migration on polyester: Heat is penetrating too deeply for too long. Shorten dwell time and lower temperature simultaneously.
- Faded or light colors in sublimation: The dye didn’t fully convert. Extend dwell time toward the 60-second end of the range and verify your temperature is reaching 385°F.
- Inconsistent results across a batch: Timer drift or uneven platen pressure. Recalibrate the timer and check platen alignment before adjusting any other setting.
A secondary press matters more than most people expect. DTF transfers benefit from a second press of 5–10 seconds after peeling the film. That post-press drives the adhesive deeper into the fibers, improves durability, and produces a matte finish. Skipping it is one of the most common causes of premature peeling.
For a full troubleshooting workflow, Transferkingz has a dedicated DTF troubleshooting guide covering the most common failure points.
Why pre-pressing makes your main dwell time more effective
Pre-pressing is a short initial press before you apply the transfer. It takes 3–5 seconds and most people skip it. That’s a mistake, especially in humid environments or when pressing thick garments.
What pre-pressing actually does: it drives moisture out of the fabric before the adhesive ever touches it. Moisture trapped in fibers interferes with chemical bonding during the main press. Even a small amount of humidity can prevent full adhesion, which shows up as lifting edges or inconsistent bond strength across the design.
The Transferkingz heat press guide covers pre-pressing as a standard step in the application process. Flattening the fabric also removes wrinkles that would otherwise create uneven contact between the platen and the transfer, leading to patchy adhesion.
Pro Tip: Pre-press for 3–5 seconds, let the garment cool for a few seconds, then apply your transfer. That brief cooling window prevents the residual heat from pre-activating the adhesive before you’re ready to press.
How dwell time affects heat press machine wear over time
Dwell time doesn’t just affect the transfer. It affects the machine pressing it.
Running consistently long dwell times at high temperatures accelerates platen wear. The heating element cycles harder and longer to maintain temperature under load, which shortens its service life. Silicone pads on the lower platen also degrade faster when exposed to sustained high heat, losing their even pressure distribution over time.
Short dwell times create a different problem. Frequent short cycles mean the machine opens and closes more often per hour, increasing mechanical wear on the hinge and pressure mechanism. For high-volume shops, that adds up.
The practical takeaway: dialing in accurate dwell times for each material isn’t just about print quality. It reduces unnecessary machine stress. A press running at the correct time and temperature for the job lasts longer than one that compensates for poor settings by running hotter or longer than needed. Calibrate regularly, replace silicone pads when they show compression marks, and log your settings per material so you’re not guessing on every run.
Key Takeaways
Dwell time is the most overlooked variable in heat pressing, yet it directly controls whether a transfer bonds permanently or fails after the first wash.
| Point | Details |
|---|---|
| Standard time ranges by material | Cotton runs 10–15 seconds, cotton/poly blends 12–17 seconds, polyester 8–15 seconds, and sublimation 45–60 seconds. |
| Adjust time before pressure | When adhesion fails, increase temperature by 5–10°F first, then extend dwell time by 3–5 seconds. |
| Pre-press for 3–5 seconds | Removing moisture before the main press improves adhesion consistency, especially in humid conditions. |
| Post-press adds durability | A second press of 5–10 seconds after peeling drives adhesive deeper and reduces premature peeling. |
| Machine wear follows dwell time | Consistently over-long or over-hot pressing accelerates platen and heating element degradation. |
Get print-ready DTF transfers from Transferkingz

Dialing in your dwell time only works when the transfer itself is made to spec. Transferkingz produces custom DTF transfers with premium inks and films designed to bond reliably at standard heat press settings, with no minimum order and fast turnaround. Whether you’re pressing a single shirt or running a full production batch, the transfers are ready to apply.
0 comments