

Borderless (full bleed) stickers print edge to edge with no gap between artwork and cut line, while bordered stickers leave a printed white or colored margin framing the design. Pick borderless for photos, badges, and full-background artwork; pick a border for logos, dark or mixed surfaces, and designs with fine detail near the edges.
- Borderless wins when your art fills the whole shape and you want a seamless, label-free look.
- A bordered finish wins when contrast, brand consistency, or a small buffer around delicate linework matters more than a clean edge.
- Caveat: every cutter has a tiny margin of error, so a borderless design without enough bleed risks a thin white sliver along one side.
Rule of thumb: if your background color runs to the very edge of your design, build in bleed and go borderless. If your background is transparent or you’re printing on unpredictable surfaces, keep a border.
Key Takeaways
The right sticker finish depends on whether your design needs a printed buffer for contrast and safety or an edge-to-edge look, and either works with die-cut or kiss-cut production.
| Point | Details |
|---|---|
| Borderless suits full-background art | Choose full bleed for photos, badges, and designs where color runs to the edge. |
| Borders suit logos and mixed surfaces | A white border adds contrast and protects fine detail near the cut line. |
| Cut method is a separate choice | Die-cut and kiss-cut both work with bordered or borderless artwork. |
| Bleed prevents white slivers | Extend background art at least 1/8 inch past the cut line on borderless files. |
| Transfer Kingz supports both finishes | Transfer Kingz’s UV DTF permasticker line handles borderless and bordered production with no minimum order. |
Table of Contents
- What “Full Bleed” and “Bordered” Actually Mean for Sticker Artwork
- Die-Cut vs Kiss-Cut: A Different Decision From Border vs Borderless
- When to Choose Borderless vs a Visible Border
- Order-Ready File Checklist for Bordered and Borderless Stickers
- Common Printing and Cutting Problems (and How to Avoid Them)
- How Cutter Tolerance Shapes the Border Decision
- A Practical Middle Ground Between Design and Production
- Get Your Sticker Files Production-Ready With Transfer Kingz
- Frequently Asked Questions
What “Full Bleed” and “Bordered” Actually Mean for Sticker Artwork
These terms describe what happens at the edge of your file, not just how the final sticker looks. Bleed is the extra artwork you extend past your intended cut line, usually a fraction of an inch, so nothing white shows if the blade shifts slightly. The safety margin (or safe area) is the opposite buffer on the inside, keeping text and logos away from the edge so nothing gets clipped. The cut line is the exact path the cutter follows. A full bleed (borderless) sticker has artwork extending past that cut line in every direction. A white or visible border sticker intentionally leaves a printed margin between the artwork and the cut line, which is different from bleed because it’s a design choice, not a production safeguard.
Bleed and safety margins exist because printers ask customers to extend backgrounds slightly past the intended cut line, so small cutting variations during production don’t leave an unprinted edge showing through, according to Sticker Ninja.
- On a proof, check that background color or imagery visibly extends past the dotted cut line.
- Confirm text or logos sit well inside the printed area, not hugging the edge.
- If you asked for a border, measure that it’s consistent in width all the way around.
Die-Cut vs Kiss-Cut: A Different Decision From Border vs Borderless
Cutting method and border style are two separate decisions that people often mix up. Die-cut stickers are trimmed exactly to the contour of your design and peel off the backing sheet individually. Kiss-cut stickers are cut through the vinyl layer only, leaving them sitting on a larger backing sheet you peel by hand. Both methods work with either a bordered or borderless design. A photo sticker can be die-cut with no border, or kiss-cut with a white frame around it.
- Kiss-cut suits sheets of stickers meant for easy peeling, like a sticker pack or a sheet of logo decals.
- Die-cut suits single, standalone stickers where the shape itself is part of the design, such as a mascot or product badge.
Neither cut method changes the printed edge treatment. That decision happens entirely in your artwork file.
When to Choose Borderless vs a Visible Border
A white border earns its keep on logos, wordmarks, and anything meant to sit on inconsistent surfaces like laptops, car bumpers, or tinted glass. Vinyl Disorder notes that a border is commonly recommended for branding stickers specifically because it maintains visual separation from whatever surface it lands on. Fine detail close to the edge also benefits from that buffer since a border hides minor trimming shifts that would otherwise clip a thin line or small letterform.
Borderless works best when the artwork is the whole picture: photography, full-color badges, packaging labels, or any design with a background color that’s meant to disappear into the product it’s applied to.
A few practical factors to weigh:
- Scale. Small stickers (under 2 inches) show trimming imperfections more obviously, so a border can mask minor shifts.
- Thin strokes. Delicate outlines near the cut line are riskier without a border or generous bleed.
- Surface color. Dark or clear surfaces make borderless art blend in or vanish unless the design accounts for it.
Pro Tip: For small or intricately shaped designs, a narrow border gives the cutter enough room to vary slightly without eating into your artwork.
Order-Ready File Checklist for Bordered and Borderless Stickers
Get these specs right before you upload artwork or approve a proof, and you’ll avoid nearly every common production headache.
- Bleed: extend background art sufficiently past the intended cut line for borderless designs. Bordered designs don’t need bleed on the border itself, but any background color inside the border still needs it.
- Safe area: keep text, logos, and important details at least 1/16 to 1/8 inch inside the cut line so nothing gets trimmed off.
- Resolution: export raster images (photos, textures) at 300 DPI at final print size. Lower resolution looks fine on screen and blurry once printed.
- Color space: work in CMYK or whatever print profile your vendor specifies. RGB files can shift color noticeably once printed.
- File format: vector formats like AI, EPS, or PDF hold up best for logos and shapes with hard edges. High-resolution PNG works for photo-based art, provided a cut path is included or supplied separately.
- Cut lines: supply a named spot color (commonly “CutContour”) on its own vector layer, or use your vendor’s template if one is provided.
For a borderless job, send full-bleed background art with the cut line set to the outer edge of your design. For a bordered job, send the border as part of the artwork itself, with the cutline traced around the outside of that border, not the inner design.
Pro Tip: Export your cutline as an actual vector path, not a rasterized outline, and always review the proof at 100 percent zoom. Shrinking a proof to fit your screen hides exactly the kind of edge problems you’re trying to catch.
Common Printing and Cutting Problems (and How to Avoid Them)
A white sliver along one edge almost always traces back to insufficient bleed. Fix it by extending background art further past the cut line next time. Uneven borders usually happen when a narrow border meets a complex cut path. Widening the border slightly, especially around tight curves, gives the cutter more forgiving room to work with. Clipped text comes from ignoring the safe area. Pull any text or fine detail further from the edge. Peeling issues are typically a material or lamination problem rather than a border issue, since durability comes from the vinyl and lamination, not from whether a printed border exists.
- Confirm your bleed and safe area numbers with your printer before finalizing artwork.
- Always request a digital proof, and ask about the printer’s cutter tolerance in writing.
Pro Tip: Ordering a small sample run before committing to a full batch is the cheapest way to catch a trimming shift or color surprise before it shows up on 500 stickers, as Sticker Ninja points out.
How Cutter Tolerance Shapes the Border Decision
Cutter precision varies from shop to shop, and it directly affects whether borderless artwork comes out clean. Shops running modern cutting equipment can contour-cut borderless stickers accurately when the file includes correct bleed and a properly placed cutline. Some vendors automatically add a small safety margin to compensate for tolerance; others cut exactly to the line you supply, so it pays to ask which approach a shop uses before you finalize a borderless design.
- Ask directly: “What’s your typical cutter tolerance, and do you auto-add a safety margin?”
- Confirm whether your vendor prefers a supplied CutContour layer or their own template.
Transfer Kingz generally recommends a small border for intricate multi-color designs and supports full borderless production once bleed and cutlines are set up correctly, which the UV DTF permasticker product line is built to handle.
A Practical Middle Ground Between Design and Production
Choose the finish that serves your design intent, but don’t skip a small test run when the artwork or surface is unfamiliar. A cheap sample tells you more than any spec sheet.
Get Your Sticker Files Production-Ready With Transfer Kingz
Transfer Kingz cuts out the guesswork of file prep. Whether you’re going borderless with a photo-heavy design or keeping a clean white border around your logo, the team helps you dial in bleed, cutlines, and safe areas before anything goes to print.

There’s no minimum order, so you can run a handful of samples before committing to a bulk batch, and turnaround stays fast whether you need UV DTF permastickers or standard DTF transfers. If application questions come up once your stickers arrive, the bubble-free application guide walks through the process step by step. Ready to get your design order-ready? Head over to Transfer Kingz’s Dallas printing services to upload your file and request a proof.
Frequently Asked Questions
Is borderless or bordered better for small stickers? Small stickers under 2 inches often do better with a thin border since it hides minor cutter shifts that would otherwise clip a borderless edge.
Does a border make a sticker more durable? No. Durability comes from the vinyl material and lamination, not the printed border itself, according to Decals.com.
Can I get a borderless finish with a kiss-cut sticker sheet? Yes. Kiss-cut and die-cut both work with borderless or bordered artwork since the cut method and the border style are independent choices.
How much bleed do I need for a borderless sticker? A minimum of 1/8 inch (0.125 in) of extended background art past the cut line is standard for most print shops.
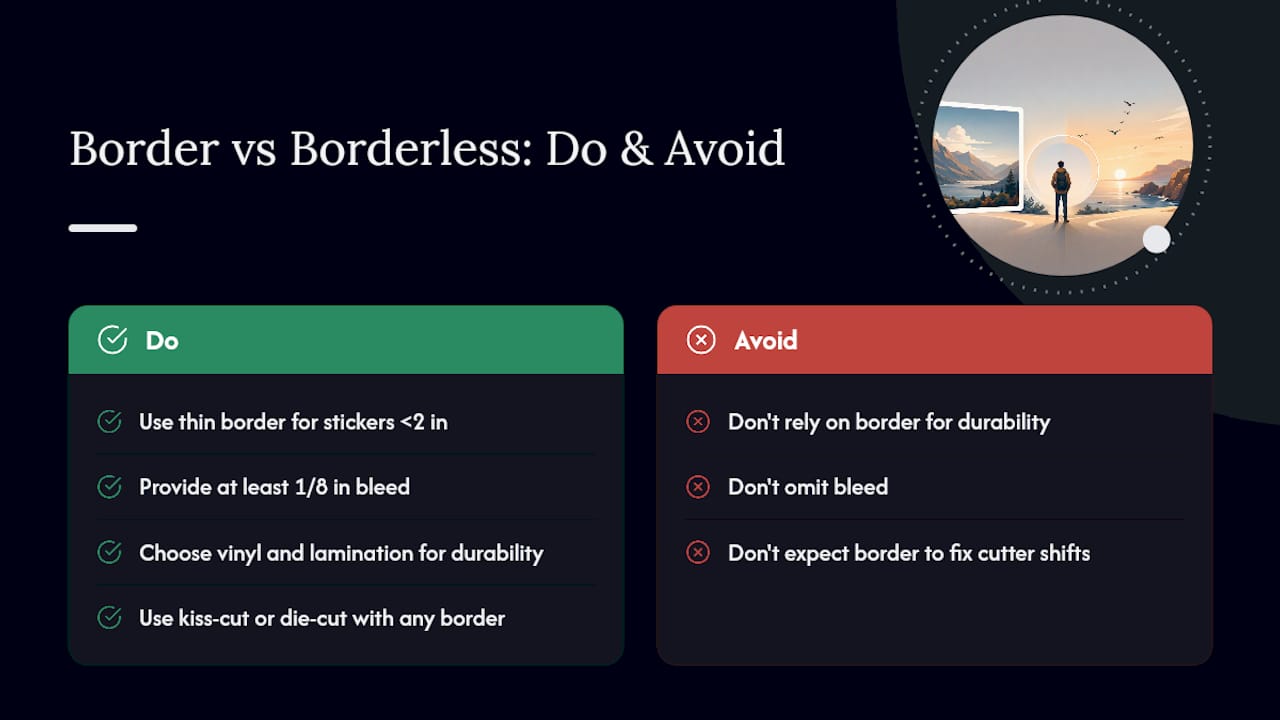
What causes a visible white sliver on a borderless sticker? Insufficient bleed is the most common cause, since even a small cutter shift will expose unprinted paper or vinyl along the edge.
0 comments