

For printed stickers, send vector PDF, AI, or EPS files for logos and cutlines, or high-resolution PNG/TIFF at 300 DPI for photographic art. For messaging apps, build a transparent PNG master and convert it to WebP or APNG. Before you upload or submit anything, check one thing above all else: resolution at final output size, plus a clean cutline or defined transparency.
TL;DR:
- Using vector formats like AI, EPS, or PDF is essential for logos and cutlines to ensure sharp scaling; raster formats like PNG and TIFF suit photographic or textured artwork.
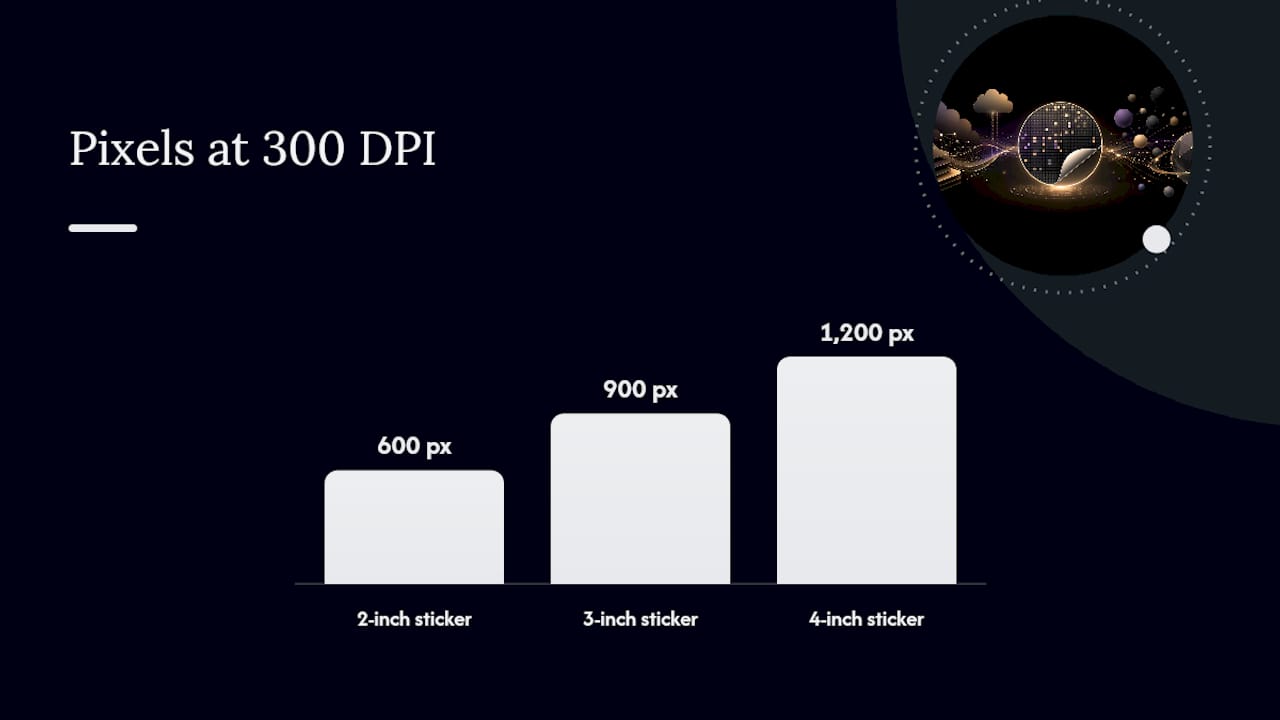
- Files must be at 300 DPI at final size, with simple calculations indicating 600 pixels for a 2-inch sticker, 900 pixels for 3 inches, and 1,200 pixels for 4 inches, ensuring print quality.
- CMYK color mode prevents unwanted tone shifts during printing, and transparency or a defined cut path is required for die-cut edges, with cutlines on a separate, clearly labeled layer.
- For messaging app stickers, create a master transparent PNG at a comfortable size and convert to platform-specific formats like WebP or APNG, respecting size limits such as 512×512 pixels and 300 KB file size cap.
- Always preview exported files at 100% zoom to verify edges, font outlines, and transparency, reducing the chance of rejected proofs or reprints due to common file mistakes.
Table of Contents
- Accepted Sticker File Formats and When to Use Each
- Technical Print Specs: DPI, Color Mode, Bleed, and Transparency
- Exporting From Illustrator, Photoshop, Procreate, and Canva
- Digital Sticker Formats for Messaging Apps
- Quick Preflight Checklist Before You Upload or Print
- Transfer Kingz Perspective: The File Mistakes We See Most
- Get Your Stickers Printed Without the Guesswork
- Sources
- FAQ
Accepted Sticker File Formats and When to Use Each
Not every format does the same job, and picking the wrong one is the fastest way to end up with a blurry proof or a rejected upload. Here’s how the common sticker design formats break down by purpose:
- AI (Adobe Illustrator): The native vector format for logos, lettering, and cutline paths. Best when you’re building the file from scratch and need full editability.
- EPS: An older vector container, still requested by some print shops for compatibility with legacy workflows.
- PDF: The most universal print format. It can hold vector art, raster images, or both, and it’s the standard for multi-design sticker sheets.
- SVG: A web-friendly vector format, ideal for logos and simple graphics destined for digital use or laser cutting.
- PNG: The go-to raster format for anything needing transparency, including single stickers and messaging app assets.
- TIFF: A high-quality raster format with no compression loss, often used for photographic or painted artwork sent to print.
- PSD: The layered Photoshop format, useful when a printer or collaborator needs to edit individual elements before final export.
- JPG: Acceptable for photo-heavy designs, but it doesn’t support transparency and compresses detail, so it’s the weakest choice on this list.
Vector formats win for anything with clean edges, text, or a cutline, because the artwork scales to any size without losing sharpness. A logo saved as AI or SVG looks identical at one inch or ten. Raster formats like PNG and TIFF make sense when the artwork itself is photographic, painted, or textured. That kind of detail simply can’t be built in vector shapes.
Here’s the catch most people miss: a PDF or SVG file isn’t automatically “safe” just because it’s technically a vector container. Both formats can have low-resolution raster images embedded inside them. A PDF with a pixelated logo pasted in still prints like a pixelated logo. Vector formats are best for logos and cutlines, but a PDF can still hide low-resolution raster content, so always verify vector content and embedded-image resolution before you send the file anywhere.
Technical Print Specs: DPI, Color Mode, Bleed, and Transparency
Resolution is where most sticker orders go wrong. The professional standard is 300 DPI (dots per inch) at final printed size, and that phrase, “at final size,” is the part people skip. A 2-inch sticker needs to be roughly 600 pixels wide. A 3-inch sticker needs about 900 pixels wide, and a 4-inch sticker needs around 1,200 pixels. This matches common print guidance that a 3 inch design should run about 900 pixels across, since 300 DPI simply means 300 pixels for every printed inch.
Color mode matters just as much. Screens display in RGB, but print production runs on CMYK. Files submitted in RGB often shift once converted, usually toward duller or slightly different tones than what you saw on screen. Soft-proofing in CMYK before you export, or requesting a physical test print for anything color-critical, catches this before it becomes a wasted print run.
| Spec | Standard requirement |
|---|---|
| Resolution | 300 DPI at final printed size |
| Color mode | CMYK for print |
| Bleed | extra artwork extending beyond the cut edge |
| Cutline | Separate vector layer, clearly named |
| Fonts | Outlined or fully embedded |
| Transparency | Alpha channel for die-cut edges, or defined cut path |
Bleed and cutlines work together but aren’t the same thing. Bleed is extra artwork extending past where the sticker actually gets cut, so no white sliver shows up if the cut shifts a fraction of a millimeter. The cutline is the actual path the cutter follows, and it belongs on its own named vector layer, separate from your artwork. Printers commonly request a clearly named cutline layer and outlined fonts specifically to avoid font substitution errors during file processing.
For file size, keep exports reasonable by flattening unnecessary layers and avoiding uncompressed TIFFs when a PDF will do. Most print shops have upload caps in the range of 50 to 100 MB.
Pro Tip: If your sticker has a die-cut edge that follows the artwork shape, decide upfront whether you’re relying on alpha transparency (a PNG with a see-through background) or an actual cut path (a vector line the machine follows). Mixing the two assumptions is one of the most common causes of a rejected proof.
Exporting From Illustrator, Photoshop, Procreate, and Canva
Each app has its own quirks, and getting the export settings right saves a round of back-and-forth with your printer.
- Illustrator: Save as a print PDF in CMYK. Outline all fonts so nothing substitutes on the printer’s end. Put your cutline on its own layer, name it something obvious like “CutLine,” and build in bleed before exporting.
- Photoshop: Set your canvas dimensions in inches at 300 DPI from the start, not after the fact. Export as PNG or TIFF with transparency preserved, and if you have a die-cut shape, supply a vector cut path alongside the raster file when you can.
- Procreate: Export PNG at your target pixel dimensions, or hand over the PSD if a printer needs to inspect layers. Watch the edges closely. Procreate’s anti-aliasing can soften fine detail more than expected once scaled down.
- Canva: Use PDF Print for multi-design sheets. For a single sticker needing a transparent background, export high-res PNG, but check your plan first. Canva workflows often flag transparent PNG export as a Pro-only feature, with PDF Print as the safer default on free accounts.
Digital Sticker Formats for Messaging Apps
Digital stickers follow different rules than print, and the format mismatch trips up a lot of first-time creators. Build your master file as a transparent PNG at a comfortable working size, then convert down to whatever the target platform actually requires.
- Most major apps, including WhatsApp and Signal, expect 512×512 pixel WebP files for static stickers.
- Signal specifically caps sticker file size at 300 KB per image, so heavy detail needs compression before upload.
- Animated stickers generally need APNG or animated WebP, not GIF. Both formats hold more colors and support real alpha transparency, while GIF compresses harshly and can’t do soft edges.
- Free conversion tools like Squoosh, or command line utilities like cwebp, handle the PNG-to-WebP step cleanly without degrading edge quality.
Quick Preflight Checklist Before You Upload or Print
Run through this before hitting submit. It takes two minutes and catches most of what causes reprints.
- Final dimensions match your target DPI (300 DPI for print, correct pixel size for apps).
- Color mode is CMYK for anything going to a physical printer.
- All fonts are outlined or embedded, not linked externally.
- The cutline sits on its own clearly labeled layer.
- Transparency is preserved where needed, or a cut path is included instead.
- The exported file has been opened and inspected at 100% zoom, not “fit to window.”
That last step matters more than it sounds like it should. Checking edges at actual size catches jagged anti-aliasing and soft type that a zoomed-out preview hides completely.
Transfer Kingz Perspective: The File Mistakes We See Most
The recurring issue isn’t exotic. It’s a PDF with a low-res logo pasted inside, a missing cutline layer, or artwork built in RGB with no thought to how CMYK will shift it. Our DTF pixel math guide walks through the dimension math that prevents most reprints. If you only do one thing before you submit, reopen the export at 100% zoom and look at the edges.
— Anthony
Get Your Stickers Printed Without the Guesswork
Transferkingz turns a properly prepped file into finished stickers without the file-format runaround. Once you know your artwork meets spec, upload and get a proof back before anything goes to press, with no minimum order size holding up a small batch or a one-off run.

Whether you’re printing custom stickers, UV DTF PermaStickers, or full DTF transfer sheets, the upload-and-proof flow works the same way: send your file, confirm the specs match, approve the proof, and it ships. That workflow fits independent artists shipping small batches just as well as it fits a shop running production volume. If you’re deciding between a bordered edge and a clean die-cut, our border versus borderless guide covers the cutline tradeoffs before you export. Ready to see it printed? Start an order through Transferkingz’s DTF printing services in Dallas and upload your file for a proof.
Sources
- Stickers
- Tips for submitting vector files for printing
- PNG vs SVG vs PDF for Custom Sticker Printing - YouStickers
FAQ
What Is the Best File Format for Stickers?
Vector formats like AI, EPS, or PDF are best for logos, text, and cutlines because they scale without losing sharpness. High-resolution PNG or TIFF works for photographic or painted artwork.
How Do I Open a .Wastickers File?
A .wastickers file is a packaged sticker set built for a WhatsApp sticker-maker app, not a standard image file, and it needs the matching app installed to install the pack rather than a generic image viewer.
What Format Should I Use for Sticker Printing?
Vector PDF, AI, or EPS files handle logos and cutlines best, while a high-resolution PNG or TIFF at 300 DPI works for detailed or photographic designs going to print.
Is 300 DPI Good for Stickers?
Yes. 300 DPI at final printed size is the standard professional benchmark for sharp print.
What Size Should Digital Stickers Be for Messaging Apps?
Most platforms, including WhatsApp and Signal, expect static stickers built as 512×512 pixel WebP files, with animated packs typically requiring APNG or animated WebP instead of GIF.
0 comments