
TL;DR:
- Textile printing requires fabric preparation, design accuracy, appropriate method selection, and proper fixation for durable results. Small businesses and hobbyists often use inkjet printers with pre-treated fabric sheets to produce vibrant, wash-resistant prints efficiently. Proper curing and testing are essential to prevent fading, cracking, or dull colors after washing.
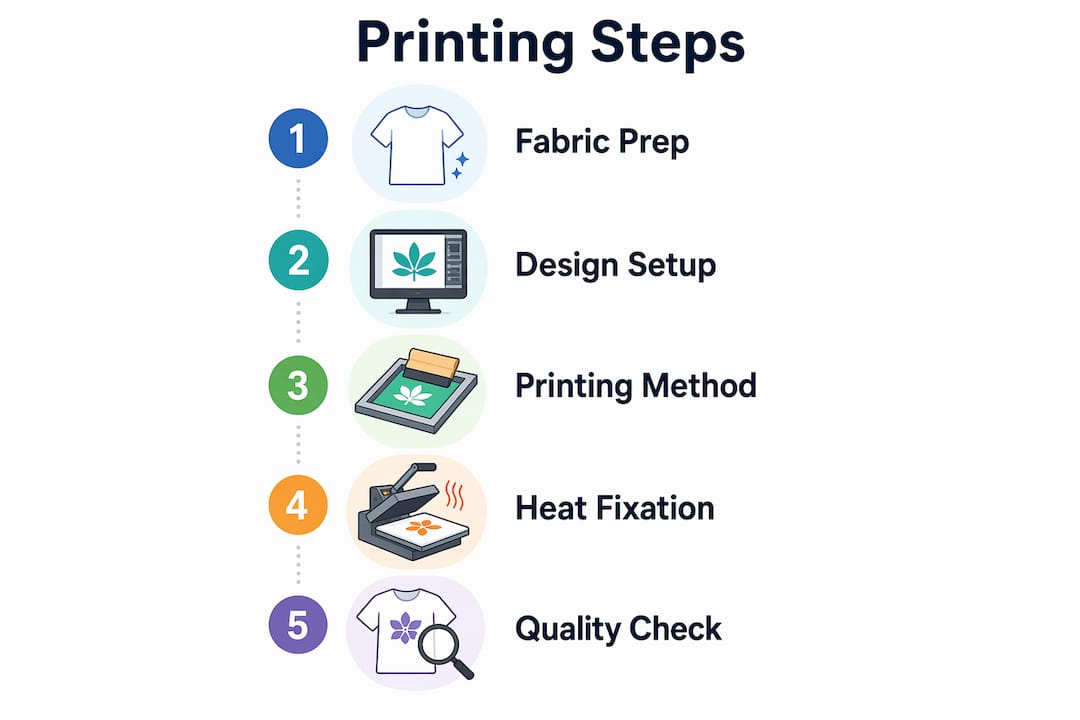
Textile printing step by step is the systematic process of preparing fabric, creating a design, applying ink, and finishing the print for durability. The full workflow covers five phases: fabric selection, pre-treatment, design preparation, printing, and fixation. Over 60% of independent crafters now use home inkjet printers with pre-treated fabric sheets, which shows how accessible the process has become. Whether you are a small business owner producing custom merchandise or a hobbyist making one-of-a-kind pieces, understanding each phase prevents costly mistakes and delivers professional results.
What materials and tools do you need to start textile printing?
The right materials determine your results before you print a single drop of ink. Fabric substrate is the first decision. Cotton works best with Direct-to-Garment (DTG) printing and reactive inks. Polyester requires disperse inks and is the only fabric that works with sublimation printing. Blended fabrics can work with pigment inks, though color vibrancy is typically lower than on pure fibers. Matching your fabric to the correct technique is not optional. Sublimation works only on polyester, while DTG performs best on natural fibers like cotton.
Your ink type must match both the fabric and the printing method. Pigment inks sit on top of the fiber and work across many fabric types. Reactive inks bond chemically with natural fibers and produce the most vibrant colors on cotton. Disperse inks are designed specifically for synthetic fabrics and activate with heat. Using the wrong ink on the wrong fabric produces faded, uneven, or non-washable results.
The core tools you need depend on your chosen method:
- Inkjet printer with fabric-compatible settings (for home or small-scale printing on pre-treated sheets)
- Pre-treated printable fabric sheets (for inkjet home printing)
- Screen printing frame and squeegee (for screen-based methods)
- Heat press (for heat transfer, sublimation, and DTF application)
- Design software such as Adobe Illustrator, Photoshop, or free alternatives like Inkscape
- Stabilizer or backing material to keep fabric flat during printing
| Fabric Type | Best Printing Method | Ink Type |
|---|---|---|
| 100% cotton | DTG, screen printing | Reactive, pigment |
| 100% polyester | Sublimation, DTF | Disperse |
| Cotton/poly blend | DTF, pigment inkjet | Pigment |
| Linen or natural fiber | Screen printing | Reactive |
Pro Tip: Buy a small sample of your chosen fabric and run a test print before committing to a full production run. A failed test on 10 inches of fabric costs far less than a failed run of 50 shirts.
How do you prepare your fabric and design files before printing?
Fabric preparation is the step most beginners skip and most professionals never compromise on. Raw fabric contains residual starches, oils, and sizing agents that prevent ink from bonding correctly. These residues cause uneven color, blurry edges, and early fading. Washing fabric in warm water without fabric softener removes most surface contaminants. For DTG printing, a dedicated pre-treatment solution is applied and then heat-pressed into the fabric before printing begins.
Pre-treatment controls print edge sharpness and dot spread. A poorly prepared surface cannot be corrected after printing. This is the most decisive step in the entire process.
Preparing your digital design file requires equal attention. Follow these steps:
- Set your image resolution to at least 200 DPI. The recommended standard is 300 DPI for photo-quality results. Ink spreads slightly on textile fibers, so lower resolution images pixelate visibly.
- Choose the right file format. PNG files preserve transparency and sharp edges. JPEG files work for photographic designs but compress detail. Avoid low-resolution web images.
- Mirror your design if using iron-on or heat transfer methods. The image prints in reverse and flips correctly when applied to fabric.
- Increase color saturation by 10–20%. Fabric absorbs ink differently than paper, so colors print slightly duller. Compensating in your design software keeps the final result vibrant.
- Adjust contrast for dark fabrics. Designs printed on dark textiles need a white underbase layer to make colors pop.
- Set your printer media type to “heavyweight matte” or “cardstock.” This setting slows carriage speed, which allows deeper ink penetration and prevents faded prints on fabric sheets.
Pro Tip: Always do a test print on plain paper first. Hold it up to the fabric to check scale and color before loading your fabric sheet into the printer.
For a deeper look at selecting the right fabric for your project, the textile substrates guide from Transferkingz covers material properties in detail.
What are the step-by-step printing methods and when to use each?
The five core textile printing methods each follow a distinct process and suit different project types. Choosing the wrong method for your scale or fabric wastes time and money.
Inkjet printing on pre-treated fabric sheets
- Load a pre-treated printable fabric sheet into your inkjet printer.
- Set media type to “heavyweight matte” or “cardstock” in printer settings.
- Print your design at 300 DPI.
- Allow the print to dry for 5–10 minutes before handling.
- Peel the fabric from its paper backing and heat-set with an iron or heat press.
This method works well for quilters, crafters, and small-batch creators. It requires no special equipment beyond a standard inkjet printer.
Screen printing
- Create a film positive of your design (one per color).
- Burn each design onto a mesh screen coated with photo emulsion.
- Set the screen over your fabric and apply ink with a squeegee.
- Cure the ink with a conveyor dryer or heat press.
- Repeat for each color layer.
Screen printing carries high fixed costs but low unit costs at volume. It is the most cost-effective method for large runs of the same design. For a detailed comparison of screen printing versus digital methods, the DTF vs screen printing breakdown from Transferkingz is worth reading.
Heat transfer and DTF printing
- Print your design onto a transfer film using a DTF printer.
- Apply hot-melt adhesive powder to the wet ink.
- Cure the powder in an oven or with a heat press.
- Position the transfer on your fabric.
- Press with a heat press at the recommended temperature and time.
- Peel the film and allow the print to cool.
DTF printing works on virtually any fabric type, including cotton, polyester, and blends. It requires no pre-treatment and produces vibrant, wash-resistant results.
Sublimation printing
- Print your design onto sublimation transfer paper using sublimation ink.
- Position the paper on your polyester fabric.
- Press with a heat press at 385–400°F for 45–60 seconds.
- Remove the paper immediately and allow the fabric to cool.
Sublimation produces permanent, full-color prints with no texture on the surface. The ink becomes part of the fiber. It only works on polyester or polyester-coated substrates.
| Method | Complexity | Best for | Minimum Setup Cost |
|---|---|---|---|
| Inkjet on fabric sheets | Low | Home crafters, small batches | Low |
| Screen printing | High | Large volume, single design | High |
| Heat transfer / DTF | Medium | Custom runs, mixed fabrics | Medium |
| Sublimation | Medium | Polyester, all-over prints | Medium |
Digital textile printing is growing at 25% annually in the luxury fashion sector. That growth reflects the method’s ability to handle unlimited colors and fine gradients that screen printing cannot replicate.
Pro Tip: For small business owners producing fewer than 50 units per design, DTF or digital printing almost always costs less than screen printing once you factor in setup fees.
How do you finish and troubleshoot textile prints for lasting quality?
Fixation is the step that determines whether your print survives washing. Heat curing is the most common method. A heat press applied at 320°F–350°F for the correct duration bonds the ink permanently to the fiber. Steam fixation is used for reactive and acid inks on natural fibers and requires a dedicated steamer. Skipping or rushing fixation causes prints to fade or crack after just a few washes.
Fixation temperature and duration correlate directly to wash fastness. Insufficient heat curing causes premature print failure regardless of ink quality. This is not a step to estimate.
After curing, wash the fabric in cold water to remove any residual ink or pre-treatment chemicals. Use a gentle detergent and avoid bleach. Turn printed garments inside out before washing to protect the print surface. Air drying extends print life longer than machine drying.
Common problems and how to fix them:
- Faint or washed-out print: Caused by insufficient ink saturation or wrong printer settings. Switch to “heavyweight matte” media setting and reprint.
- Color bleeding or blurry edges: Caused by inadequate pre-treatment or excess ink. Reduce ink density in printer settings and confirm fabric was properly pre-treated.
- Uneven coverage: Caused by fabric movement during printing. Use a stabilizer or adhesive spray to hold fabric flat.
- Cracking after washing: Caused by under-curing. Re-press the garment at the correct temperature for the full recommended time.
- Colors look dull: Caused by low saturation in the design file or wrong ink type for the fabric. Increase saturation in your design software and verify ink-fabric compatibility.
Proper fixation is not the final step. It is the step that makes every previous step matter. A perfectly printed design on a perfectly prepared fabric fails completely if the curing stage is rushed or skipped.
Pro Tip: Keep a log of your heat press settings, ink types, and fabric combinations for every project. When a print succeeds, you can replicate it exactly. When it fails, you know exactly what to adjust.
Key Takeaways
Textile printing produces durable, professional results only when fabric preparation, design accuracy, method selection, and fixation are each executed correctly.
| Point | Details |
|---|---|
| Pre-treatment is non-negotiable | Raw fabric contains residues that block ink bonding; always clean and treat before printing. |
| Resolution sets print quality | Use 300 DPI for photo-quality results; 200 DPI is the minimum to avoid visible pixelation. |
| Method must match scale | Screen printing wins at high volume; DTF and digital printing cost less for small custom runs. |
| Fixation determines durability | Heat cure at 320°F–350°F for the full recommended time to prevent fading and cracking after washing. |
| Test before full production | A test print on a fabric sample saves time, material, and money on every project. |
What I’ve learned from years of watching prints succeed and fail
The single biggest mistake beginners make is treating pre-treatment as optional. They spend hours on a beautiful design, load quality ink, and then print onto fabric that was never properly cleaned. The result looks fine when it comes off the printer. After one wash, the colors are gone. Pre-treatment is not a bonus step. It is the foundation every other step depends on.
The second lesson is that method selection is a business decision, not just a technical one. I have seen artists fall in love with screen printing because it looks professional, then lose money on every order because their run sizes never justified the setup cost. DTF printing changed that equation. You can produce one custom shirt or one hundred with the same per-unit cost structure. For small creators and growing businesses, that flexibility matters more than any other factor.
The third thing I would tell any beginner is to respect the finishing stage as much as the printing stage. Curing is where the print becomes permanent. Rushing it by using too low a temperature or too short a press time is the most common cause of print failure I have seen. Set a timer. Use a calibrated heat press. Do not guess.
Experimentation is how you grow. But the core process, preparation, printing, and fixation, is not where you experiment. Get those right every time, then push your creativity in the design itself.
— Anthony
How Transferkingz supports your custom textile printing projects
Custom textile printing does not have to mean buying expensive equipment or mastering every technique from scratch. Transferkingz specializes in Direct-to-Film (DTF) transfers that you apply to virtually any fabric with a standard heat press.

DTF transfers from Transferkingz arrive ready to press, with no minimum order requirement and fast turnaround times. You upload your artwork, and Transferkingz handles the printing on premium film with high-quality inks. The result is a vibrant, wash-resistant transfer you apply in minutes. For custom apparel businesses and independent artists in Texas, the DTF printing services page covers ordering details, turnaround times, and design support. If you want a central hub for all your transfer needs, the Print Point service page is the place to start.
FAQ
What is the first step in textile printing?
Fabric preparation is the first step. Clean the fabric to remove oils and sizing agents, then apply any required pre-treatment solution before printing begins.
What resolution do I need for fabric printing?
Use a minimum of 200 DPI, though 300 DPI is the recommended standard for sharp, photo-quality results on textile fibers.
Can I use a regular inkjet printer to print on fabric?
Yes, with pre-treated printable fabric sheets and the correct printer settings. Set your media type to “heavyweight matte” or “cardstock” to slow carriage speed and improve ink absorption.
What temperature do I need to cure a fabric print?
A heat press set to 320°F–350°F for the manufacturer-recommended time is the standard for most ink types. Insufficient heat causes prints to fade or crack after washing.
Which printing method is best for small custom runs?
DTF printing and digital inkjet printing are the best options for small or one-off custom runs. Screen printing becomes cost-effective only at higher volumes due to its high fixed setup costs.
0 comments