
TL;DR:
- Understanding design uploads involves properly preparing and submitting digital files according to platform-specific format and resolution requirements to ensure accurate print results. Using vector formats like .ai or .eps for logos and text, and high-resolution PNG files for transparency, helps produce quality prints while managing file size and metadata prevents submission issues. Carefully reviewing proofs, confirming final submission, and maintaining organized workflows improve success rates and reduce production delays.
Understanding design uploads means knowing how to prepare, format, and submit digital artwork files so a custom printing platform produces exactly what you designed. Platforms like Transferkingz, Custom Ink, and Redbubble each enforce specific file format rules, resolution minimums, and size caps that determine whether your order prints cleanly or gets flagged for corrections. Get the file right before you upload and you skip the back-and-forth entirely. This guide covers every stage of the design upload process, from choosing the correct file type to managing proofs and avoiding the most common submission errors.
What file formats and specs work best for design uploads?
File format choice directly controls print scalability, color accuracy, and how well your design survives enlargement. According to deep knowledge from Custom Ink’s design experts, vector files scale without quality loss, making formats like .ai and .eps the best choice for logos and text-heavy artwork. Raster formats like .png handle transparency well, while high-resolution .jpg files work for photo-based prints as long as they meet the 200 DPI minimum.

Most platforms, including Custom Ink’s Design Lab, accept .ai, .eps, .png, .jpg, .psd, and .pdf with resolution and size requirements attached to each. For most print jobs, 300 DPI is the standard. Drop below that and the printer will either reject the file or produce a blurry result. Photo prints can go as low as 200 DPI, but 300 DPI remains the safer target.
File size is the constraint most first-time uploaders underestimate. Many platforms cap uploads at 20MB, and exceeding that limit triggers either a system error or a manual review delay. One underappreciated cause of bloated file sizes is hidden metadata. Tools like GIMP embed Exif, XMP, IPTC data, and thumbnail previews into exported files. Disabling metadata during export from GIMP or Adobe Photoshop keeps file sizes lean and prevents compatibility failures on upload.
| Format | Best use case | Pros | Cons |
|---|---|---|---|
| .ai / .eps | Logos, text, line art | Infinitely scalable, no quality loss | Requires Adobe Illustrator to edit |
| .png | Designs with transparency | Supports transparent backgrounds | Larger file size than .jpg |
| .jpg | Photo-based artwork | Small file size, widely accepted | No transparency, lossy compression |
| .psd | Complex layered designs | Preserves layers and effects | Large file size, slower to upload |
| Print-ready final files | Universal compatibility | Can embed fonts incorrectly if not flattened |
Pro Tip: Export your PNG files at 300 DPI with the “flatten image” option enabled and metadata deselected. This single habit eliminates the two most common upload rejection causes before you even reach the upload screen.
How does the design upload process work, and what pitfalls should you avoid?
The upload process on most custom printing platforms follows a predictable sequence: select your file, upload it to a staging area, preview the placement, adjust sizing or position, then submit the final order. Each step is distinct, and skipping the last one is the most costly mistake beginners make.
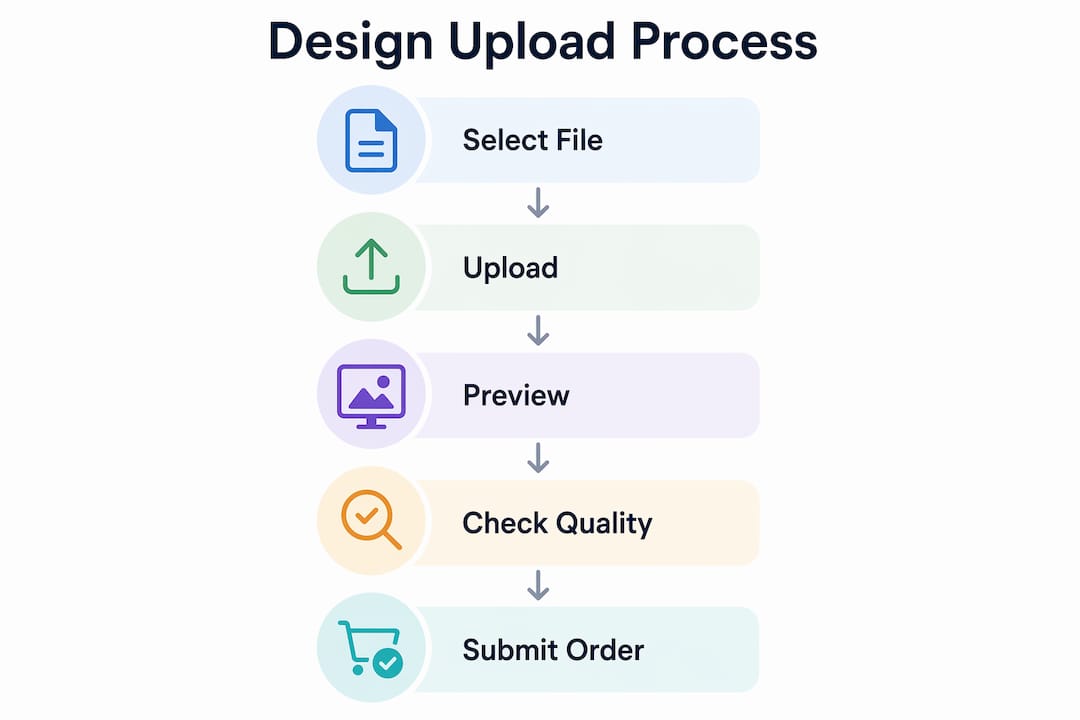
The distinction between “uploaded” and “submitted” trips up more users than any technical file error. Clear UI labels that separate these two states prevent the situation where a customer believes their order is placed when the file is only staged. A file sitting in a staging area is not an order. Until you hit the final submission button, nothing goes to print.
Common pitfalls in the design upload process include:
- Unsupported file types. Uploading a .bmp or .tiff when the platform only accepts .png or .jpg causes an immediate rejection. Check the accepted formats list before opening the upload dialog.
- Resolution below the minimum. A 72 DPI screen-resolution image looks sharp on your monitor but prints as a blurry smear. Always check DPI in your design software before exporting.
- Missing transparency. Designs with white backgrounds that should be transparent will print with a white box around them on colored garments. Export as .png with a transparent background.
- Exceeding the file size cap. Files over 20MB on most platforms either fail silently or queue for manual review, adding days to your turnaround.
- Skipping the preview step. Most platforms render a mockup of your design on the product. Skipping this step means you miss placement errors, scaling problems, or color shifts before they go to print.
Pro Tip: After uploading, zoom into the product preview at 100% to check edge placement and color contrast against the garment color. What looks fine at thumbnail size often reveals a critical alignment issue at full resolution.
What are best practices for managing design uploads to ensure quality?
Organized file management before you reach the upload screen saves more time than any post-upload fix. The following numbered workflow applies whether you are uploading a single design or managing a catalog of 50 custom products.
- Name files with a consistent convention. Use a format like ProjectName_ColorVersion_300dpi.png. This prevents uploading an outdated version and makes it easy to locate the right file when a platform asks you to replace or update artwork.
- Compress files without sacrificing resolution. Tools like Adobe Photoshop’s “Save for Web” feature or TinyPNG reduce file size while preserving print quality. Removing unnecessary metadata during this step also prevents compatibility issues downstream.
- Use staged uploads for multi-product projects. Platforms that support staged uploads let you build your order incrementally rather than uploading everything at once. This reduces errors and lets you review each design placement before committing to the full order.
- Review the proof before approving. Pre-print review catches file issues that automated checks miss. Starting with correct formats and resolution reduces the number of correction cycles, which directly shortens production time.
- Know how to replace a file after upload. Most platforms allow you to swap a file without restarting the order. Locate this option before you need it. Replacing a file mid-order is far faster than canceling and resubmitting.
- Use platform design templates. Templates from tools like Adobe Express or a platform’s built-in design lab show you the exact printable area, bleed zones, and safe margins for each product type. Designing inside these boundaries eliminates placement errors entirely.
For a deeper look at how these steps fit into a full production workflow, the DTF print workflow guide from Transferkingz breaks down each stage from file prep to finished transfer.
How does UI design affect your upload experience?
The interface you upload through shapes how confident you feel about the process and how often errors occur. A trustworthy upload UI is nearly invisible to the user. Progress bars, success confirmations, and clear error messages do their job without demanding attention. When they are absent, users upload the same file twice, miss errors, or abandon the process entirely.
The most effective upload interfaces share four features. Drag-and-drop upload areas reduce friction for users who work with multiple files. File previews and progress indicators confirm the upload succeeded without requiring the user to navigate away. Editable file lists let you remove or replace a file before final submission, which reduces repeated uploads and order errors. Clear error messages that name the specific problem, such as “File exceeds 20MB limit” rather than “Upload failed,” tell you exactly what to fix.
“The best upload experience is one where users never have to wonder what just happened. Every action should produce an immediate, readable response.” — Eleken, File Upload UI Research
Mobile-friendly upload design matters more than most small business owners realize. A growing share of custom print orders are initiated on mobile devices, and platforms that require desktop-only file selection lose those customers at the upload step. Accessibility standards like WCAG 2.1 also require that upload interfaces work with screen readers and keyboard navigation, which benefits all users when implemented correctly.
Automated pre-print checks are the newest addition to the upload experience. These tools scan your file for resolution, color mode (RGB vs. CMYK), and transparency issues the moment the upload completes. They catch problems in seconds that would otherwise surface during manual review hours later.
What practical tips help small businesses succeed with custom print uploads?
Choosing the right file format for your specific printing method is the single most impactful decision in the design upload process. DTF (Direct-to-Film) printing, the method Transferkingz specializes in, produces the best results with high-resolution PNG files that include transparent backgrounds. DTG (Direct-to-Garment) printing follows similar requirements. Screen printing, by contrast, works best with vector files because each color is printed as a separate layer.
Here are the most practical tips for small business owners managing regular design uploads:
- Match your file format to your print method. PNG with transparency for DTF and DTG. Vector .ai or .eps for screen printing. High-res .jpg only for photo-realistic prints.
- Use a design lab when your artwork is complex. Services like Adobe Express, Canva Pro, or a platform’s built-in design tool handle sizing and bleed automatically. This is faster than manually adjusting a file that was built for screen display.
- Write clear product descriptions and tags. On platforms where your designs appear in a catalog, accurate tags improve searchability. This is not a file issue, but it determines whether customers find your product after you upload it.
- Keep a local backup of every uploaded file. Platforms occasionally lose files during server migrations or account changes. A local folder organized by project and date protects you from starting over.
- Communicate with your printer during pre-print review. If a platform flags your file, respond with the corrected version immediately rather than waiting. Free pre-print review services from professional printers exist specifically to catch these issues before production starts.
Pro Tip: Before uploading any design intended for a dark garment, add a white underbase layer to your file. DTF and DTG printers apply this automatically, but seeing it in your mockup confirms the final colors will appear as intended.
For small business owners building a full custom apparel line, the custom apparel design guide from Transferkingz covers product-specific design considerations that go beyond the upload step.
Key takeaways
Successful design uploads depend on matching your file format and resolution to your print method before you reach the upload screen.
| Point | Details |
|---|---|
| File format determines print quality | Use vector files for logos and text; PNG with transparency for DTF and DTG printing. |
| 300 DPI is the standard resolution | Files below this threshold print blurry; always check DPI before exporting. |
| 20MB is the common size cap | Compress files and strip metadata to stay within platform limits and avoid delays. |
| “Uploaded” is not “submitted” | A staged file is not an order. Always complete the final submission step. |
| Pre-print review saves production time | Starting with clean, correctly formatted files reduces correction cycles significantly. |
What I’ve learned from watching people struggle with uploads
I have seen the same upload mistakes repeat across hundreds of custom print projects, and the pattern is always the same. Someone spends hours on a design, exports it at 72 DPI because that is the default in their software, and then wonders why the proof looks pixelated. The fix takes 30 seconds once you know it. The frustration of discovering it after submission takes much longer to recover from.
The part most guides skip is the mental model. People treat the upload as the finish line when it is actually the starting gate for production. Everything that happens after you click “upload” depends entirely on the quality of what you sent. A clean file at 300 DPI with proper transparency is not a technical nicety. It is the difference between a same-day approval and a two-day correction cycle.
My honest recommendation for anyone managing uploads regularly: build a pre-export checklist and run it every single time. Resolution set to 300 DPI. Metadata stripped. Background transparency confirmed. File named correctly. This takes under two minutes and eliminates the majority of upload failures I see. The best practices for digital printing resource from Transferkingz is the closest thing to a published version of that checklist I have found.
The technology side is genuinely improving. Automated pre-print checks and smarter upload interfaces mean platforms catch more errors before they reach production. But no automated system fixes a 72 DPI file. That still starts with you.
— Anthony
How Transferkingz makes your design upload process easier
Transferkingz specializes in high-quality DTF transfers with a platform built for individuals and small businesses who need fast, reliable custom printing without minimum order requirements.

When you upload your design through Transferkingz, the platform accepts high-resolution PNG and vector files, provides clear placement previews, and supports orders of any size. The team offers pre-print review support to catch file issues before production begins, so your order moves forward without delays. Whether you are printing one custom piece or building a full product line, Transferkingz handles the technical side so you can focus on the design. Explore DTF transfers in Texas or check out DTF transfers in Dallas to get started with your next custom print project.
FAQ
What file format is best for uploading designs to a print platform?
PNG with a transparent background at 300 DPI is the most reliable format for DTF and DTG printing. Vector formats like .ai or .eps are best for logos and text-based designs that need to scale without quality loss.
Why did my design upload fail?
The most common causes are exceeding the platform’s file size limit (typically 20MB), submitting an unsupported file type, or uploading a file with hidden metadata that inflates its size. Stripping metadata during export and compressing the file usually resolves the issue.
What is the difference between uploading and submitting a design?
Uploading places your file in a staging area on the platform. Submitting finalizes your order and sends the file to production. A file that is only uploaded is not an active order.
What resolution do I need for custom print designs?
300 DPI is the standard resolution for most custom print jobs. Photo-based designs can go as low as 200 DPI, but anything below that risks a blurry final print.
How do I fix a design after I have already uploaded it?
Most platforms allow you to replace or edit an uploaded file before final submission. Locate the file management option in your order dashboard, swap the corrected file, and re-confirm the placement preview before resubmitting.
0 comments