
TL;DR:
- Proper heat application, including correct temperature, pressure, and timing, is essential for durable DTF transfers.
- Using a heat press provides consistent results compared to household irons, reducing failures and rework.
- Precise process control and understanding peel methods greatly influence the longevity and quality of printed garments.
Grab a household iron and press a DTF transfer onto a fresh cotton tee, and there’s a good chance you’ll watch it peel away after the first wash. That’s not a transfer problem. That’s a heat application problem. Most failed prints trace back to three variables: wrong temperature, uneven pressure, or poor timing. Whether you’re decorating ten shirts a week or running a small production shop, understanding exactly how heat bonds a DTF transfer to fabric is what separates prints that last for years from ones that flake off after a few wears. This guide breaks down the mechanics, the settings, the peel methods, and the mistakes that cost small businesses real money.
Table of Contents
- Understanding heat application in DTF printing
- Key heat settings and how they impact results
- Peel methods: Cold vs hot peel in DTF printing
- Common heat application mistakes and troubleshooting
- Our perspective: Why precision in heat application overrides equipment cost
- Next steps: Partner with experts for flawless DTF transfers
- Frequently asked questions
Key Takeaways
| Point | Details |
|---|---|
| Precise heat matters | The right temperature, pressure, and timing ensure vibrant, lasting DTF prints. |
| Match settings to fabric | Always adjust your heat and time for cotton, polyester, and blends to avoid errors. |
| Cold peel is standard | Use the cold peel method for the best matte finish and print durability in DTF transfers. |
| Test before production | Always test on scrap fabric and allow 24 hours to cure before washing garments. |
Understanding heat application in DTF printing
Heat application is the process of using controlled heat and pressure to activate the hot-melt adhesive powder coated on a DTF film, bonding your design permanently to fabric fibers. Without the right combination of temperature, pressure, and time, that adhesive never fully melts into the garment. The result is a print that looks fine at first but cracks, peels, or fades within a few washes.
This is why the choice of heat tool matters so much. A household iron creates inconsistent pressure and uneven heat distribution. Every pass is a gamble. A dedicated heat press, by contrast, delivers a flat, calibrated platen that holds a precise temperature and applies even pressure across the entire design. If you plan to sell finished garments or fulfill orders regularly, learning heat press application basics will save you significant rework time and materials.
Before you press anything, your setup matters as much as your equipment. Here’s what to do every time:
- Pre-press your garment for 3 to 5 seconds to remove moisture and wrinkles
- Check that the fabric surface is completely lint-free
- Position your transfer film with the design facing down onto the fabric
- Use a heat-resistant pillow or foam pad inside the garment to prevent ghosting on the back
- Allow the finished piece to fully cure before handling or stacking
The DTF transfer temperature best practices guide reinforces a critical habit that serious producers follow: always run a test swatch first, keep your fabric clean and lint-free, and allow a 24-hour cure before wash to lock in adhesion.
“A heat press beats a household iron for production every time. The consistency you get from a calibrated press is simply not replicable with a hand tool.”
With this foundation in place, let’s get precise about the variables that control your outcome.
Key heat settings and how they impact results
Not every fabric responds to heat the same way. Pressing a polyester blend at the same temperature you’d use for heavyweight cotton is a fast path to scorched fabric, print distortion, or a design that won’t stick. Knowing the right settings for each material is one of the most practical skills you can develop as a DTF decorator.
The fabric-specific settings that consistently deliver reliable results break down like this:
| Fabric type | Temperature range | Press time | Pressure |
|---|---|---|---|
| 100% cotton | 300 to 325°F | 10 to 15 seconds | Medium |
| Polyester | 270 to 300°F | 10 to 12 seconds | Medium-light |
| Cotton/poly blends | 290 to 310°F | 12 to 15 seconds | Medium |
| Heavy canvas or denim | 315 to 330°F | 15 to 18 seconds | Medium-firm |
| Performance/moisture-wick | 265 to 285°F | 8 to 12 seconds | Light |
Under-heating is just as damaging as over-heating. If your temperature or press time falls short, the adhesive powder never fully activates. You get a transfer that looks applied but hasn’t actually bonded. It will peel away at the edges within a few washes. Over-heating creates a different set of problems: scorching, color shift on sensitive fabrics, and a plastic-looking sheen on the print surface.
For anyone working with a range of DTF material types, tracking your press settings per fabric in a simple log pays off fast. You’ll stop second-guessing and start reproducing results.
Pro Tip: Before any new production run, press one test piece on a scrap of the exact fabric you’re using. Let it cool completely, then do a fingernail test on the edge. If it lifts, your settings need adjusting. This thirty-second step saves dozens of ruined garments.
Now that you understand how settings affect results, let’s cover the part most beginners overlook: when and how you pull the film off.
Peel methods: Cold vs hot peel in DTF printing
You’ve applied heat and pressure. The timer goes off. Now what? The moment you peel the film off is just as critical as everything that came before it. Peel too soon or too slow, and you risk ruining a print that was actually applied correctly.
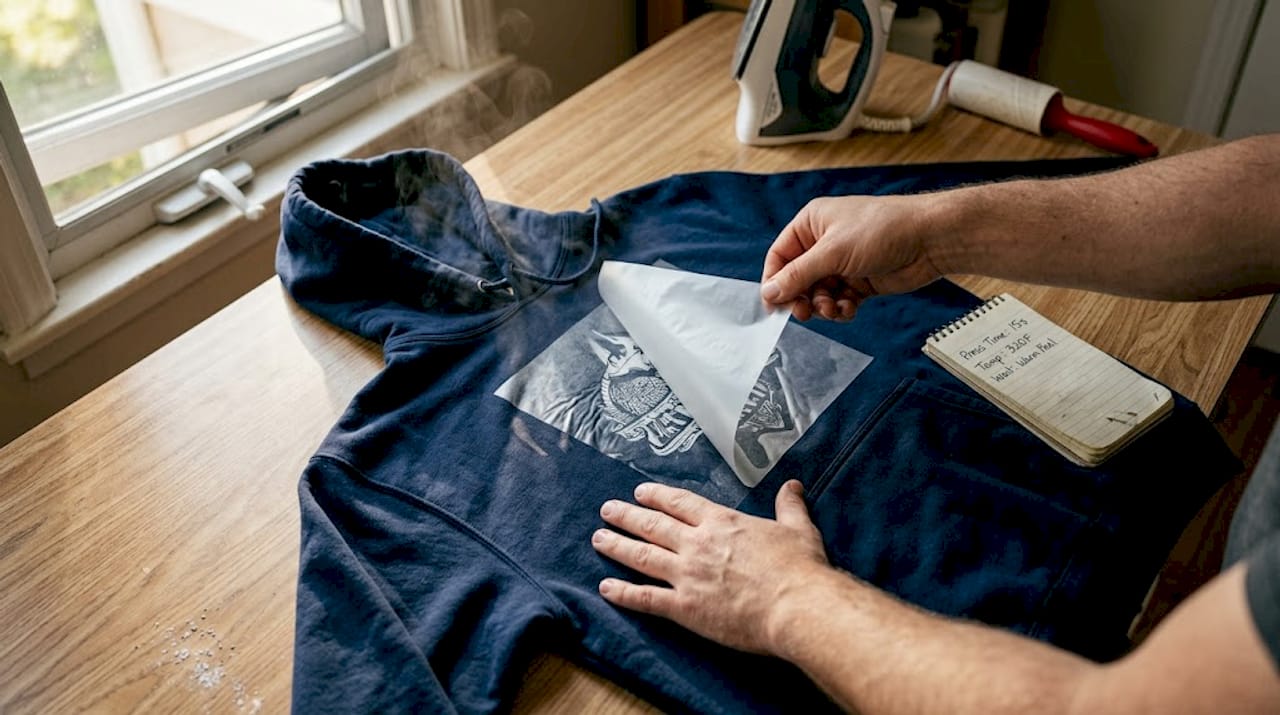
DTF transfers come in two peel types: cold peel and hot peel. These aren’t just preferences. They’re built into the film itself, so you need to know which type you’re working with before you press.
Cold peel means you let the transfer cool to room temperature before removing the film. This typically takes 60 to 90 seconds after pressing. Cold peel transfers produce a matte finish with a softer hand feel. The adhesive has more time to lock into the fabric fibers, which tends to yield better durability. As standard peel methods for DTF confirm, cold peel is the most common and reliable method for everyday production.
Hot peel means pulling the film immediately after the press opens, while the transfer is still hot. This creates a glossier finish and saves time in a fast-paced workflow. The tradeoff is less margin for error. If the adhesive hasn’t set quite right, peeling hot can lift portions of the design.
| Feature | Cold peel | Hot peel |
|---|---|---|
| When to peel | After cooling (60 to 90s) | Immediately after pressing |
| Finish | Matte, soft | Glossy, vibrant |
| Durability | Higher | Moderate |
| Risk of error | Lower | Higher |
| Best for | Everyday production | Rush orders, specific aesthetics |
Choosing between them depends on the job. For most small business use cases, cold peel is the safe default. If you’re comparing DTF to other methods, check out this DTF vs DTG comparison to understand where each process excels.
- Use cold peel for cotton, heavy garments, and anything going into extended wash cycles
- Use hot peel when the film is specifically designed for it and you need faster throughput
- Never force a cold peel film while hot — the design can tear or distort
- Peel slowly and at a low angle regardless of method
Equipped with that knowledge, let’s tackle what happens when things go wrong.
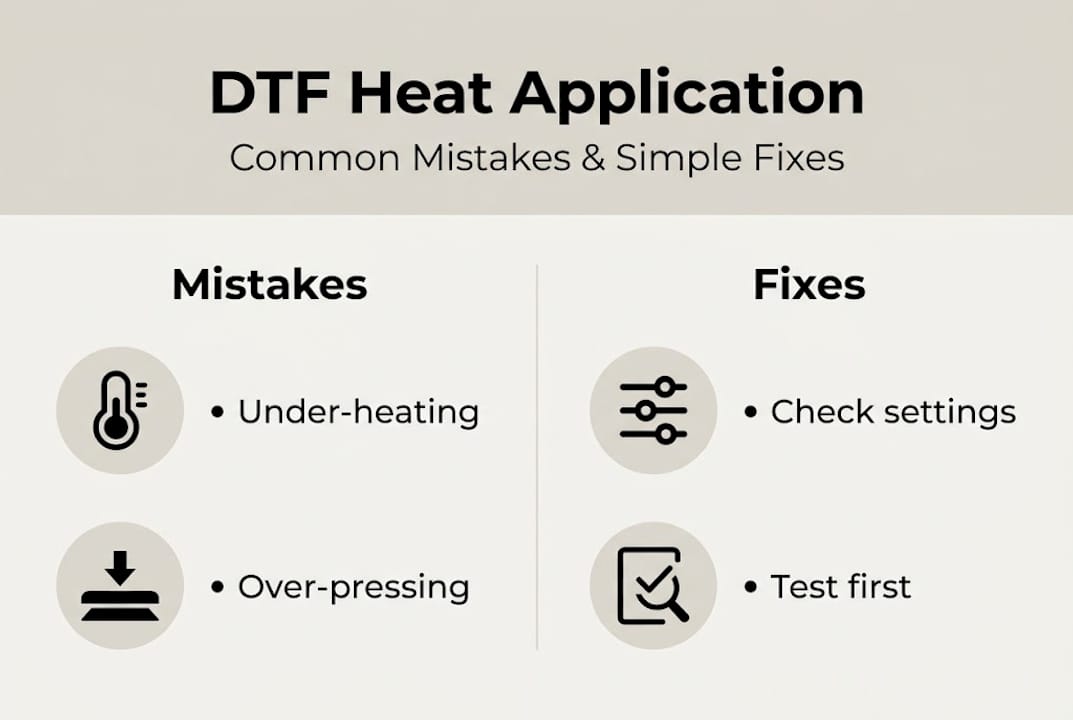
Common heat application mistakes and troubleshooting
Even experienced decorators run into problems. The difference is knowing what caused the issue and how to fix it before the next batch. Here are the five mistakes that account for the majority of failed DTF applications.
- Wrong temperature for the fabric. Pressing polyester at cotton settings scorches the garment and degrades the print. Always match your temperature to the fabric type.
- Uneven pressure across the platen. A press that’s higher on one side creates inconsistent bonding. Check your platen calibration regularly and use a pressure testing sheet.
- Skipping the test swatch. Jumping straight into production without a test piece is where most costly errors happen. One test swatch costs cents. A run of ruined shirts costs real money.
- Dirty or damp fabric. Lint, dust, or moisture on the fabric surface prevents the adhesive from bonding cleanly. Always pre-press and inspect the surface before applying the transfer.
- Washing too soon after pressing. Rushing the garment into the wash before the adhesive fully cures leads to premature peeling. Wait the full cure time.
The 24-hour cure before wash rule isn’t just a suggestion. It’s the window the adhesive needs to fully set at the molecular level within the fabric.
Pro Tip: Keep a production log. Note the fabric type, press temperature, time, and peel method for every job. When something goes wrong, you can trace back exactly where the variable shifted. This habit alone cuts troubleshooting time in half.
“A heat press delivers the consistent pressure and even temperature that a household iron simply cannot replicate, making it the only real choice for production-level DTF work.”
For a deeper look at what goes wrong in real production settings, this breakdown of DTF printing mistakes covers scenarios that show up repeatedly for small shops. And if you want your finished prints to hold up over time, the print durability guide is worth bookmarking.
Our perspective: Why precision in heat application overrides equipment cost
Here’s something the gear-focused conversations in this industry rarely admit: a $3,000 heat press operated sloppily will produce worse results than a $400 entry-level press run with discipline and consistency. We’ve seen it repeatedly.
The decorators who get the best results aren’t always the ones with the most expensive equipment. They’re the ones who understand that every variable — fabric prep, temperature calibration, press time, peel angle — compounds. One loose variable throws off the whole application.
Small business owners especially benefit from investing time rather than money first. Learn your materials. Run your test swatches. Build a simple process log. Understand why cold peel works the way it does before you chase hot peel for speed. The fundamentals of expert heat application cost nothing to practice and pay off on every single run.
Mastery isn’t about the machine. It’s about the operator knowing exactly what each variable does and controlling it deliberately. That’s what separates consistent, professional output from a hit-or-miss workflow.
Next steps: Partner with experts for flawless DTF transfers
If you’ve worked through this guide and you’re ready to stop troubleshooting and start producing, the quality of your source transfers matters just as much as your application technique.

At Transfer Kingz, we supply production-ready DTF transfers designed to perform at exact temperature and pressure specs, so your application process works the first time. Whether you’re running small custom batches or fulfilling larger orders, our DTF transfers in Dallas and DTF transfers across Texas ship fast with no minimums. If you’re newer to the space and want to understand the bigger picture of what this technology can do, explore how DTF transfers are reshaping custom apparel production for small businesses everywhere. Great transfers start with great source material.
Frequently asked questions
What’s the ideal temperature and time for DTF heat application?
For cotton, use 300 to 325°F for 10 to 15 seconds; for polyester, 270 to 300°F for 10 to 12 seconds; for blends, 290 to 310°F for 12 to 15 seconds, per fabric-specific DTF settings. Always run a test piece before your full production run.
Do I need a heat press or is an iron enough for DTF transfers?
A heat press is strongly recommended because it delivers even pressure and calibrated temperature that a household iron cannot match. For consistent, production-level results, a press is the right tool.
Should I use a cold or hot peel method?
Cold peel is the standard for a matte, durable finish and works for most production needs. Hot peel delivers a glossier result but requires more precision, as confirmed by standard DTF peel guidance.
How soon can I wash a garment after DTF heat application?
Wait at least 24 hours before washing to allow the adhesive to fully cure. Washing too early is one of the top causes of edge peeling, according to DTF cure time guidance.
0 comments